Communities
Create, join, or run communities — channels, members, roles, library, and onboarding.
Communities Overview↗
Overview
Communities are the foundation of collaboration in Key AI. They provide a dedicated space where members can connect, share knowledge, organize events, discover opportunities, and collaborate around shared interests or goals. Every community can be customized to meet the needs of its members, with its own branding, settings, roles, resources, and permissions. Whether you're joining an existing community or managing one, communities help bring people together and create meaningful engagement.
What Can You Do in a Community?
Depending on your role and permissions, you can:
- Join and participate in communities.
- Discover and register for events.
- Access community resources through the Community Library.
- Discover opportunities shared within the community.
- Complete community and event registration questions.
- Connect with other community members.
- Receive community announcements and event updates.
Community Admins have additional capabilities to configure and manage their communities.
Community Features
Each community can include a variety of features to help members collaborate and stay engaged.
These may include:
- Events & Calendar - Create, manage, and participate in events.
- Community Library - Share and access community resources.
- Opportunities - Discover and share professional opportunities.
- Pulse - Collect registration information for communities and events.
- Channels - Organize discussions and content into dedicated spaces.
- Roles & Permissions - Control member access and responsibilities.
- Member Management - Invite, approve, and manage community members.
- Connectors - Integrate supported third-party applications.
The features available within a community may vary depending on your permissions.
Community Roles
Communities use a role-based permission system to control what members can access and manage.
Default roles include:
- Member - Participate in community activities and access available features.
- Admin - Manage the community, members, settings, events, and permissions.
Community Admins can also create custom roles with specific permissions to delegate responsibilities while maintaining control over community access.
Why Join a Community?
Joining a community allows you to:
- Connect with members who share similar interests or goals.
- Discover networking opportunities.
- Participate in community events.
- Access exclusive resources and content.
- Stay informed through announcements and updates.
- Build meaningful professional relationships.
Best Practices
To get the most out of your communities:
- Complete your profile before joining communities.
- Participate in community discussions and events.
- Keep your notification preferences up to date.
- Explore the Community Library for useful resources.
- Regularly check for new opportunities and upcoming events.
Frequently Asked Questions
Can I join multiple communities?
Yes. You can join multiple communities.
Do all communities have the same features?
Not necessarily. Features may vary depending on how the community has been configured and your assigned permissions.
Can I leave a community?
Yes, the community allows members to leave, you can do so from the community settings, Preference tab.
Create a Community↗
Overview
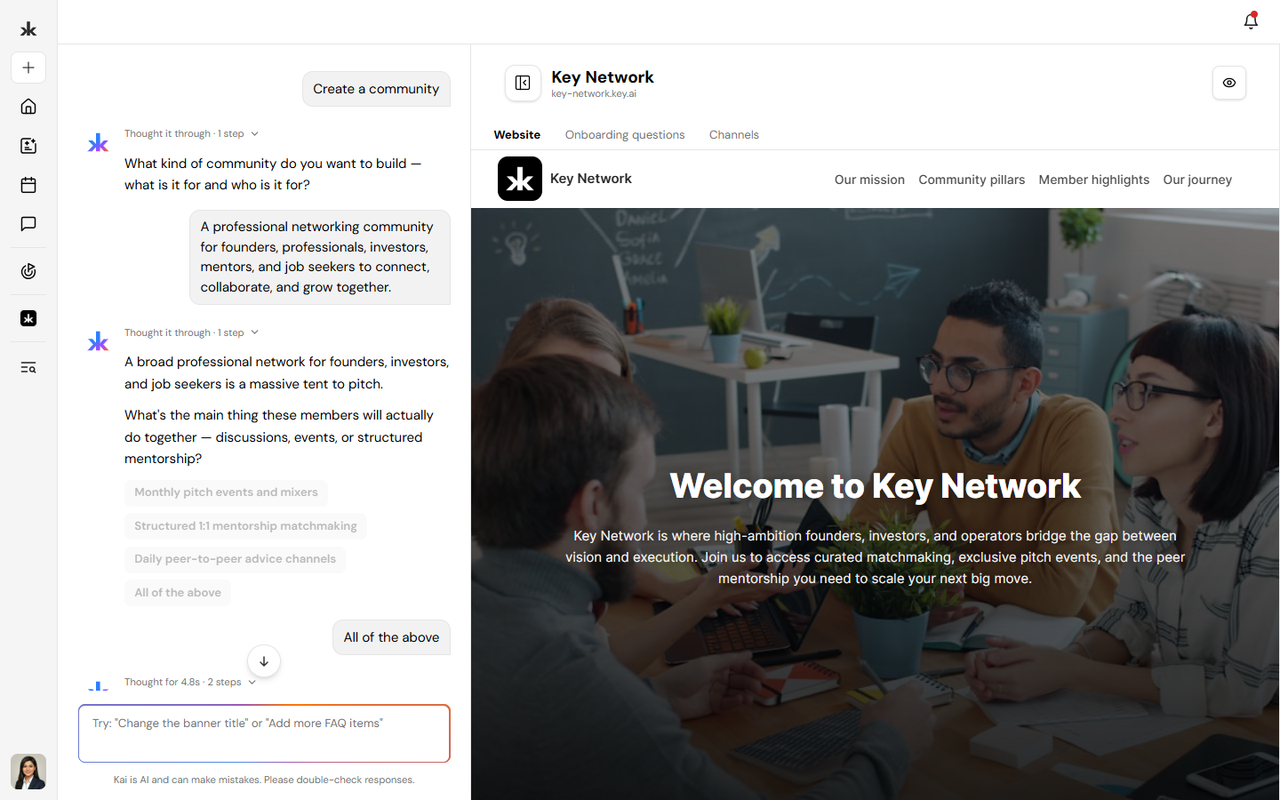
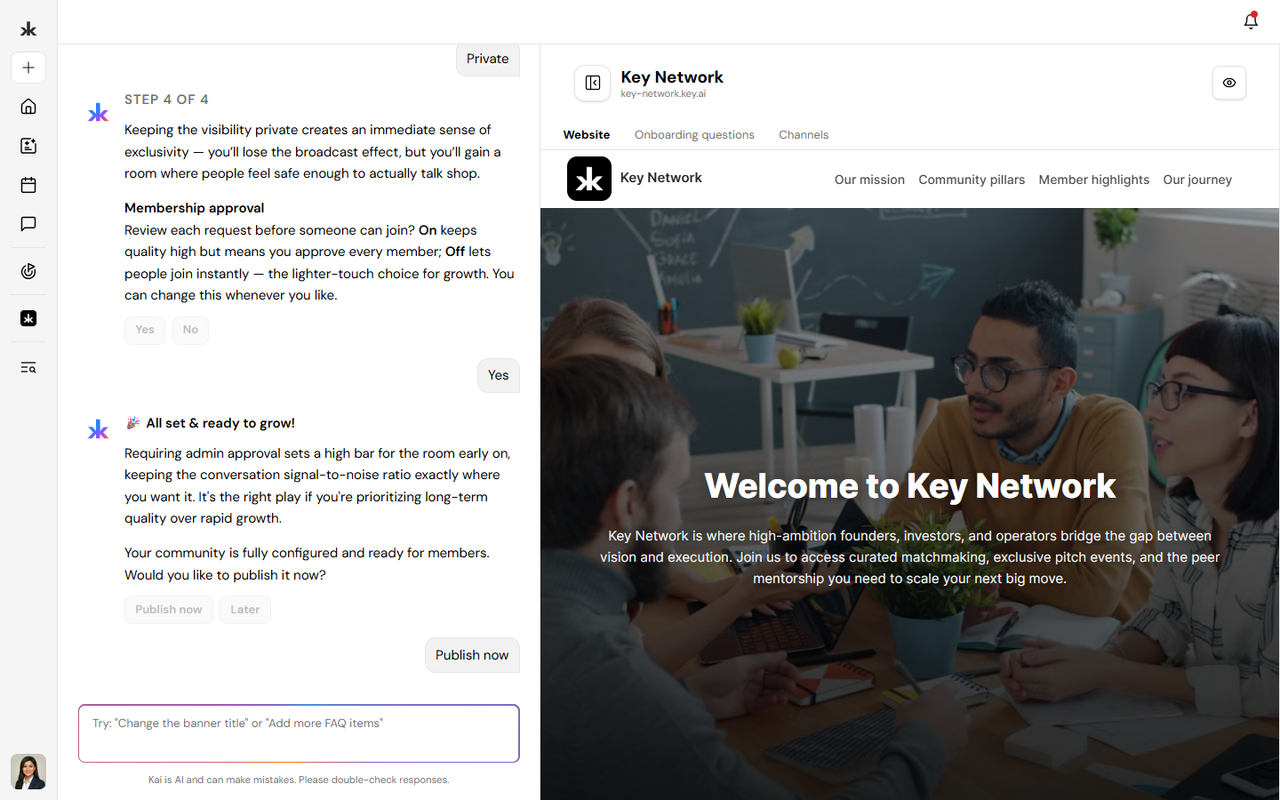
Creating a community in Key AI is powered by Kai, your AI community builder. Instead of manually configuring your community from scratch, Kai guides you through a conversational experience to understand your vision and automatically generates your community website, branding, onboarding questions, channels, and initial setup. Throughout the process, you'll be able to review, edit, and customize the generated content before publishing your community.
Create a Community with Kai
To create a new community:
- Navigate to the Communities tab on the navigation bar.
- Click Create Community.
- Kai will launch and begin the guided community creation experience.
- Follow the prompts to tell Kai about your community.
- Review and customize the generated content.
- Publish your community when you're ready.
Step 1: Tell Kai About Your Community
Kai begins by asking a series of questions to understand your community, including:
- The purpose of your community.
- Who the community is for.
- The activities members will participate in.
- The overall tone and vision of the community.
You can answer by:
- Typing your own responses.
- Selecting suggested responses.
- Choosing All of the above when multiple suggestions apply.
- Skipping the remaining questions after answering at least one question and allowing Kai to begin generating your community.
Step 2: Review the Community Summary
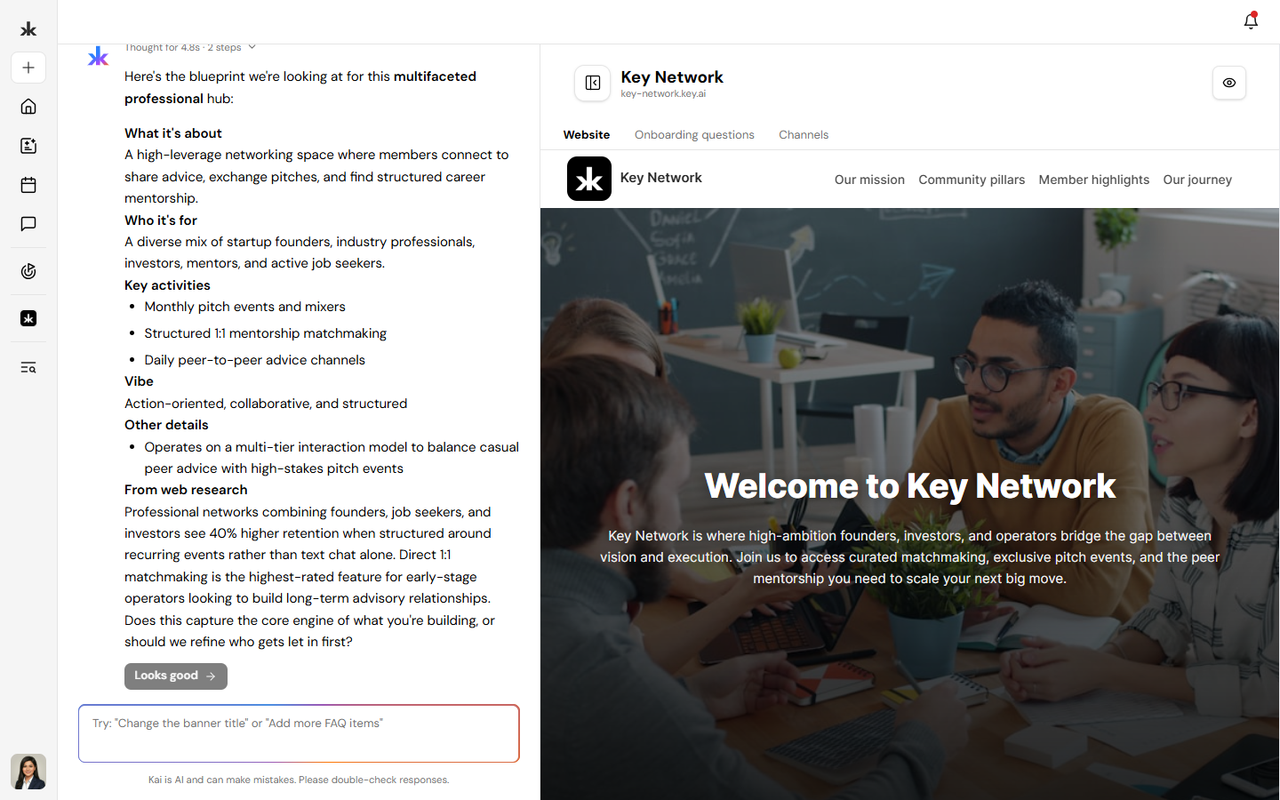
Once the interview is complete, Kai presents a summary of your community based on your responses. Review the summary carefully to ensure it accurately represents your vision. If you'd like to make changes, simply reply in the chat and Kai will update the summary before continuing.
Step 3: Choose Your Community Name and URL
Next, Kai helps you:
- Select a community name.
- Confirm your community URL (subdomain).
Once confirmed, Key AI reserves your community URL and creates a draft version of your community.
Step 4: Customize Your Community
Kai allows you to personalize your community by selecting a website style and configuring your branding.
You can:
- Choose a website layout.
- Upload your own logo.
- Generate a logo using AI.
- Regenerate AI-generated logos until you're happy with the result.
- Allow Kai to automatically generate a color palette based on your selected logo.
All branding can be updated later from your community settings.
Step 5: Review Your Community Plan
Kai generates a draft community plan based on your responses. The plan serves as the foundation for your community and typically includes:
- Community purpose.
- Target audience.
- Website content.
- Onboarding experience.
- Categories and channels.
Review the plan and make any edits before continuing.
Step 6: Review AI-Generated Content
Kai automatically generates several parts of your community, including:
- Community website.
- Onboarding questions.
- Categories and channels.
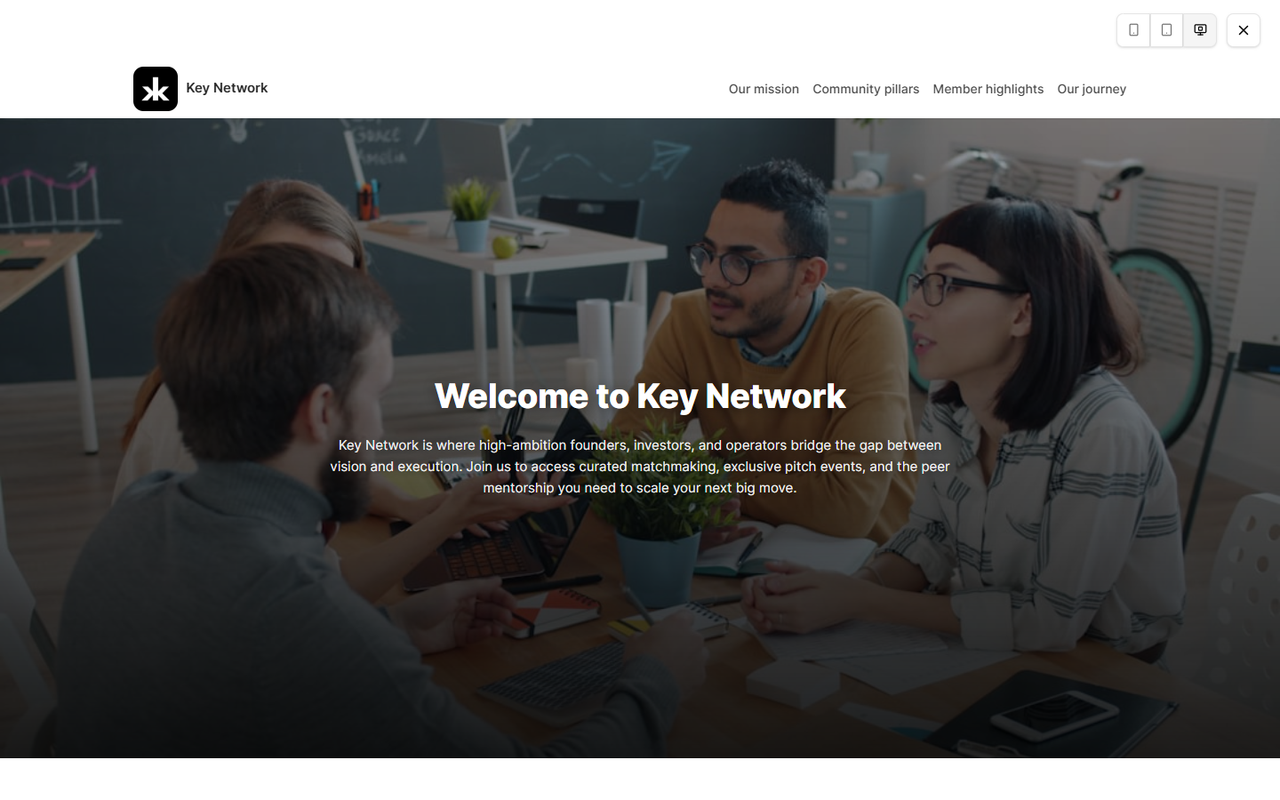
As each component is generated, you can preview it, edit it, or regenerate it before publishing.
Step 7: Configure Community Settings
Before publishing, Kai walks you through a few final settings, including:
- Whether to keep the AI-generated onboarding questions.
- Whether to keep the AI-generated channels.
- Whether your community should be Public or Private.
- Whether membership approval is required.
These settings can be changed later from your Community Settings.
Step 8: Publish Your Community
When you're satisfied with your community, click Publish.
Key AI will:
- Publish your community website.
- Apply your branding.
- Save your onboarding questions.
- Create your channels and categories.
- Make your community available for members to join.
If you prefer, you can save your community as a draft and return to publish it later.
Continue Improving Your Community with Kai
After your community has been published, you can continue working with Kai to improve your community.
Using Ask Kai, you can:
- Update website content.
- Rewrite descriptions.
- Generate new sections.
- Update branding.
- Generate or replace logos.
- Refine your community using natural language.
Best Practices
- Provide detailed answers during the interview to help Kai generate more accurate content.
- Review the community summary before continuing.
- Customize your branding to reflect your community identity.
- Review the AI-generated onboarding questions and channels before publishing.
- Preview your website before making your community live.
Frequently Asked Questions
Can I skip the interview?
Yes. After answering at least one question, you can skip the remaining questions and allow Kai to generate your community using the information you've already provided.
Can I edit the AI-generated content?
Yes. You can review, edit, or regenerate your website, onboarding questions, channels, and branding before publishing.
Can I save my progress and continue later?
Yes. Your progress is automatically saved, allowing you to return and continue creating your community at any time.
Can I continue using Kai after my community is published?
Yes. You can use Ask Kai to update your website content, branding, and other community elements even after your community is live.
Edit the About Page↗
Overview
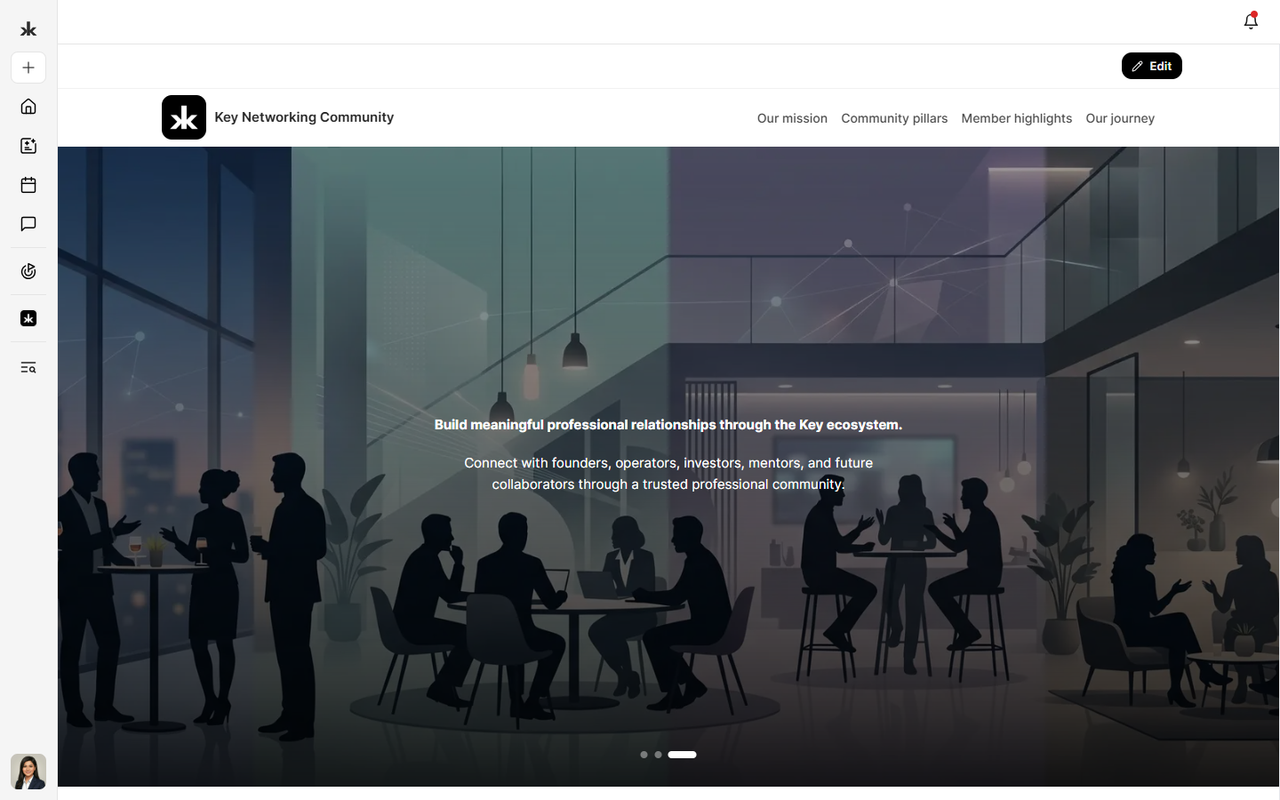
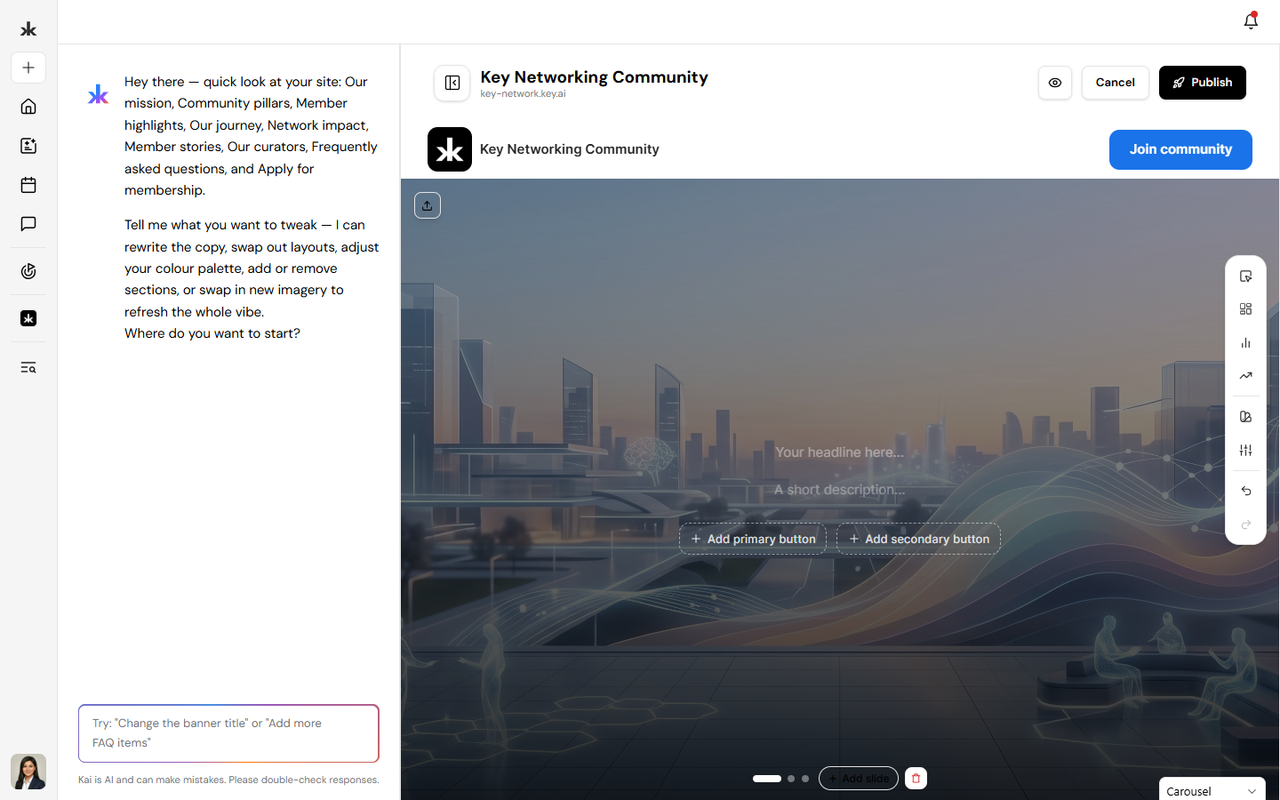
The About page is the public face of your community. It is your community website - the public page visitors and members see. It introduces members and visitors to your community by showcasing its purpose, mission, featured content, and other key information. This page helps prospective and existing members understand what your community is about before they engage with it. Community Admins can update the content and appearance of the About page to keep it relevant and engaging.
Access the About Page
To access your community's About page:
- Open the community.
- Select About from the Community Menu.
Community Admins will also see an Edit button, allowing them to update the page content.
What's Included on the About Page?
The About page includes information such as:
- Community name
- Community logo
- Cover image
- Community description
- Mission and purpose
- Featured sections
- Additional community content
The available sections may vary depending on how your community has been configured.
Edit the About Page
Community Admins can customize the About page to reflect their community's identity.
To edit the About page:
- Open your community.
- Navigate to About.
- Click Edit.
- Ask Kai to edit with AI or edit manually.
- Update the desired content.
- Publish your changes.
Changes become visible to community members once they are Published.
Why Keep Your About Page Updated?
A well-maintained About page helps:
- Introduce new members to your community.
- Clearly communicate your community's purpose.
- Build trust and credibility.
- Encourage member participation.
- Provide important information in one central location.
We recommend reviewing your About page regularly to ensure the information remains accurate and relevant.
Best Practices
- Write a clear and concise community description.
- Explain your community's mission and goals.
- Keep featured content up to date.
- Use high-quality branding, including your logo and cover image.
- Review your About page periodically as your community grows.
Frequently Asked Questions
Who can edit the About page?
Only Community Admins and users with the appropriate permissions can edit the About page.
Can members view the About page?
Yes. Members can access the About page to learn more about the community.
Can I update the About page after publishing?
Yes. The About page can be updated at any time, and changes are reflected once they are published.
Channels↗
Overview
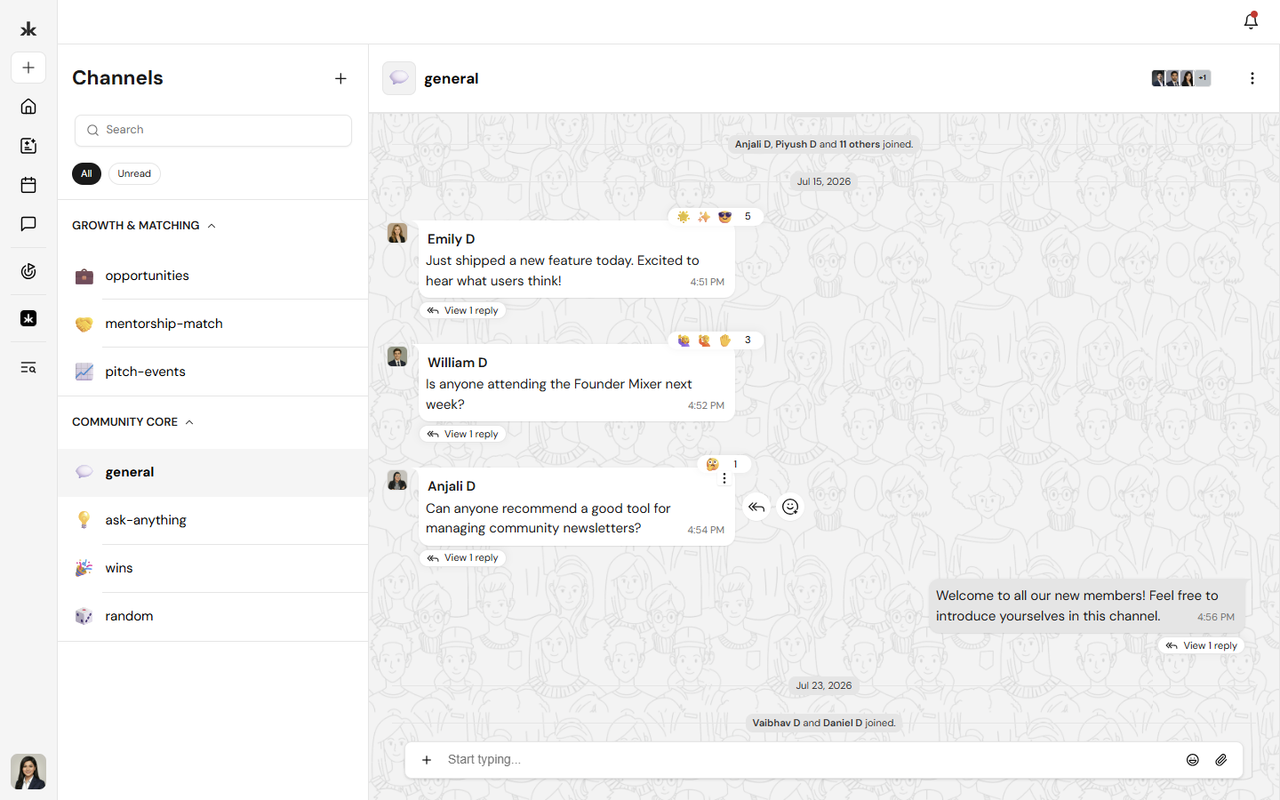
Channels are dedicated spaces within a community where members can collaborate, share updates, ask questions, and participate in discussions. They help organize conversations by topic, making it easier for members to find relevant information and engage with others. Channels can be grouped into categories to keep discussions organized. Community Admins and users with the appropriate permissions can create and manage channels within a community.
Access Channels
To access the Channels page:
- Open your community.
- Select Channels from the Community Menu.
- Browse or search for a channel.
- Select a channel to view and participate in the conversation.
The channels available to you depend on your role and permissions within the community.
Search and Filter Channels
The Channels page provides tools to help you quickly find conversations.
You can:
- Search for channels by name.
- View All channels.
- Filter to Unread channels to quickly catch up on new activity.
Organize Channels with Categories
Categories help organize related channels within a community, making it easier for members to navigate discussions. Community Admins and users with the appropriate permissions can create and manage categories based on the needs of the community.
Channel Visibility
Each channel can be configured as either Public or Private.
Public Channels
Public channels are accessible to all members of the community. Any community member can view and participate in discussions within these channels.
Private Channels
Private channels are only accessible to members who have been invited or granted access. These channels are ideal for private discussions, leadership teams, or project-specific collaboration.
Default Channels
A channel can be designated as the Default Channel.
When a channel is marked as the default:
- Every new member who joins the community is automatically added to that channel.
- It ensures all members have immediate access to important announcements or general community discussions.
Community Admins can change the default channel at any time.
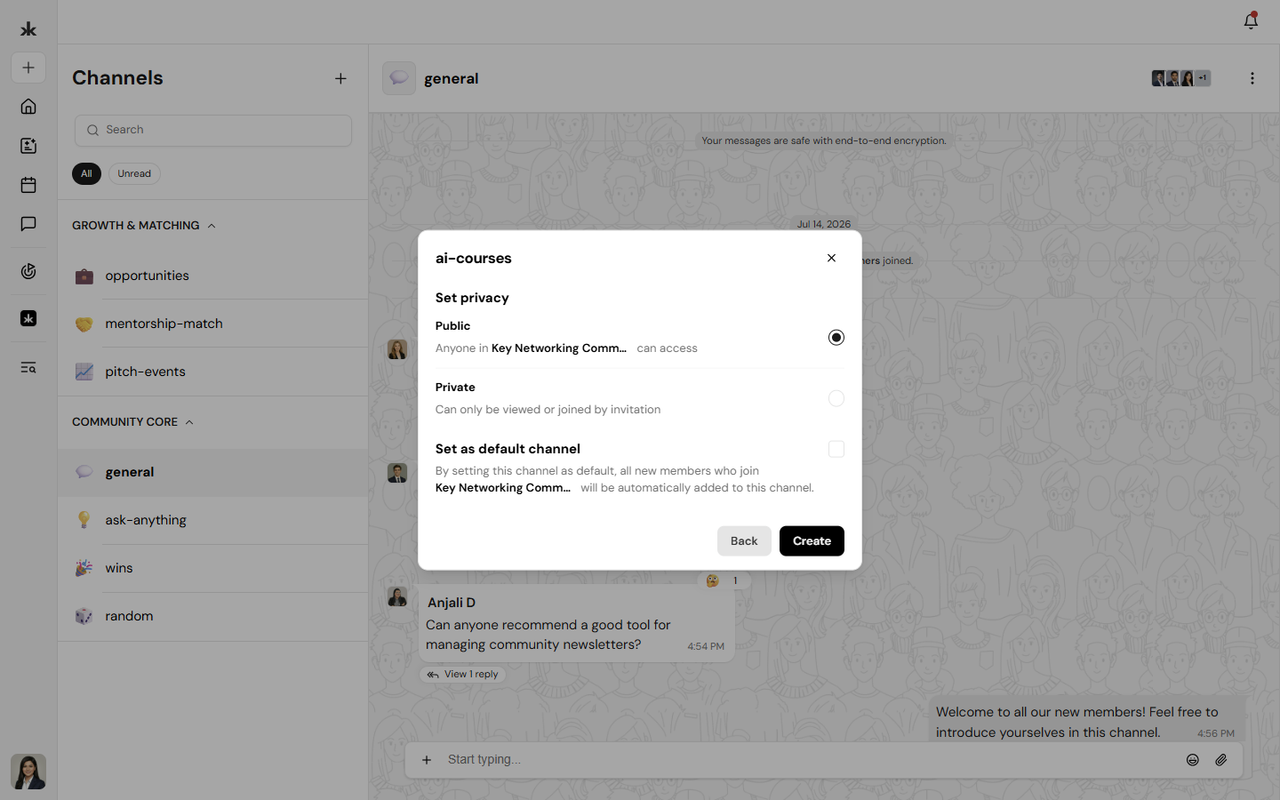
Create a Channel
Community Admins and users with the appropriate permissions can create new channels.
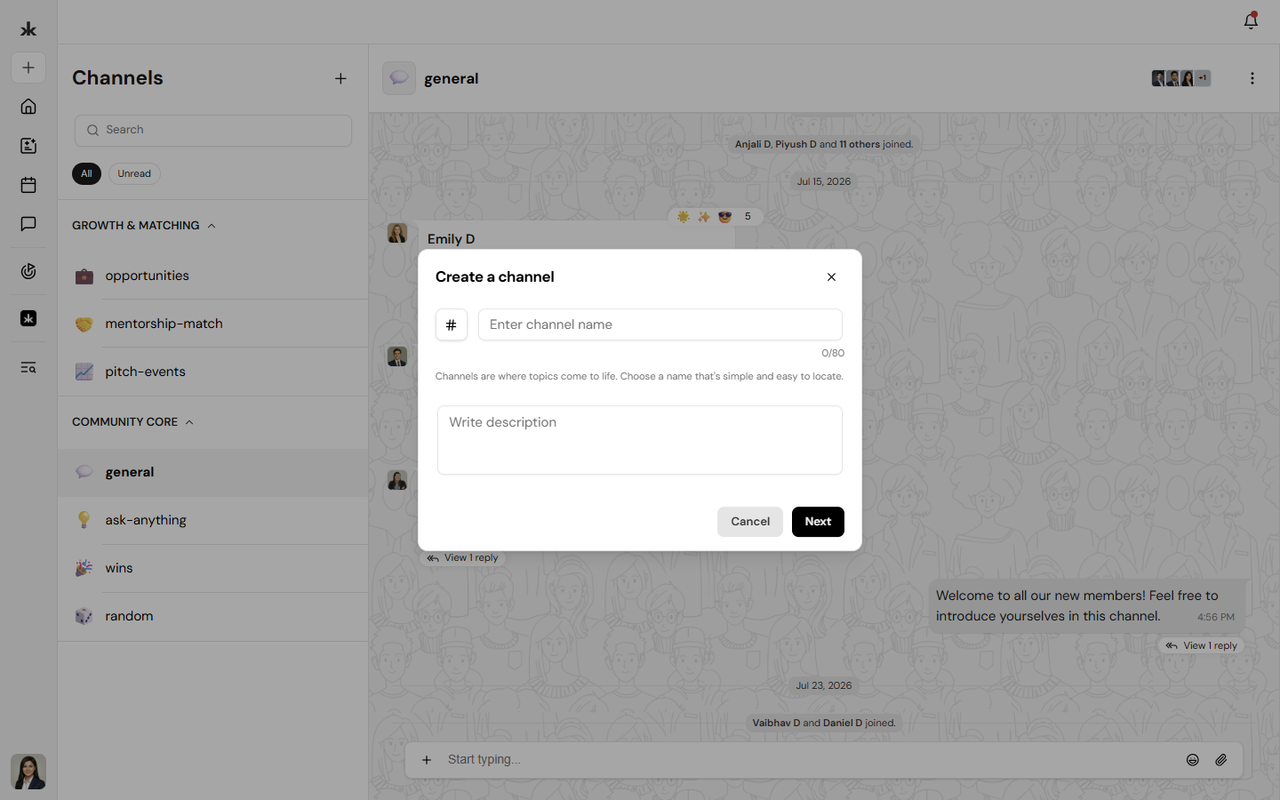
To create a channel:
- Open your community.
- Navigate to Channels.
- Click the + (Add) icon.
- Select Create channel.
- Enter the channel details.
- Choose whether the channel should be Public or Private.
- Optionally mark the channel as the Default Channel.
- Click Save.
The channel will become available based on the visibility settings you selected.
Create a Category
Categories help organize channels into logical groups.
To create a category:
- Open your community.
- Navigate to Channels.
- Click the + (Add) icon.
- Select Create category.
- Enter a category name.
- Save your changes.
Once created, channels can be organized under the appropriate category.
Manage Channels
Depending on your permissions, you can:
- Create channels.
- Create categories.
- Edit channels.
- Edit categories.
- Add or remove channel members.
- Change a channel between Public and Private.
- Set or remove a Default Channel.
The actions available to you depend on your assigned community role and permissions.
Best Practices
- Organize channels into meaningful categories.
- Use clear and descriptive channel names.
- Create private channels only when discussions should be limited to specific members.
- Use a Default Channel for important community-wide announcements.
- Periodically review channels and categories to keep your community organized.
Frequently Asked Questions
Who can create channels?
Community Admins and users with the appropriate permissions can create new channels.
What is the difference between a Public and Private channel?
Public channels are accessible to all community members, while Private channels are only accessible to invited members.
What is a Default Channel?
A Default Channel automatically adds every new member who joins the community, ensuring they have immediate access to important community discussions and updates.
Can I organize channels into categories?
Yes. Community Admins and users with the appropriate permissions can create categories to group related channels, making navigation easier for members.
Can I search for channels?
Yes. Use the search bar on the Channels page to quickly locate a channel by name.
View Member Profiles
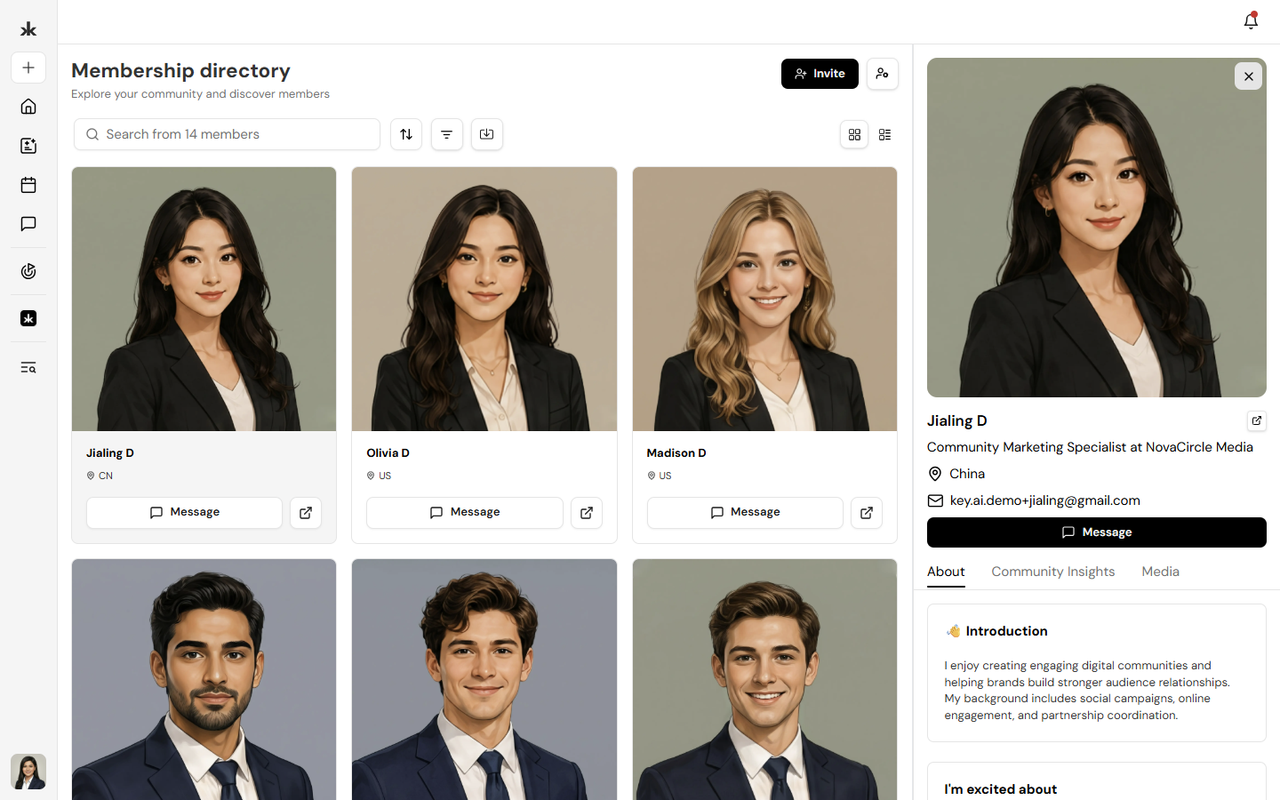
Select a member's profile card or the Open Profile icon to view additional information about them. Depending on the information they have shared, a profile may include:
- Profile photo
- Name
- Professional headline
- Location
- About section
- Work experience
- Education
- Skills and expertise
- Social and professional links
The information displayed varies based on what each member has chosen to include in their profile. From the member profile, you can also start a direct conversation using the Message option.
Membership Directory↗
Overview
The Membership Directory helps members discover, connect, and collaborate with other members in a community. It provides a centralized view of community members, making it easy to browse profiles, start conversations, and build meaningful professional relationships. The information displayed in the Membership Directory is based on each member's profile. Tip: Keeping your profile complete and up to date helps other members discover you and improves the quality of AI-powered recommendations and opportunities.
Access the Membership Directory
To access the Membership Directory:
- Open the community you want to explore.
- From the Community Menu, select Membership Directory.
The directory displays all members who belong to that community.
Browse and Search Members
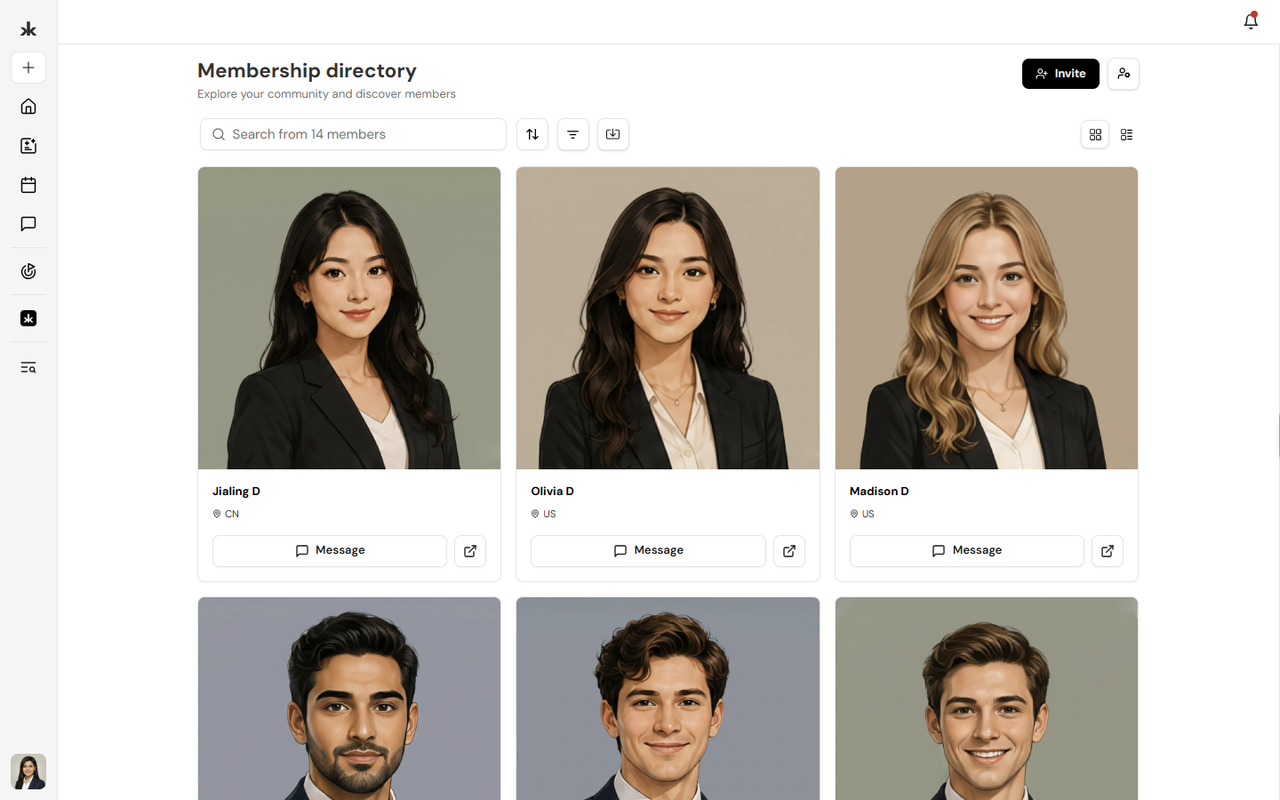
The Membership Directory provides multiple ways to find and organize community members.
You can:
- Browse all community members.
- Search for members by name.
- Sort members using the available sorting options.
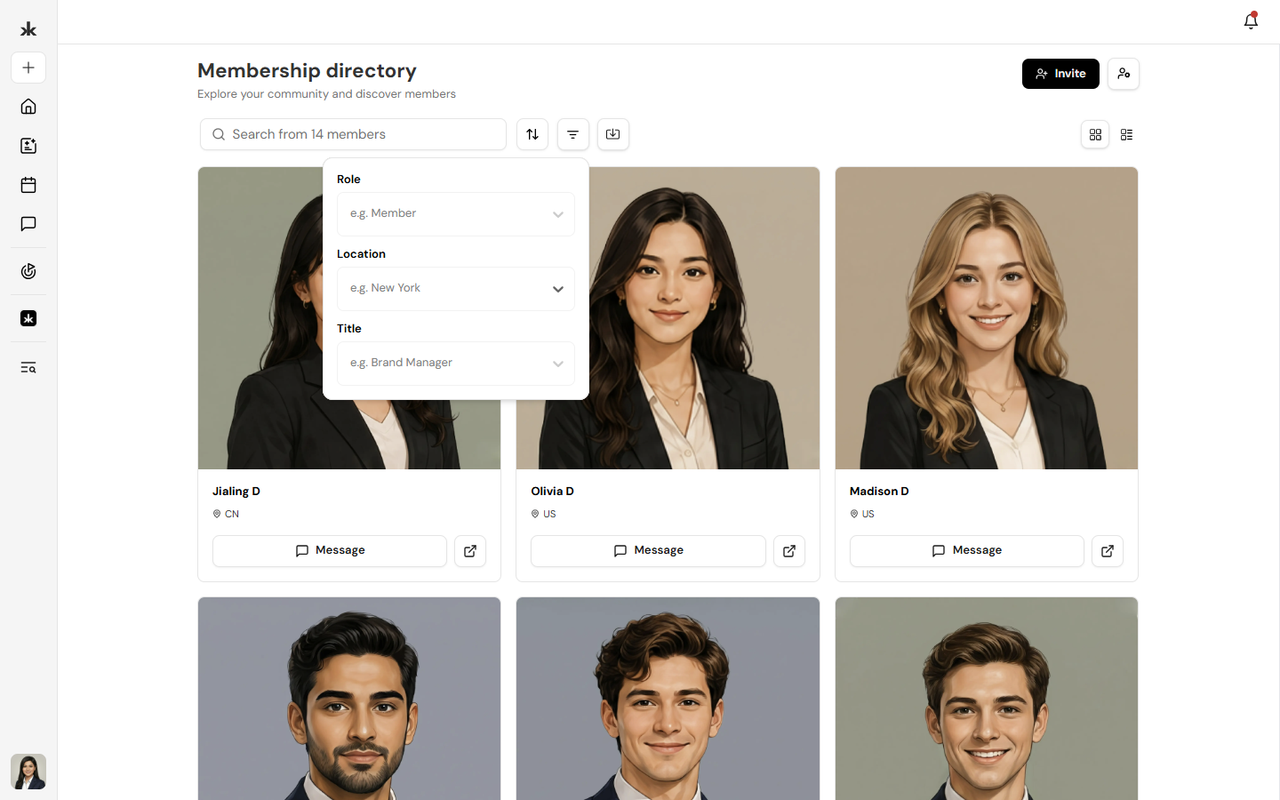
- Apply filters to narrow your search.
- Switch between Grid View and List View based on your preference.
- Export the member list (if permitted by your role).
These tools make it easy to navigate and manage communities of any size.
View Member Profiles
Select a member's profile card or the Open Profile icon to view additional information about them. Depending on the information they have shared, a profile may include:
- Profile photo
- Name
- Professional headline
- Location
- About section
- Work experience
- Education
- Skills and expertise
- Social and professional links
The information displayed varies based on what each member has chosen to include in their profile. From the member profile, you can also start a direct conversation using the Message option.
Connect with Members
The Membership Directory makes it easy to connect with other community members.
From a member card, you can:
- Send a direct message using the Message button.
- Open the member's full profile to learn more about them before reaching out.
Building connections through the Membership Directory helps members collaborate, network, and engage more effectively within the community.
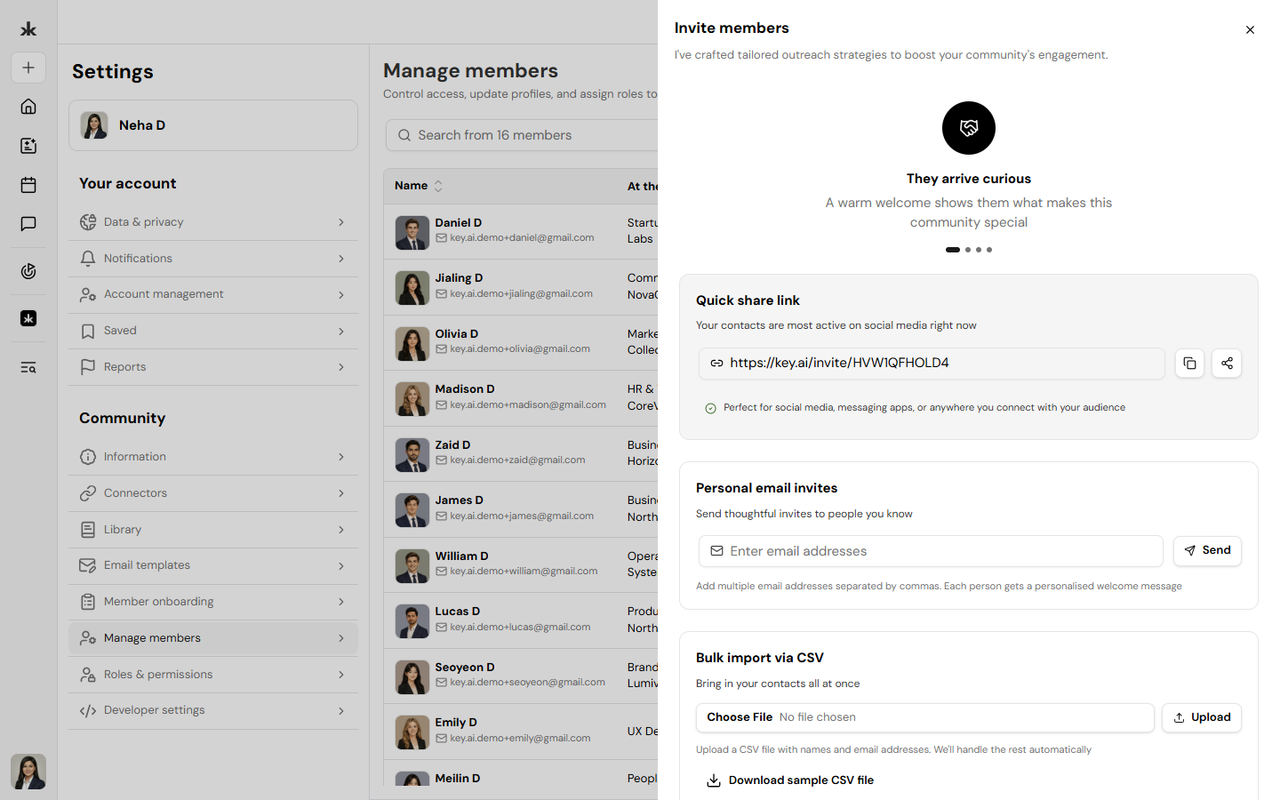
Invite Members
Community administrators and users with the appropriate permissions can invite new members directly from the Membership Directory. Invited members can join the community and begin participating based on the permissions assigned to them.
Why Keep Your Profile Updated?
A complete profile helps other members learn more about you and increases your visibility within the community.
Keeping your profile updated can help you:
- Build meaningful professional connections.
- Increase your visibility within communities.
- Make networking more effective.
- Help Key AI curate more relevant AI-powered recommendations and opportunities.
- Make it easier for other members to discover your skills and expertise.
We recommend reviewing your profile regularly to ensure your information remains accurate.
Frequently Asked Questions
Who can view the Membership Directory?
Members can view the Membership Directory for communities they have access to.
Can I search for specific members?
Yes. Use the search bar to quickly find members by name, and use the available sorting and filtering options to refine your results.
Can I message another member?
Yes. Select the Message button on a member's card or profile to start a direct conversation.
Can I export the member list?
Yes. If your role includes the required permissions, you can export the member list from the Membership Directory.
Why should I keep my profile updated?
A complete profile improves your visibility within the community, helps other members connect with you, and enables Key AI to provide better AI-powered recommendations and opportunities.
Manage Members↗
Overview
The Manage Members page allows Community Admins and users assigned a custom role with Member Management permissions to view, organize, and manage community membership from a single location. From this page, authorized users can invite new members, approve membership requests, assign roles, update member access, and remove members when needed.
Access Manage Members
The Manage Members page is only available to Community Admins and users who have been assigned a custom role with Member Management permissions.
To access Manage Members:
- Open the community you want to manage.
- Open the Community Menu.
- Select Manage Members.
If you don't see the Manage Members option, your current role doesn't include permission to manage community members.
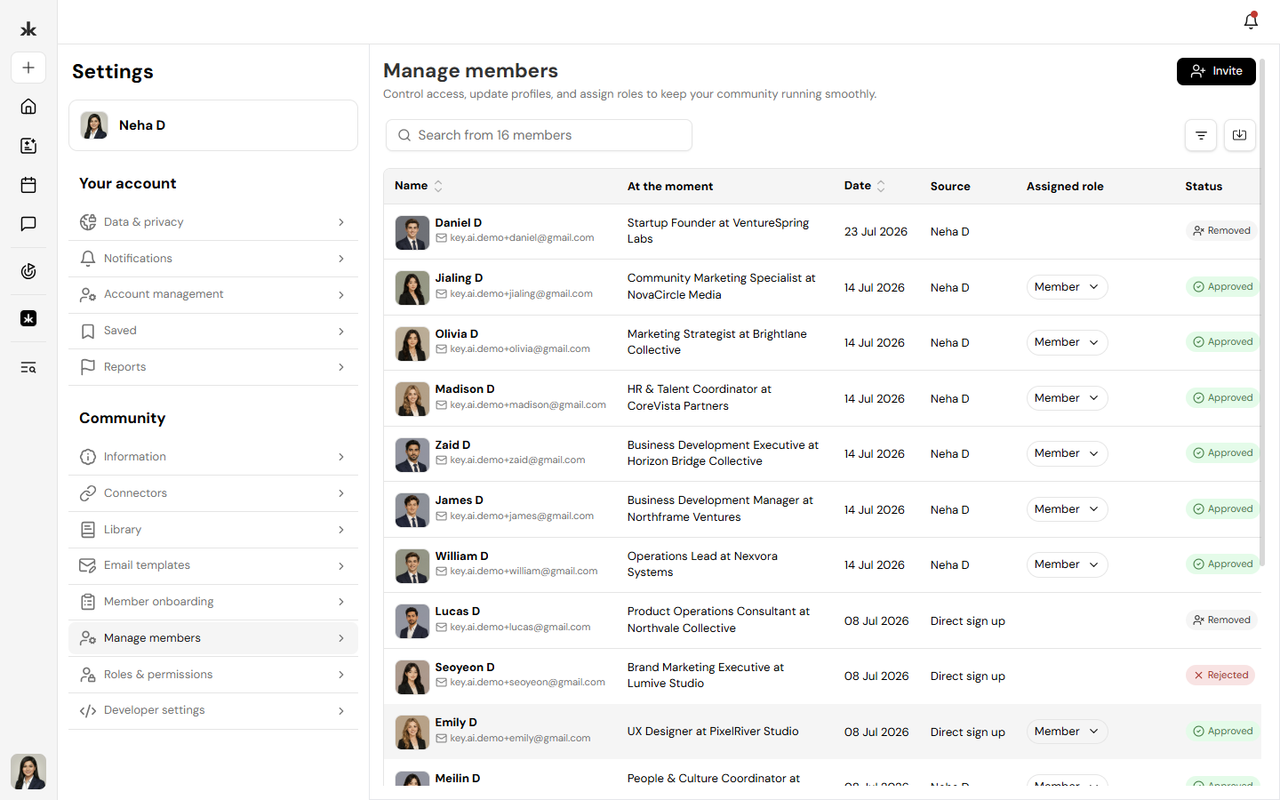
View Community Members
The Manage Members page provides an overview of all members within the community.
For each member, you can view:
- Name
- Email address
- Join date
- Assigned role
- Membership status
- At the moment
- Answers to community registration questions.
This information helps administrators quickly understand who belongs to the community and their current access level.
Search, Sort, and Filter Members
To quickly locate members, you can:
- Search by name or email address.
- Sort the member list.
- Apply available filters to narrow your results.
These tools make it easier to manage large communities efficiently.
Member Tags
Admins can use tags to organize and identify members within a community. Tags can be used to highlight specific groups or characteristics, such as VIP, Speaker, or Investor.
Admins can:
- Add up to 10 tags per member
- Apply tags to multiple members at once
- Remove tags from multiple members at once
- Use tags when searching and filtering the member list
Member tags are visible only to admins. Tags are automatically removed when a member leaves the community or their account is deleted.
Filter Members by Tags
Admins can use tags to quickly find specific members in the member list. The member list supports multiple filters, allowing admins to combine:
- Status
- Tags
You can select multiple values across these filters to narrow down the member list and find the members you're looking for more easily.
Invite Members
Authorized users can invite new members directly from the Manage Members page.
To invite a member:
- Click Invite.
- Enter the member's email address.
- Send the invitation.
Invited users will receive an email to join the community.
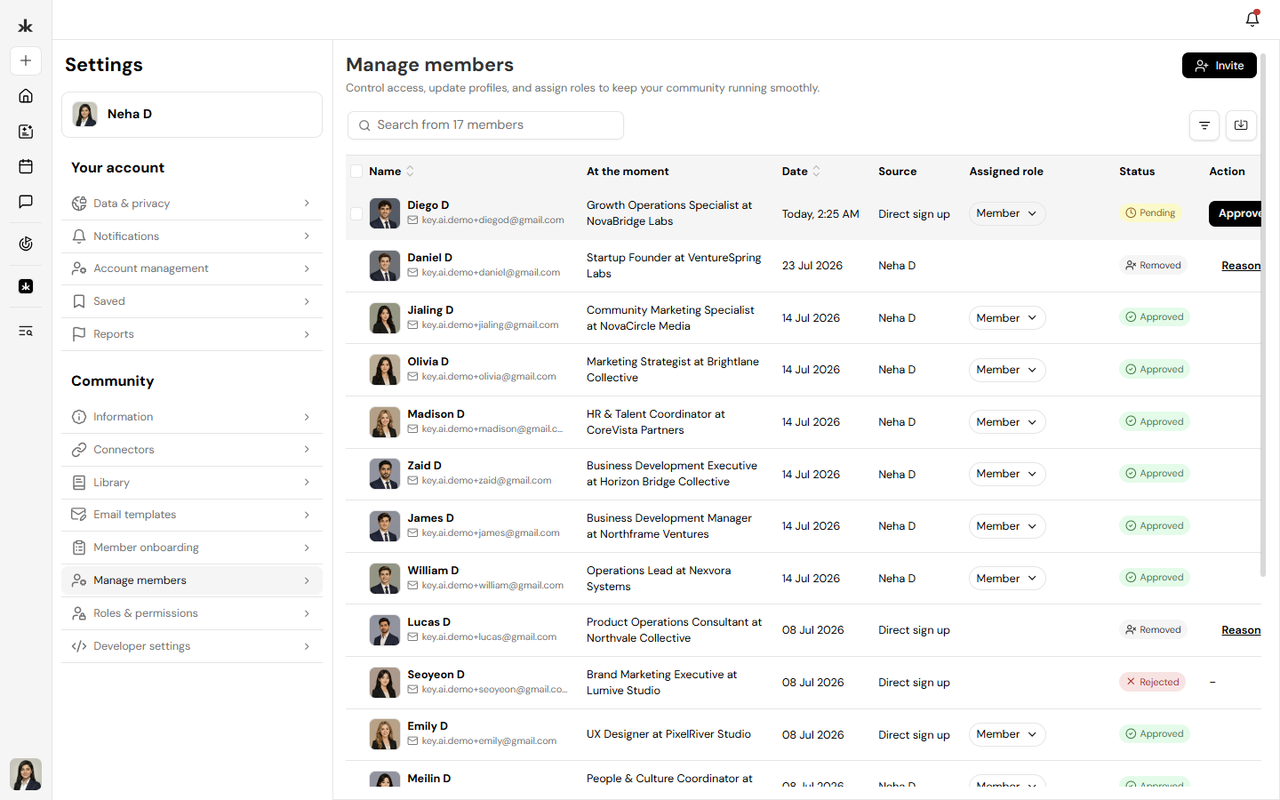
Approve Membership Requests
If your community requires approval before members can join, pending requests appear in the Manage Members page.
Authorized users can:
- Review pending requests.
- Approve membership requests.
- Decline membership requests.
Once approved, members receive access based on their assigned role.
Refresh the Members List
The Manage Members page automatically detects when changes are made in the background, such as when new members join or another admin approves, removes, or updates a member. Instead of refreshing automatically, Key AI lets you choose when to load those updates so you can continue reviewing your member list without interruption. When new updates are available, a Refresh to see updates button appears in the toolbar with an indicator dot.
Refresh the member list
- Open your community.
- Go to Settings > Manage Members.
- When the Refresh to see updates button appears, select it.
- The member list reloads with the latest updates while keeping your current search,
filters, and sorting. How it works
The refresh button only appears when new member updates are available. This prevents the member list from changing unexpectedly while you're reviewing members or performing actions, giving you full control over when the list is refreshed.
Export Members
Community administrators can export the community member list as a CSV file for reporting, record keeping, or offline analysis. Exports are generated in the background and delivered by email, allowing even large member lists to be processed without timing out.
Export your member list
- Open your community.
- Go to Settings > Manage Members.
- Select Export.
- A confirmation message appears indicating that your export is being prepared.
- Once complete, the CSV file is sent to your registered email address.
Export contents
The exported CSV includes:
- First name
- Last name
- Email address
- Phone number
- Location
- Member status
- Referral source
- Join date
- Responses to your community's membership questions
How exports are delivered: Exports are sent as an email attachment.
Permissions
Only users with the Export Members permission can export member data.
By default, this permission is available to:
- Creators
- Admins
You can also assign the permission to custom roles under Settings > Roles & Permissions without granting full administrative access.
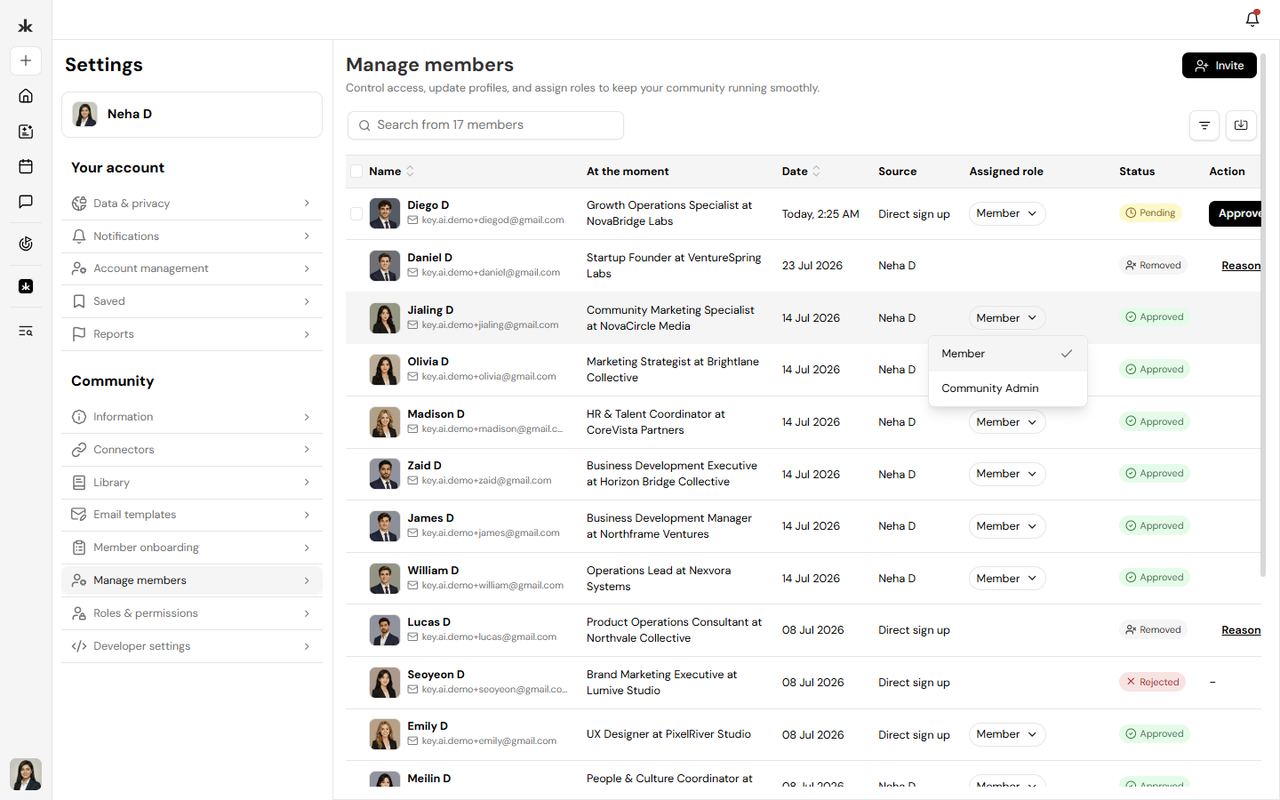
Manage Member Roles
Community Admins and users with the appropriate permissions can update a member's role at any time. Changing a member's role automatically updates the permissions available to that member within the community. For more information, see Roles & Permissions.
Remove Members
Authorized users can remove members who no longer require access to the community. Removing a member revokes their access to community resources and other community content.
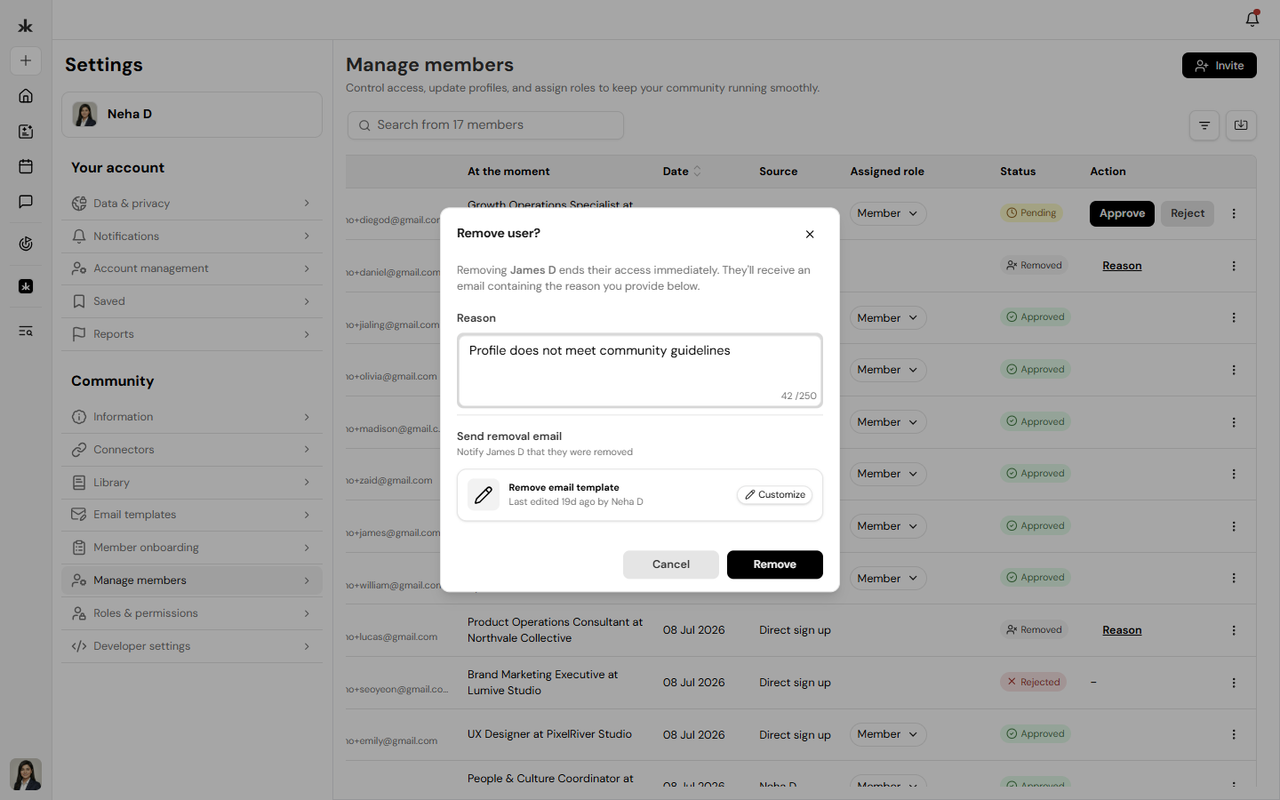
Best Practices
To effectively manage your community:
- Assign roles based on each member's responsibilities.
- Regularly review your community membership.
- Remove members who no longer require access.
- Use custom roles to grant only the permissions members need.
- Review pending membership requests regularly to keep your community active and secure.
Frequently Asked Questions
Who can access the Manage Members page?
Only Community Admins and users assigned a custom role with Member Management permissions can access the Manage Members page. Standard community members cannot view or manage community membership.
Can I change a member's role after they join?
Yes. Community Admins and authorized users can update a member's role at any time.
Can I remove a member from the community?
Yes. Community Admins and authorized users can remove members whenever necessary.
Does removing a member delete their Key AI account?
No. Removing a member only removes their access to that specific community. Their Key AI account remains active.
Roles & Permissions↗
Overview
The Roles & Permissions page allows Community Admins and users with the appropriate permissions to control what members can access and manage within a community. Key AI uses role-based access control (RBAC), where permissions are assigned to roles rather than individual members. Members automatically inherit the permissions associated with their assigned role. In addition to the default roles, Community Admins can create custom roles to match the responsibilities of different members within the community.
Access Roles & Permissions
The Roles & Permissions page is available only to Community Admins and users assigned a custom role with permission to manage community roles.
To access Roles & Permissions:
- Open the community you want to manage.
- Navigate to Community Settings.
- Select Roles & Permissions.
If you don't see this option, your current role doesn't include permission to manage community roles.
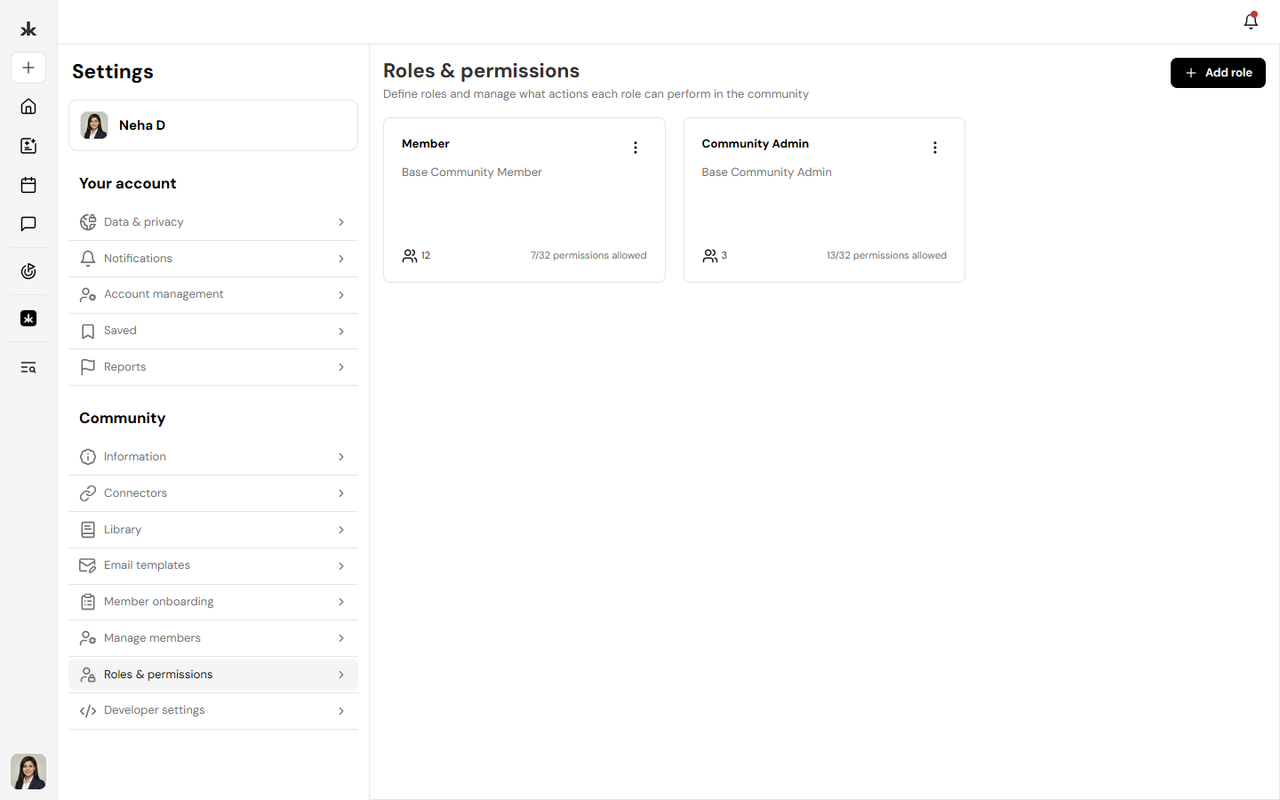
Default Roles
Each community includes default roles that provide a foundation for managing member access.
Default roles include:
- Member - Standard community access.
- Admin - Full community administration privileges.
Community Admins can also create additional custom roles to meet their community's needs.
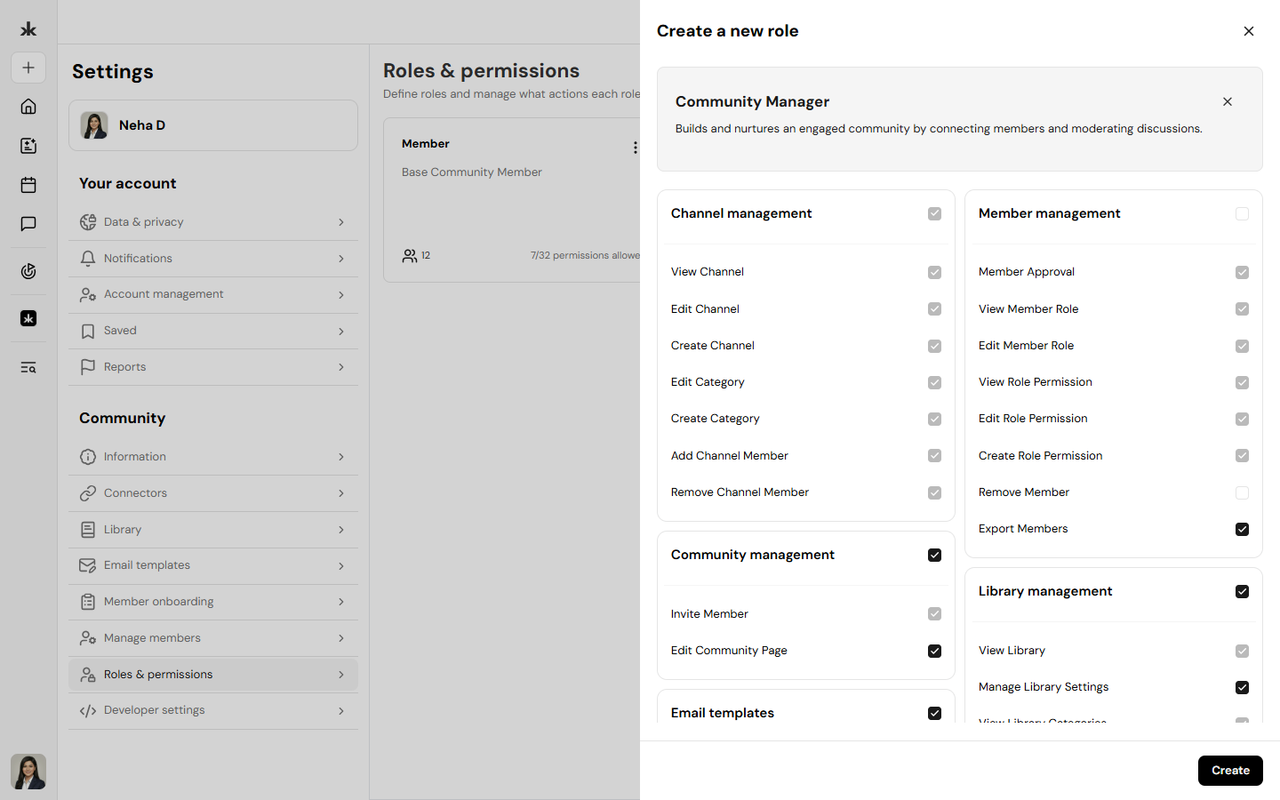
Create a Custom Role
Community Admins can create custom roles with permissions tailored to specific responsibilities.
To create a custom role:
- Open Roles & Permissions.
- Click Add Role.
- Enter a Role Title.
- (Optional) Add a description.
- Select the permissions you want to grant.
- Click Create.
The new role can then be assigned to community members.
Assign Roles to Members
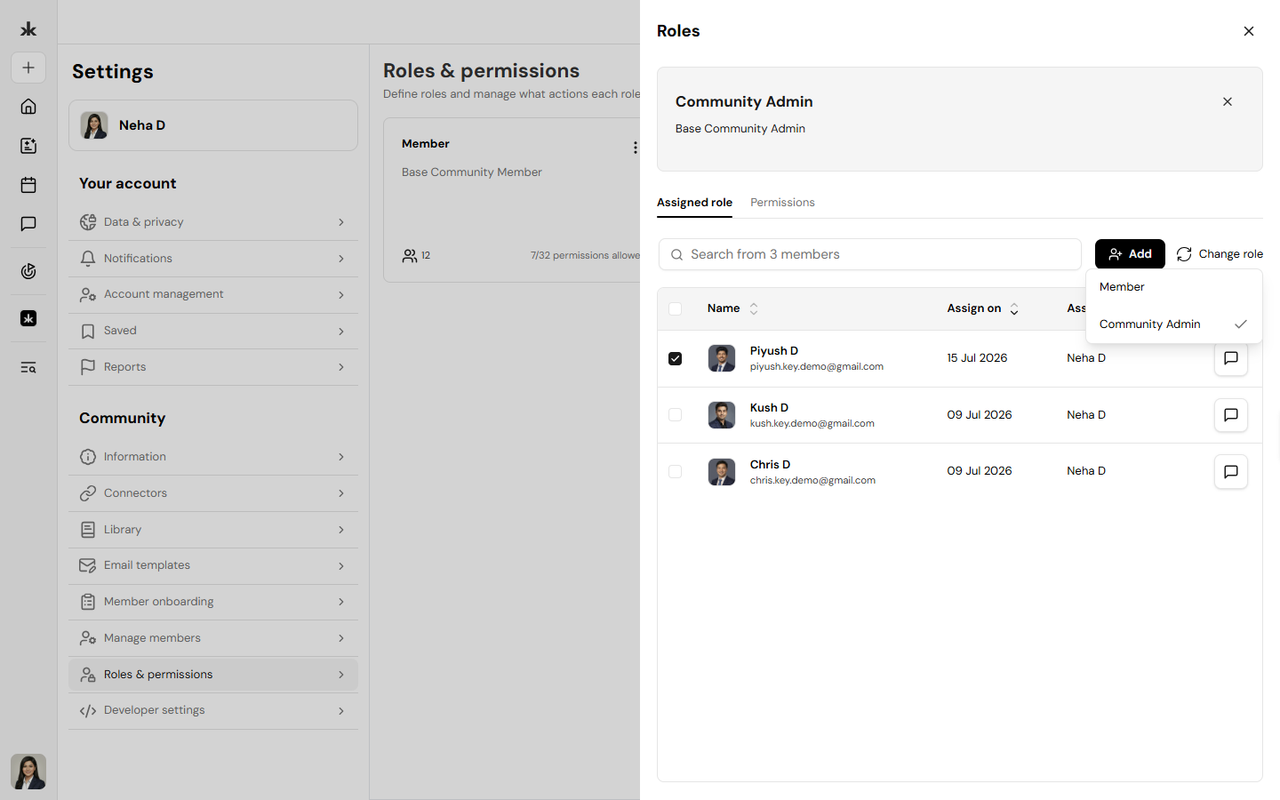
Roles determine what members can access and manage within a community.
To assign or change a member's role:
- Open Manage Members.
- Locate the member.
- Select their current role.
- Choose the new role.
- Changes are saved automatically.
The updated permissions take effect immediately.
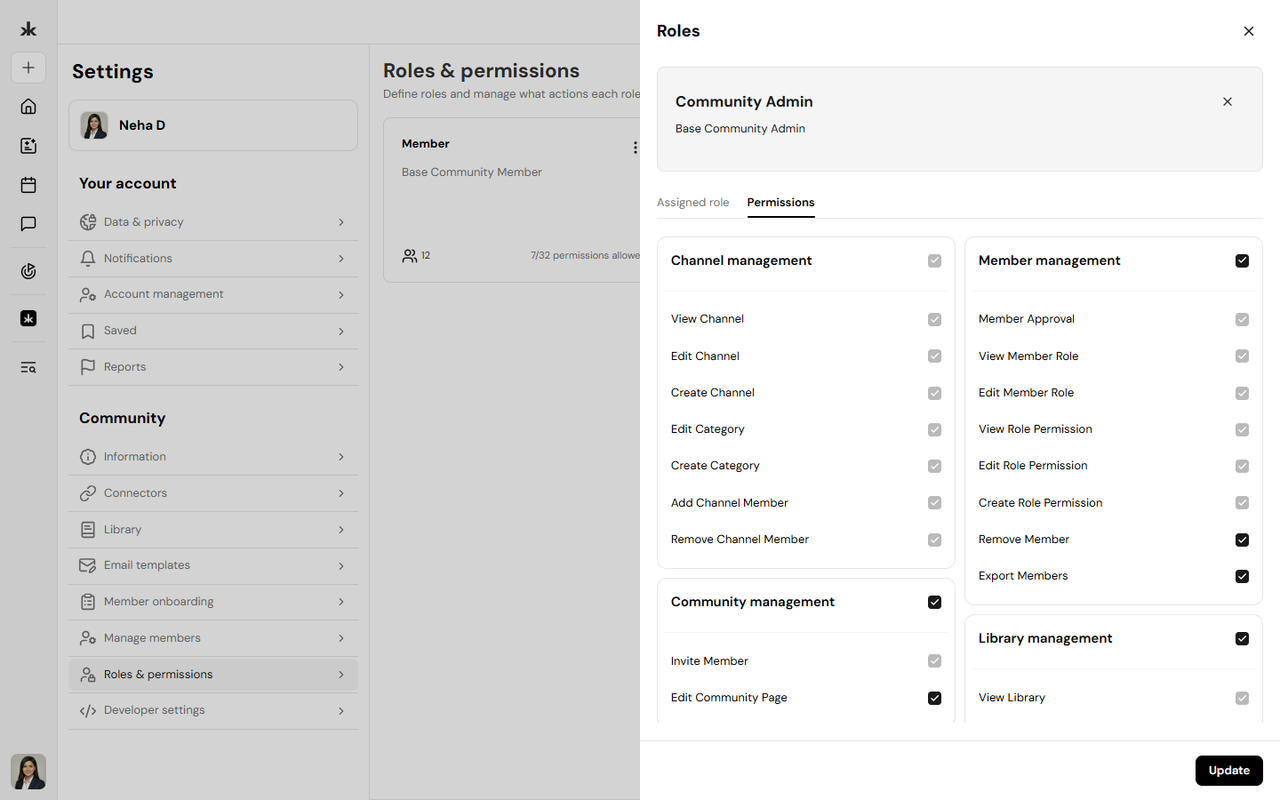
Manage Permissions
Permissions control which actions members can perform within the community. Depending on your community's configuration, permission categories may include:
- Channel Management
- Member Management
- Community Settings
- Email Templates
- Community Library
- Registration Questions
- Connectors
- Other administrative features
Community Admins can enable only the permissions required for a particular role, ensuring members have access to the features they need while maintaining community security.
Update or Remove Roles
Community Admins can update custom roles as community requirements change. When a role is updated, the changes automatically apply to all members assigned to that role.
Best Practices
To effectively manage roles and permissions:
- Follow the principle of least privilege by granting only the permissions members require.
- Create custom roles for different responsibilities instead of assigning administrative access to everyone.
- Review roles and permissions regularly.
- Remove or update unused custom roles as your community evolves.
- Periodically verify that members have the appropriate level of access.
Frequently Asked Questions
Who can create custom roles?
Only Community Admins and users assigned a custom role with permission to manage community roles can create custom roles.
Can I change a member's role later?
Yes. Member roles can be updated at any time through the Manage Members page.
Are permissions assigned to individual members?
No. Permissions are assigned to roles. Members inherit the permissions associated with their assigned role.
What happens when I update a role?
Any changes made to a role are automatically applied to all members assigned to that role.
Community Information↗
Overview
The Community Information page allows Community Admins and users with the appropriate permissions to configure the core details of a community. From this page, you can manage your community's branding, visibility, membership settings, and profile information that members see when they visit your community.
Keeping this information accurate helps members understand your community and creates a consistent experience across the platform.
Access Community Information
The Community Information page is available only to Community Admins and users assigned a custom role with permission to manage community settings.
To access Community Information:
- Open the community you want to manage.
- Click Settings.
- Select Community Information.
If you don't see this option, your role doesn't include permission to manage community settings.
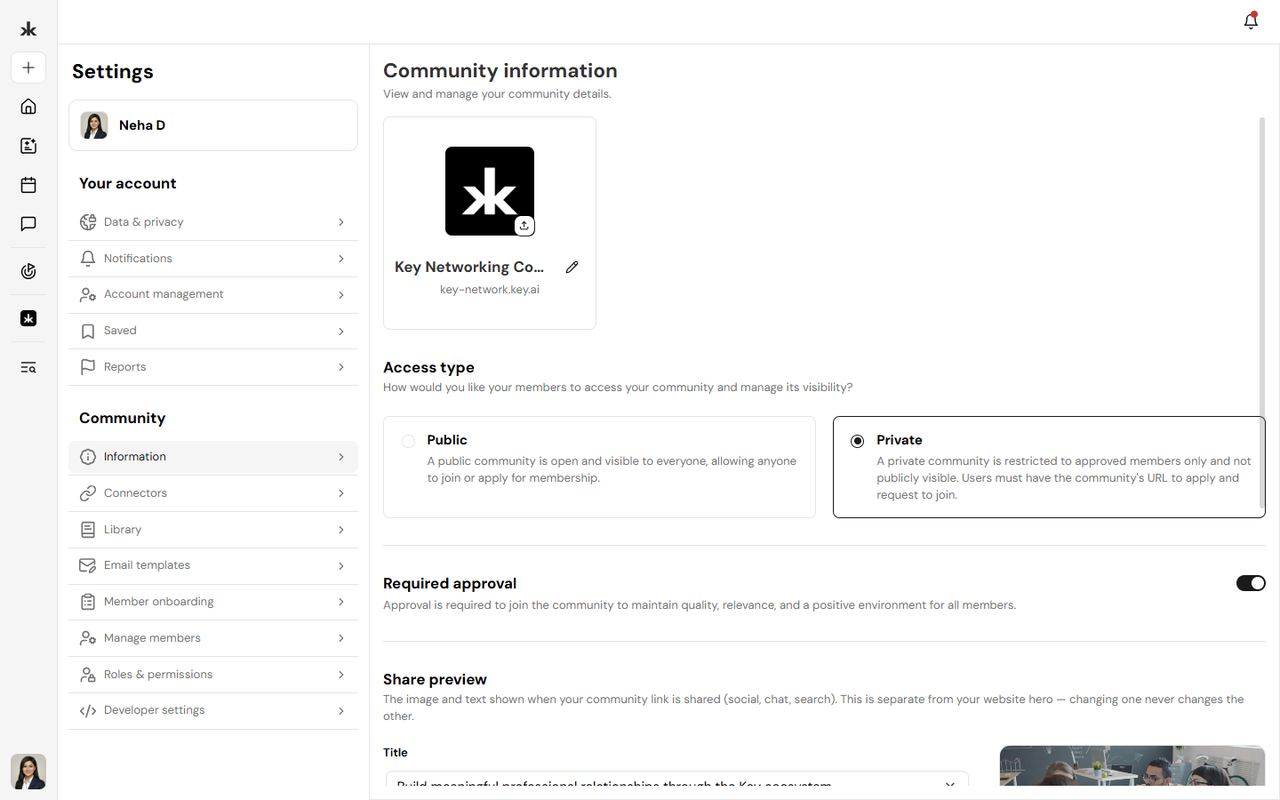
Manage Community Visibility
You can control who can discover and join your community.
Public
Anyone with access to the community can discover and join it.
Private
Only invited members or users whose membership requests are approved can access the community. Changing the visibility setting affects how new members can access your community.
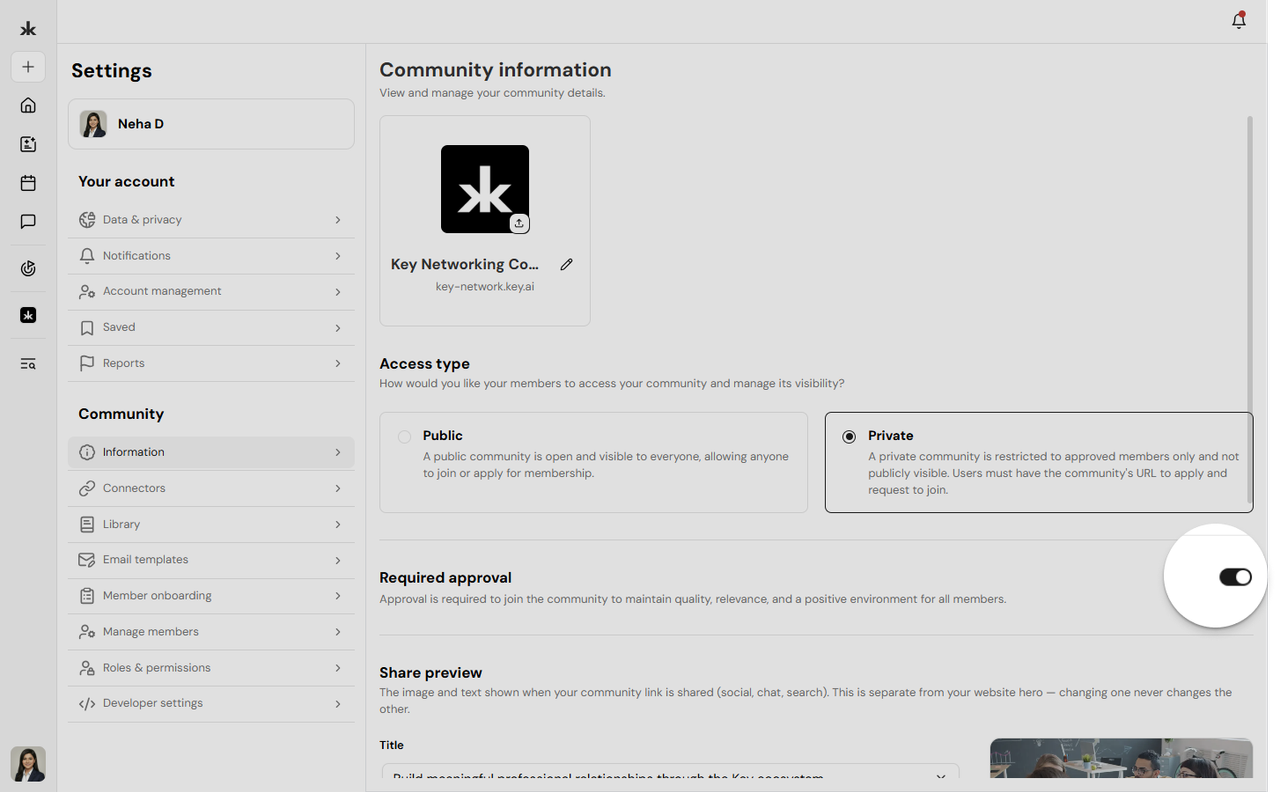
Membership Approval
You can choose whether new membership requests require approval before users can join the community.
- Enabled - Membership requests must be approved by a Community Admin.
- Disabled - Eligible users can join the community without requiring approval.
This setting provides additional control over who becomes a member of your community.
Update Community Branding
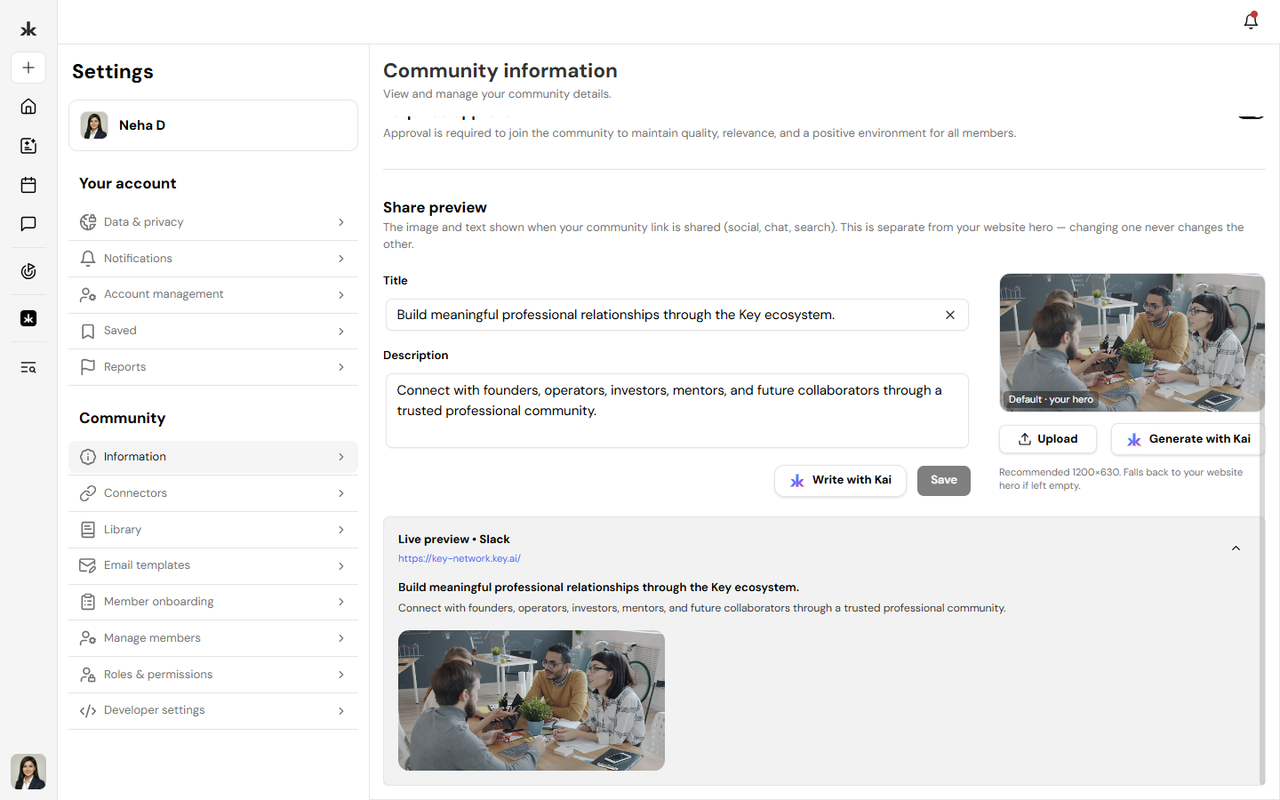
Community Information allows you to customize how your community appears to members.
You can update:
- Community banner image
- Community logo
- Community name
- Community description
Branding changes are reflected throughout the community once they are saved.
Save Your Changes
After making updates:
- Review your changes.
- Click Save.
- Your updates will be reflected throughout the community.
You can return and update your community information at any time.
Best Practices
- Use a clear and recognizable community name.
- Upload a high-quality logo and banner image.
- Write a concise description that explains your community's purpose.
- Enable membership approval for communities that require controlled access.
- Review your community information regularly to keep it accurate and up to date.
Frequently Asked Questions
Who can edit Community Information?
Only Community Admins and users with the appropriate community management permissions.
Can I change my community's visibility later?
Yes. You can switch between Public and Private at any time.
Can I update my community logo or banner?
Yes. Your community branding can be updated whenever needed.
Can I require approval before users join?
Yes. You can enable Membership Approval so new join requests must be approved by a Community Admin.
Do changes appear immediately?
Yes. Once you save your changes, the updated information is reflected throughout the community.
- Community Visibility Settings
- Membership Approval Toggle
- Community Branding
- Community Profile
Connectors↗
Overview
The Connectors page allows Community Admins to connect third-party applications with their community. Connectors extend your community's capabilities by integrating external communication and collaboration platforms, helping streamline workflows and improve member engagement. Available connectors may expand as new integrations are introduced.
Access Connectors
The Connectors page is available only to Community Admins.
To access Connectors:
- Open the community you want to manage.
- Click Settings.
- Select Connectors.
If you don't see this option, your current role doesn't include permission to manage community connectors.
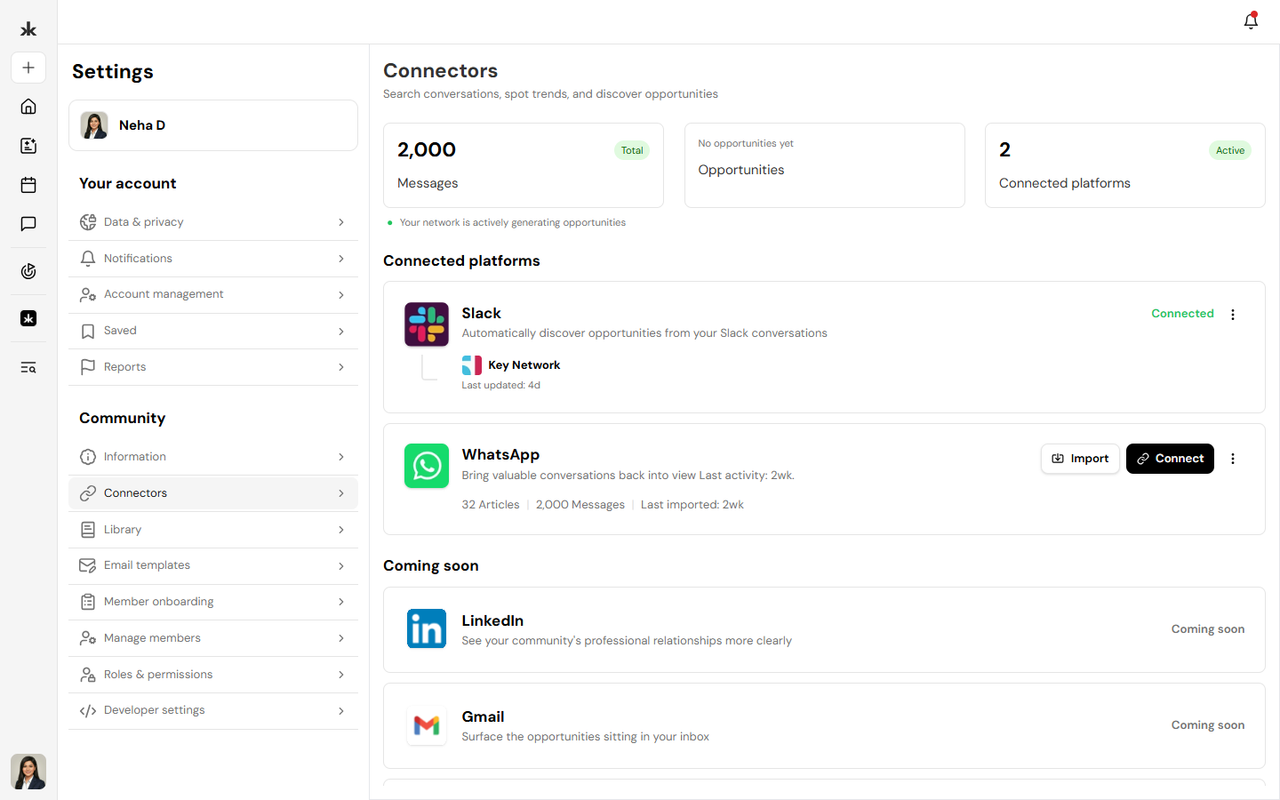
The Connectors page displays the integrations currently available for your community.
At present, the following connectors are available:
- Slack - Connect your community with Slack to enable supported communication and collaboration workflows.
- WhatsApp - Connect WhatsApp to support community messaging and communication features.
Additional integrations are planned for future releases and may appear as Coming Soon within the Connectors page.
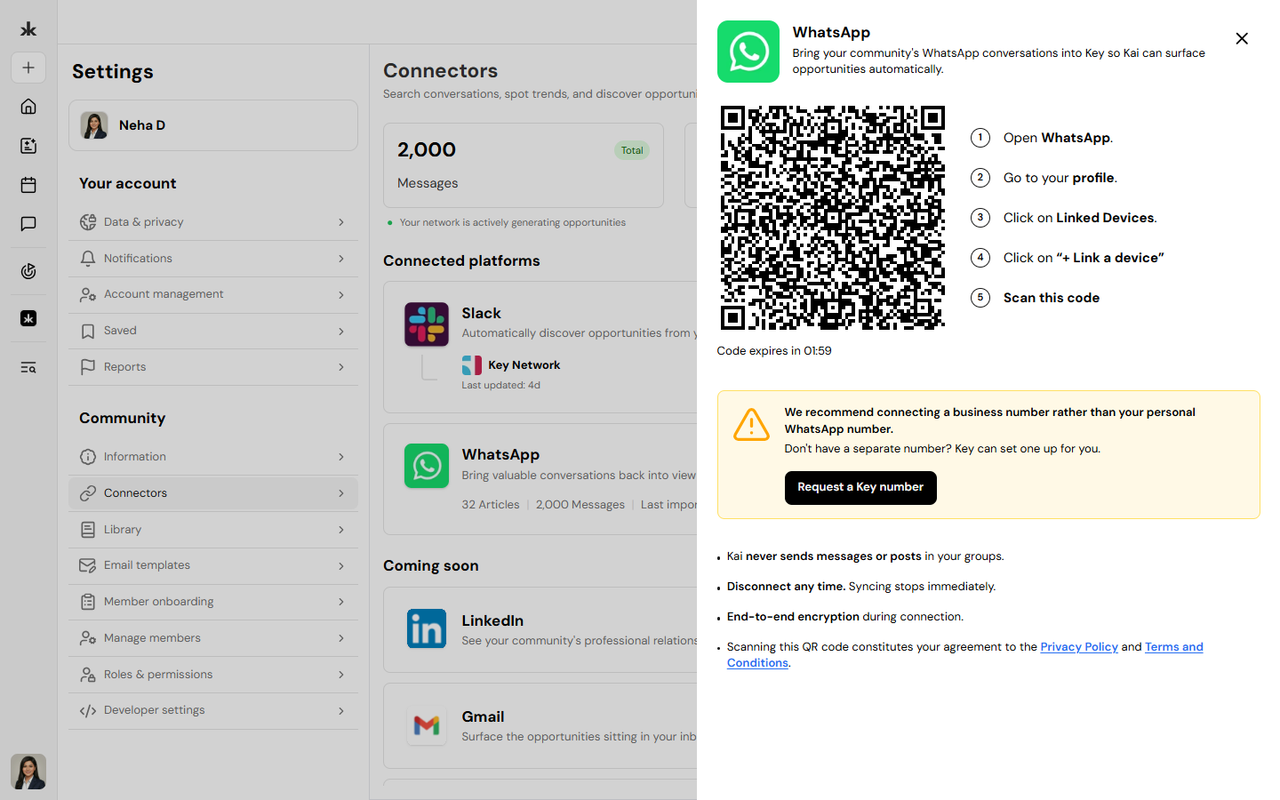
Connect an Integration
To connect a supported service:
- Open Community Settings.
- Select Connectors.
- Choose the integration you want to connect.
- Click Connect.
- Follow the authentication and authorization steps.
- Confirm the connection.
Once connected, the integration will be available for supported community features.
Disconnect an Integration
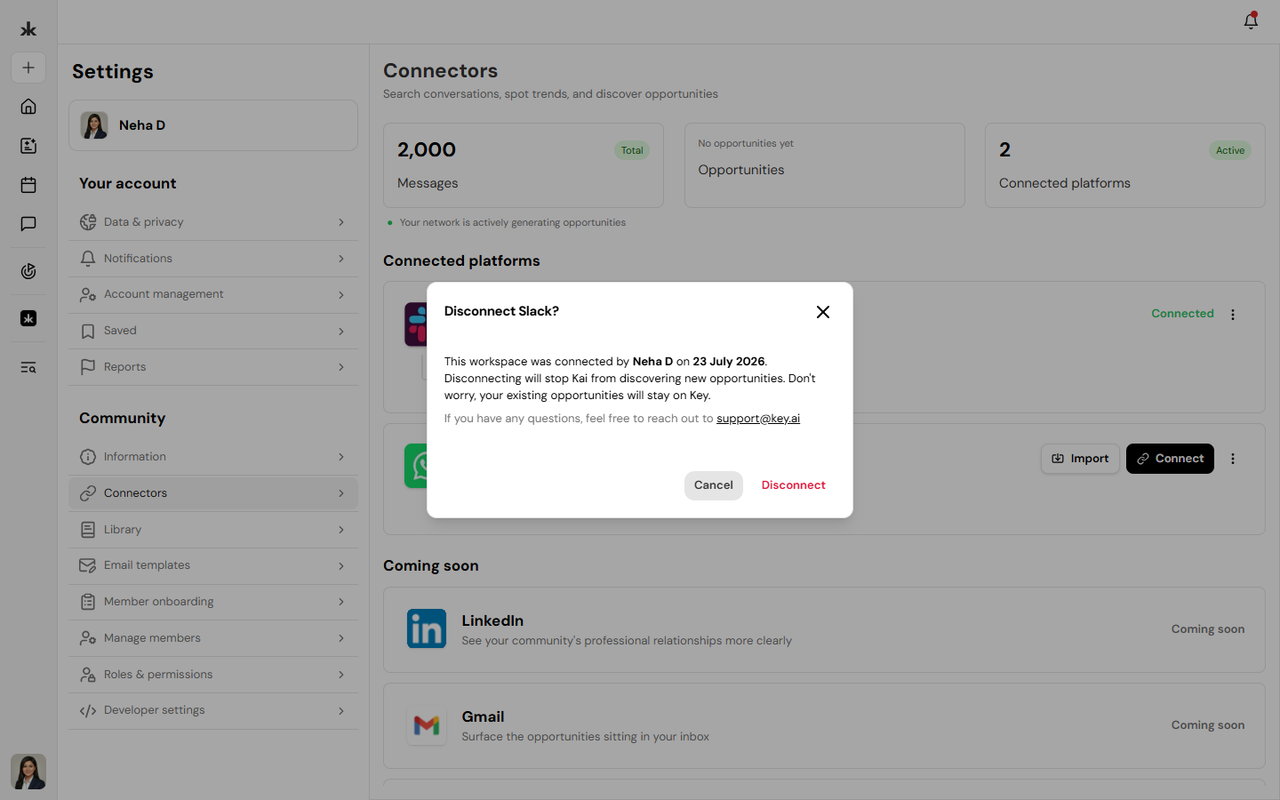
If an integration is no longer required:
- Open the Connectors page.
- Select the connected integration.
- Click Disconnect.
- Confirm your action.
Disconnecting an integration may disable features that rely on that service until it is reconnected.
Best Practices
- Connect only the integrations your community requires.
- Review connected services periodically.
- Disconnect integrations that are no longer in use.
- Ensure the appropriate permissions are granted when authorizing third-party applications.
- Reconnect integrations if authorization expires.
Frequently Asked Questions
Who can manage connectors?
Only Community Admins can access and manage connectors.
Which connectors are currently available?
Currently, Slack and WhatsApp are available for community integration. Additional connectors will be introduced in future releases.
What happens if I disconnect an integration?
Features that rely on the disconnected service may no longer function until the integration is reconnected.
Do all members have access to connectors?
No. The Connectors page is available only to Community Admins.
Community Library↗
Overview
The Library is your community's shared knowledge base. It brings important information and insights together in one place, making it easier to search, explore, and learn from your community's knowledge. The Library can turn meaningful conversations from connected Slack channels and WhatsApp groups into organized articles, while also allowing members to create and share posts directly. You can search, explore, and learn from shared knowledge, use Kai to help create and understand content, and engage with other members through comments and discussions.
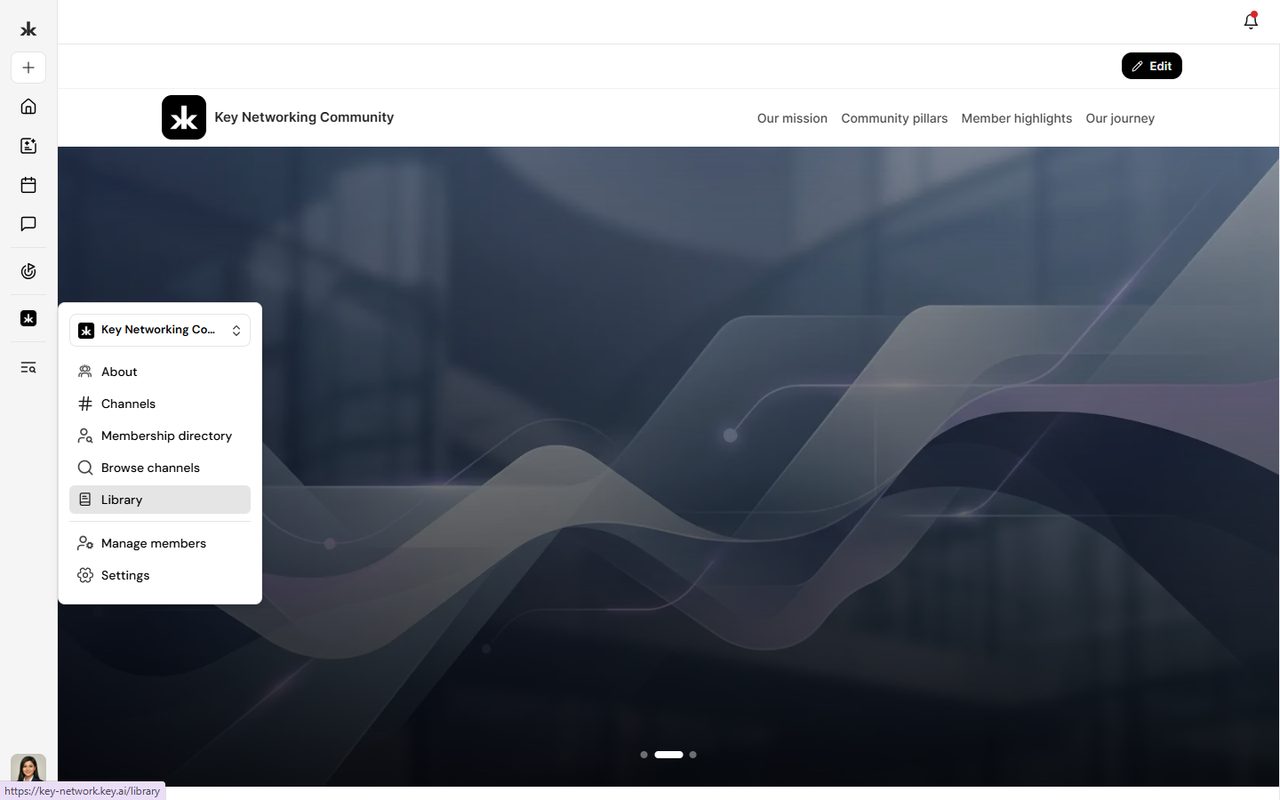
Access the Community Library
To access the Community Library:
- Open the community you want to explore.
- Select Library from the community navigation menu.
The Library opens to the Feed, where you can browse posts, search for content, filter posts by category, and switch between List and Grid views.
Create a Library Post
To create a post in the Community Library:
- Open the community where you want to create the post.
- Select Library from the community navigation menu.
- Select Create.
- Add a Headline and select a Category.
- Add content in the Body field, or select Write with Kai to create a draft with Kai.
- Add optional Tags, Media, or External links.
- Select Publish to publish the post.
If your community requires approval for Library posts, select Send for approval instead. The post will be sent to admins for review before it appears in the Library Feed. You can also select Save to drafts to continue working on the post later.
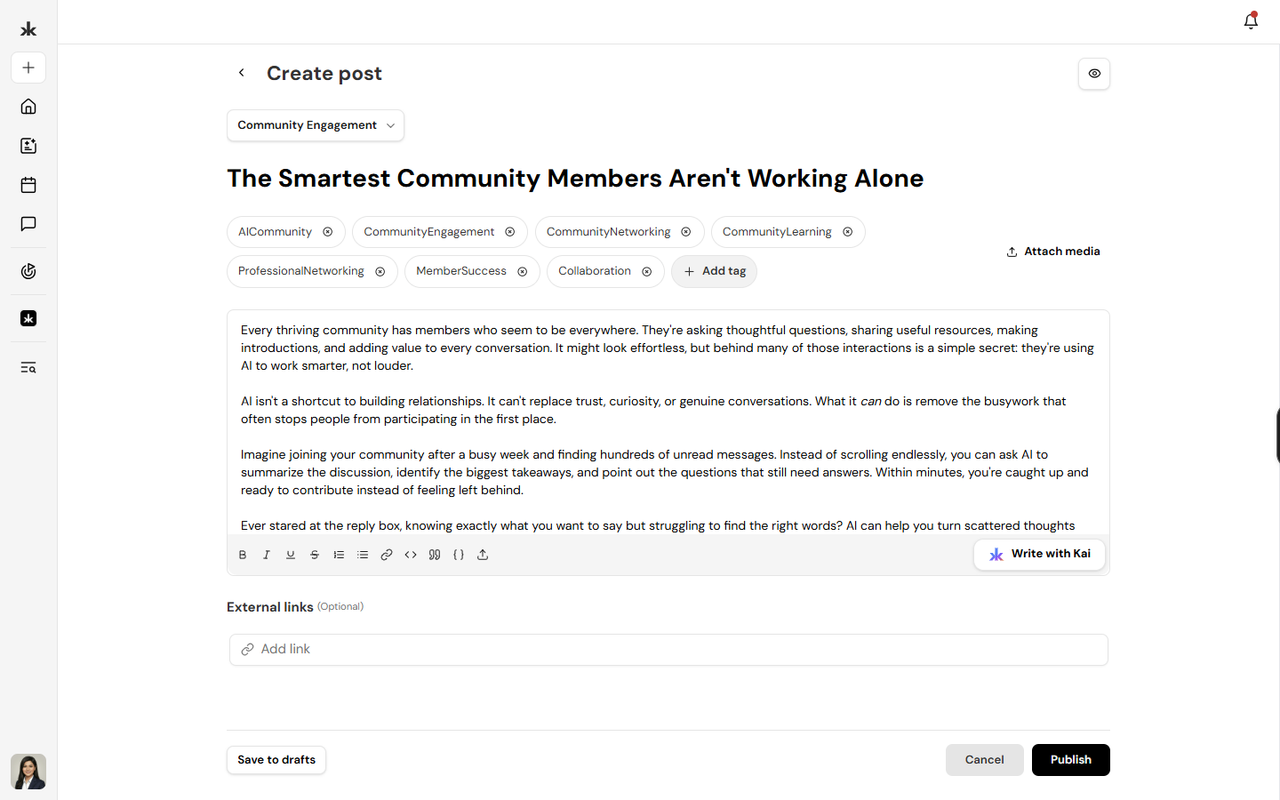
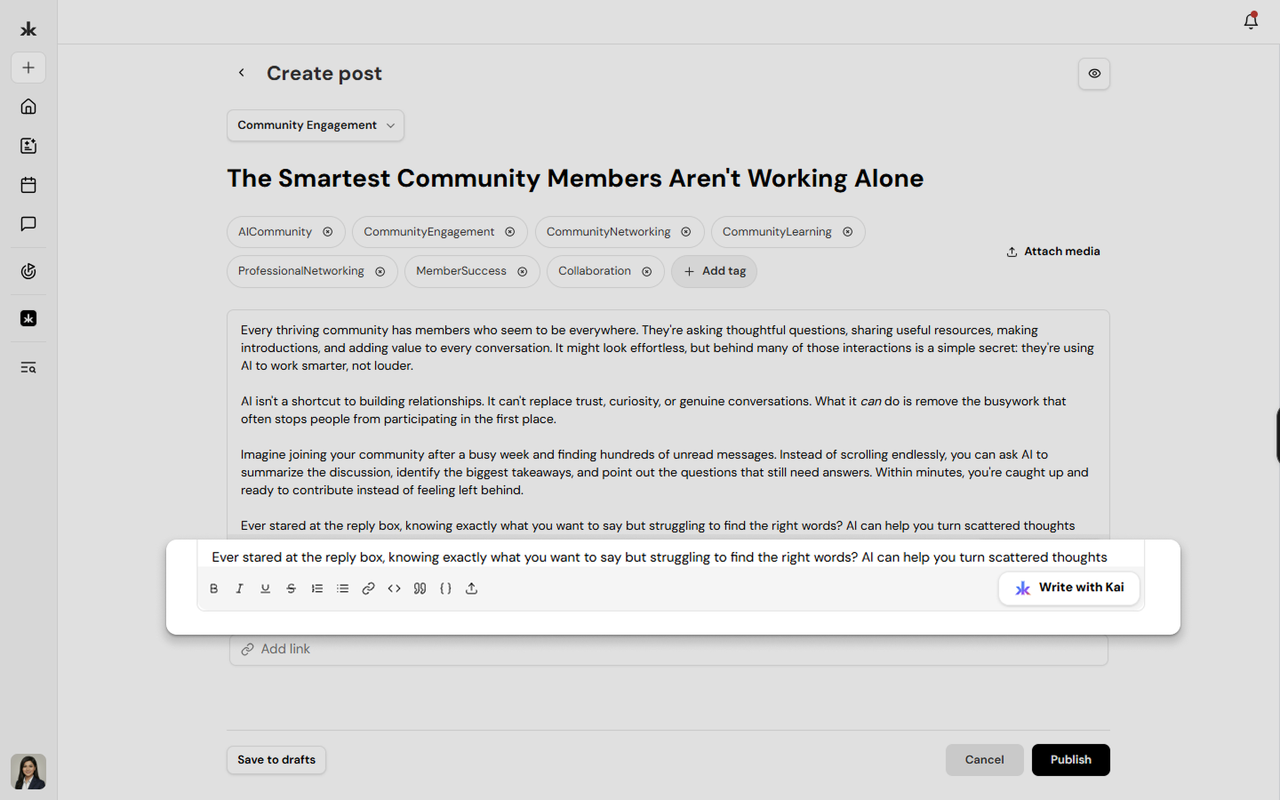
Rich Content Editor
The Rich Content Editor allows you to format the content of your Library posts.
You can use the editor to:
- Add and format text.
- Add headings and lists.
- Add links.
- Add images and other media.
You can also use Write with Kai to generate a draft from a prompt and then edit the content before publishing.
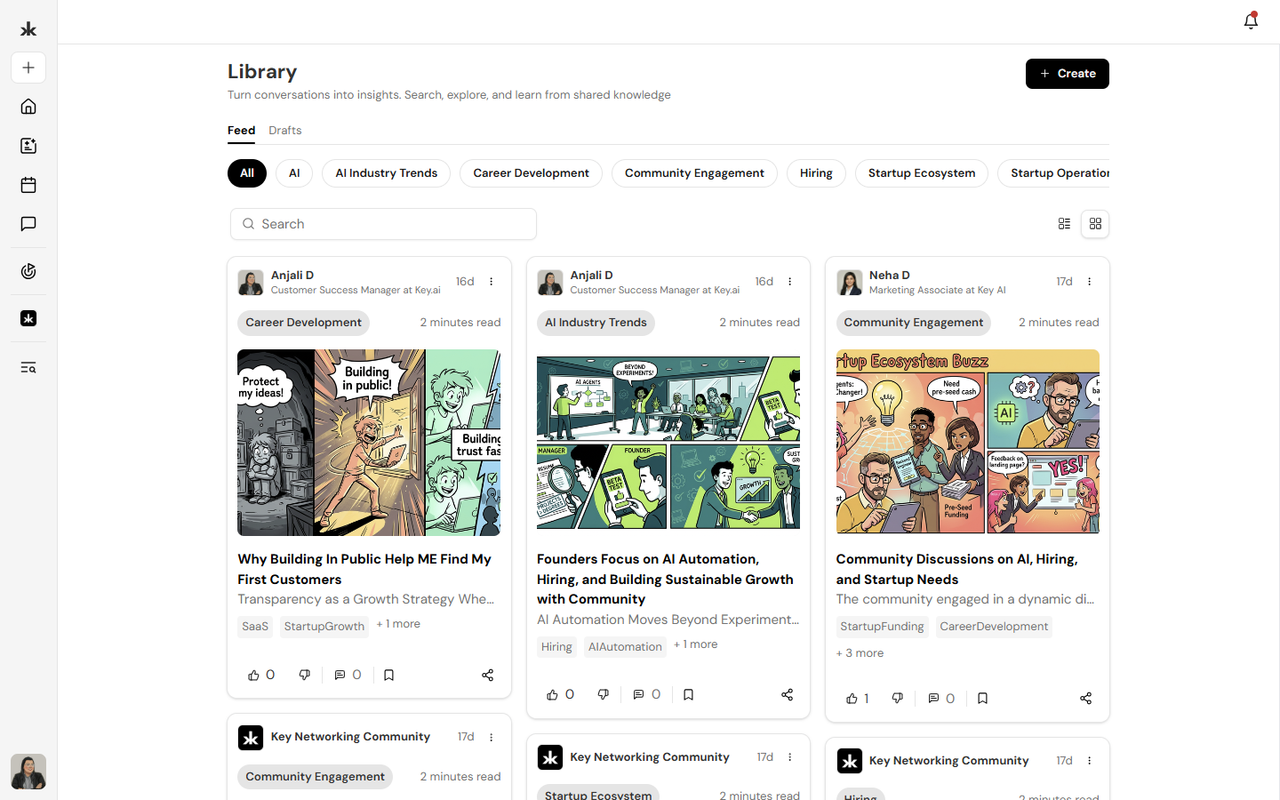
Browse Library Content
The Library Feed displays posts shared within your community. You can browse posts, search for content, and filter posts by category.
You can also switch between:
- List view - view posts in a list.
- Grid view - view posts in a grid layout.
Each post card can display the author or community, category, estimated reading time, tags, and available quick actions.
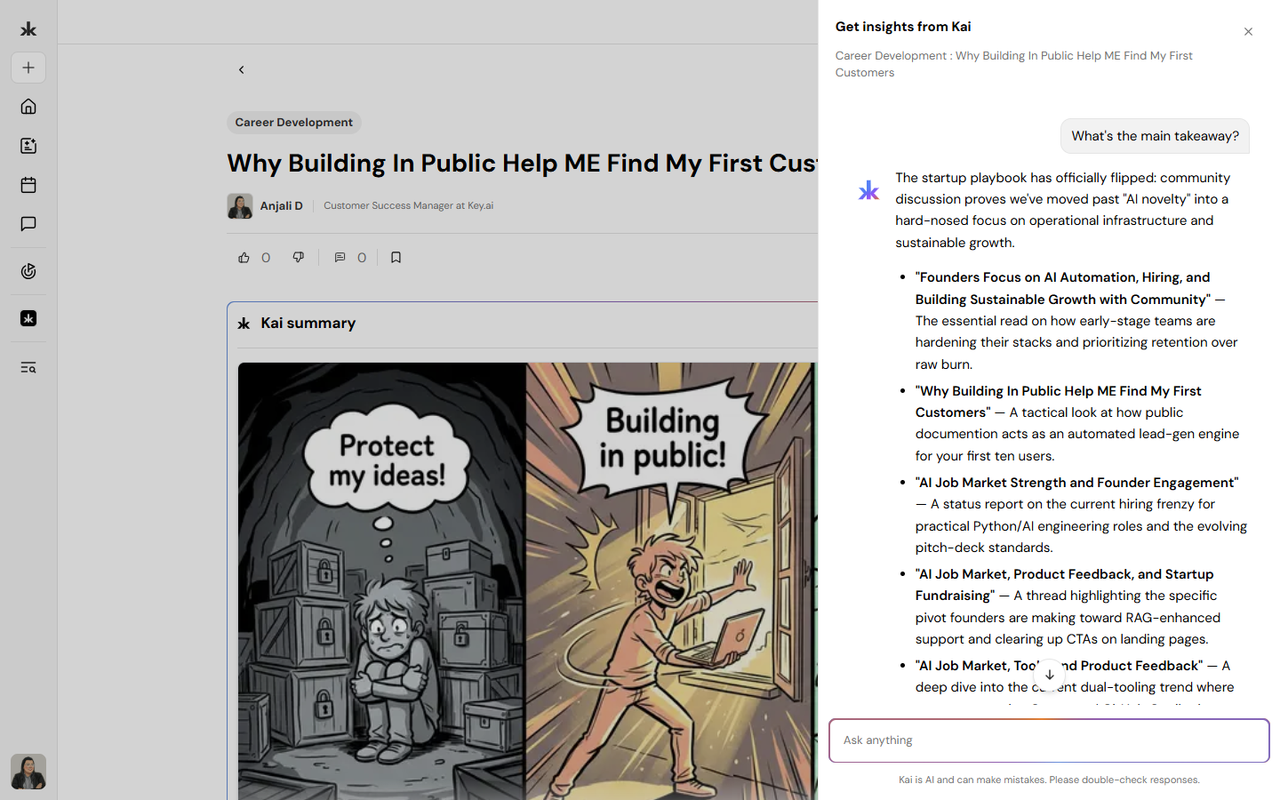
Ask Kai About a Library Article
You can use Ask Kai to ask questions about a Library post and get help understanding its content.
To ask Kai about a Library post:
- Open the Library post you want to explore.
- Select Ask Kai.
- Enter your question or select a suggested prompt.
You can ask Kai to summarize the key takeaways, clarify information, or help you understand different perspectives shared in the post.
For example, you can ask Kai to:
- Summarize the article.
- Explain a specific section.
- Find key information.
- Clarify a concept discussed in the article.
- Answer questions based on the article's content.
Manage Library Content
Community Admins, moderators, and users with the appropriate permissions can manage Library content.
Depending on their permissions, they can:
- Review posts submitted for approval.
- Approve or reject submitted posts.
- Provide a reason when rejecting a post.
- Remove posts from the community.
- Manage Library categories and settings.
Library settings can also be used to control who can contribute, whether posts require approval, notifications, and available Kai options.
Best Practices
- Use clear and descriptive headlines.
- Select the most relevant category for each post.
- Add relevant tags to make content easier to discover.
- Keep information accurate and up to date.
- Use headings and formatting to improve readability.
- Add images and external links where they provide useful context.
- Use Write with Kai to help create drafts, then review and edit the content before publishing.
Frequently Asked Questions
Who can create Library posts?
Members can create Library posts if their community permissions allow them to contribute content.
Who can view Library content?
Members can view Library content based on the visibility and permissions configured for the community.
Can Library posts be edited after publishing?
Post editing depends on the permissions available to the user and the community's Library settings.
Can I remove a Library post?
Admins and moderators with the appropriate permissions can remove posts from the community.
Can I use Kai to create Library content?
Yes. You can use Write with Kai to create a draft from a prompt and edit it before publishing. You can also use Ask Kai to ask questions about a Library post.
- Manage Library
Email Templates↗
Overview
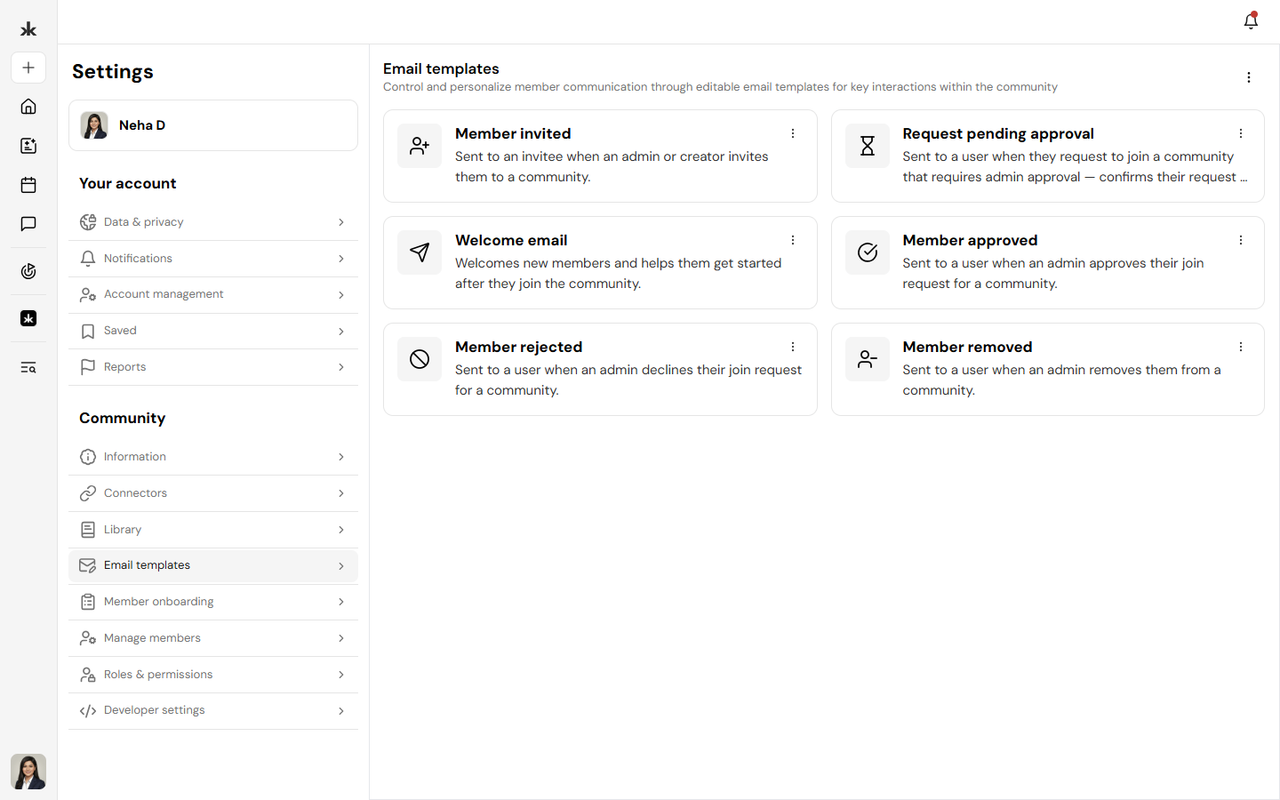
The Email Templates page allows Community Admins and users with the appropriate permissions to customize the automated emails sent from their community. Key AI provides default system email templates for supported community activities. Community administrators can customize these templates to match their community's branding, tone, and messaging. If a template is not customized, the default system-generated email is sent automatically.
Access Email Templates
The Email Templates page is available only to Community Admins and users assigned a custom role with permission to manage community settings.
To access Email Templates:
- Open the community you want to manage.
- Click Settings.
- Select Email Templates.
If you don't see this option, your current role doesn't include permission to manage email templates.
Default Email Templates
Key AI automatically sends system-generated emails for supported community activities. These default templates are ready to use and require no configuration. If you choose not to customize an email template, the platform will continue using the default system-generated version.
Customize an Email Template
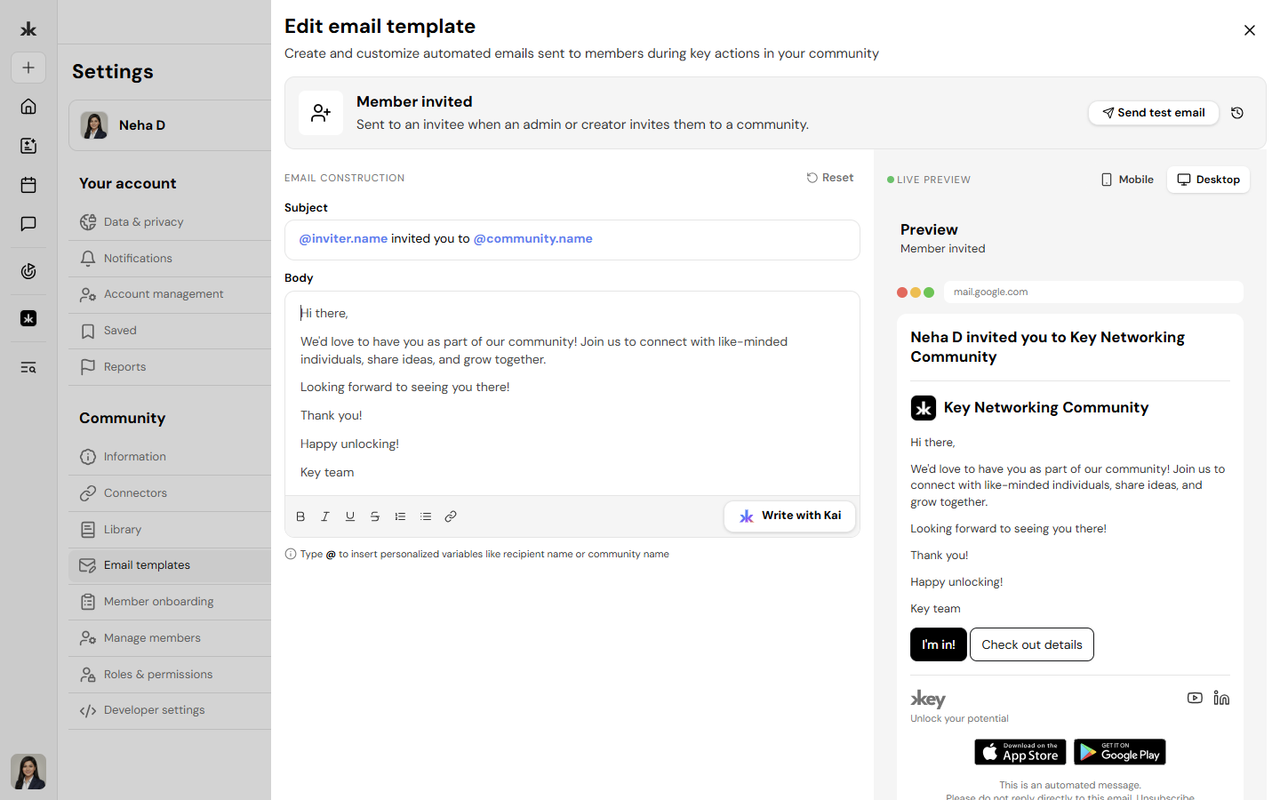
Community Admins can personalize email templates to better reflect their community's branding and communication style.
To customize a template:
- Open Email Templates.
- Select the email template you want to edit.
- Modify the subject or email content as needed or use Kai to do so.
- Save your changes.
Once saved, future emails for that template will use your customized version instead of the default system email.
Restore the Default Template
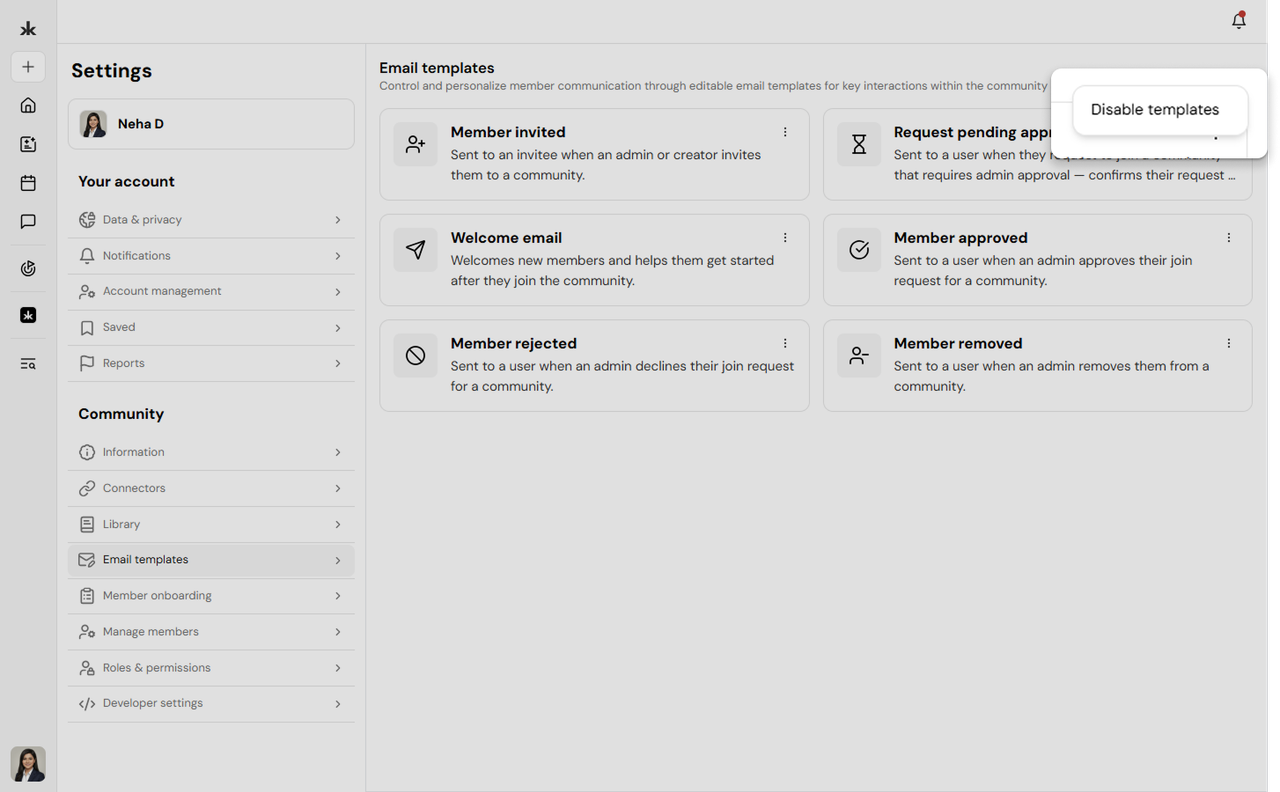
If you no longer wish to use a customized email template, you can restore the default version provided by Key AI.
Disable the templates to restore default templates
Best Practices
- Customize templates to match your community's branding and tone.
- Review email content before saving changes.
- Keep messages clear, concise, and professional.
- Update templates periodically to ensure they remain relevant.
- If customization isn't required, the default system templates provide a ready-to-use communication experience.
Frequently Asked Questions
Who can customize Email Templates?
Only Community Admins and users with permission to manage community settings can customize email templates.
Do I have to customize every email template?
No. Customizing email templates is optional. If you don't customize a template, Key AI automatically sends the default system-generated email.
Can I edit a template after saving it?
Yes. Email templates can be updated at any time.
What happens after I customize an email template?
Future emails for that template will use your customized content. Previously sent emails are not affected.
Member Onboarding↗
Overview
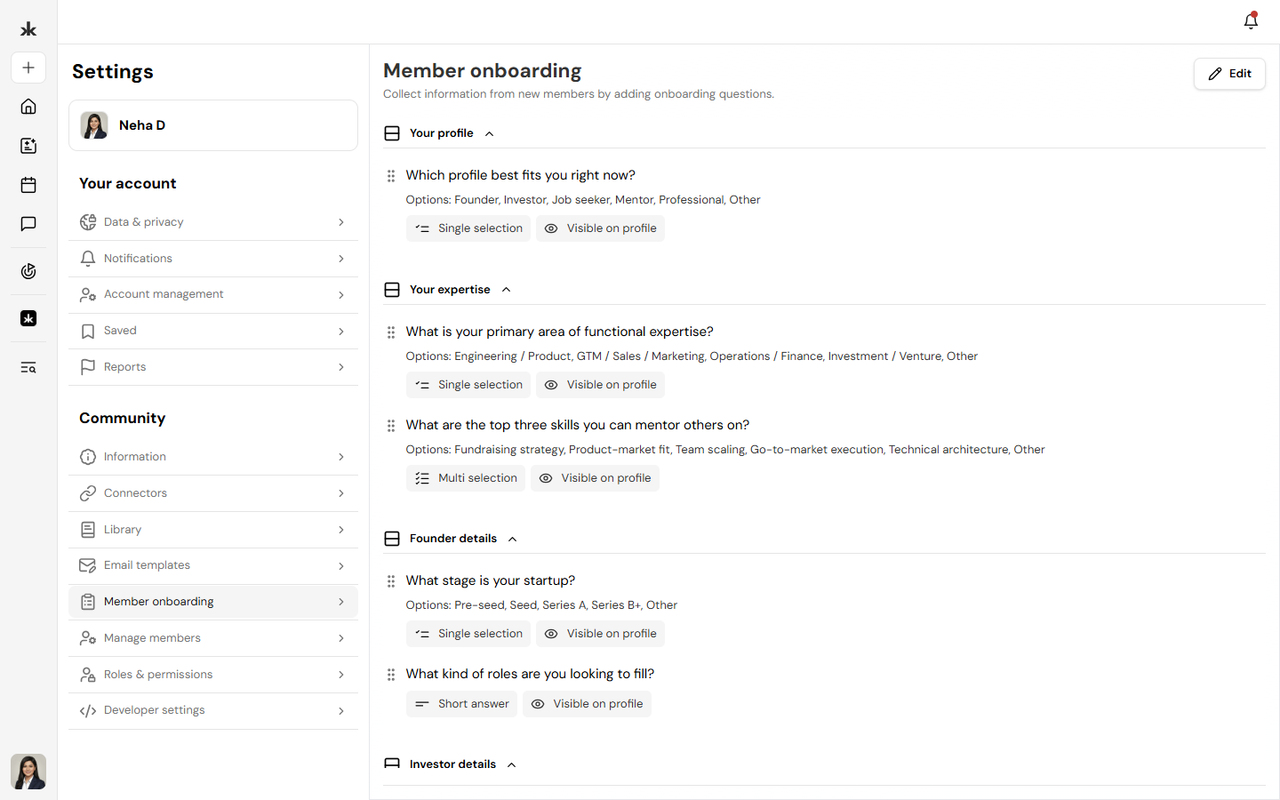
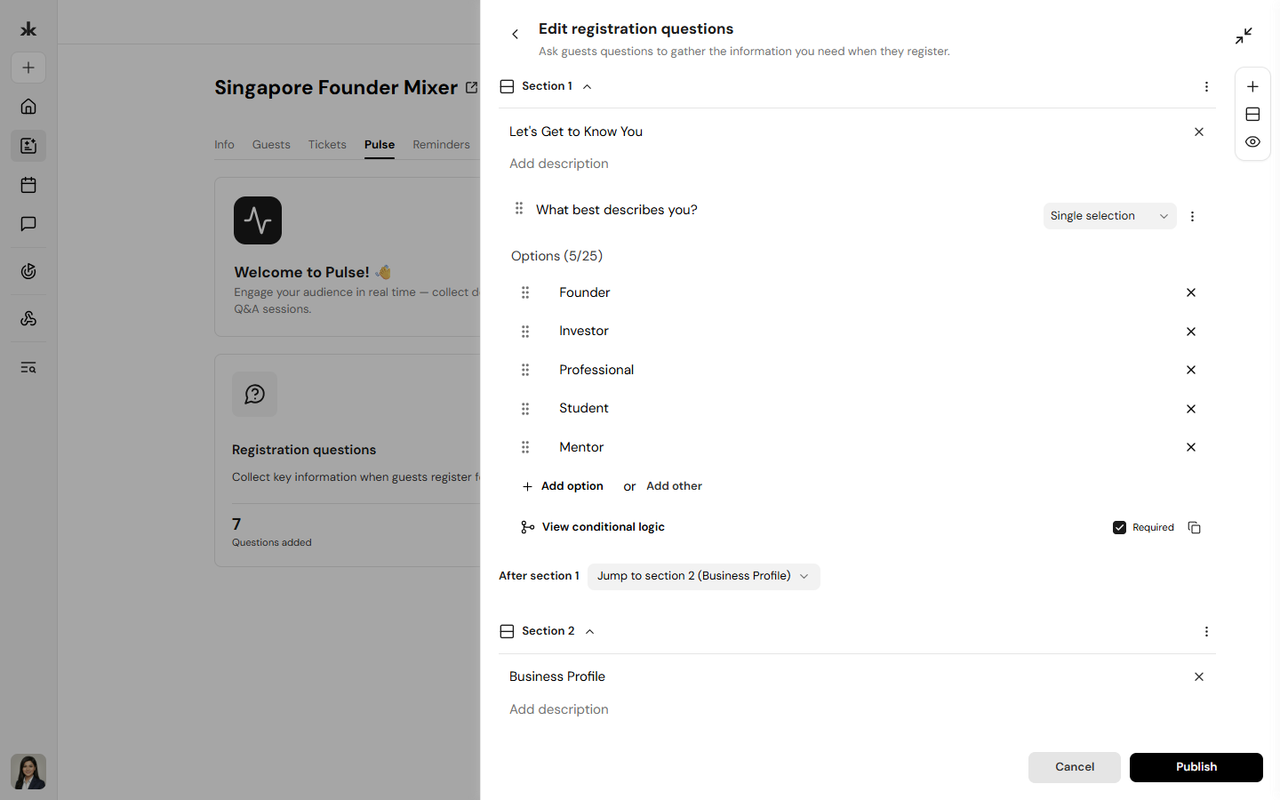
The Member Onboarding page allows Community Admins and users with the appropriate permissions to configure the registration experience for new community members. Using Registration Questions (Pulse), administrators can collect important information from members before they join the community. This helps communities better understand their members and personalize their experience. Registration questions can also include Conditional Logic, allowing follow-up questions to appear based on a member's previous responses.
Access Member Onboarding
The Member Onboarding page is available only to Community Admins.
To access Member Onboarding:
- Open the community you want to manage.
- Click Settings.
- Select Member Onboarding.
If you don't see this option, your role doesn't include permission to manage community onboarding.
Member Onboarding
Member Onboarding is presented to users when they request to join or register for a community.
These questions help administrators collect information such as:
- Professional background
- Interests
- Experience
- Community-specific information
- Any other details required for onboarding
Questions are created manually by Community Admins and can be updated at any time.
Supported Question Types
Member Onboarding supports multiple question types, allowing communities to collect information in different formats. Depending on your requirements, you can create questions such as:
- Short Text
- Long Text
- Multiple Choice
- Single Select
- Multi Select
- Dropdown
- Yes/No
- Date
- Number
The available question types may expand as new features are introduced.
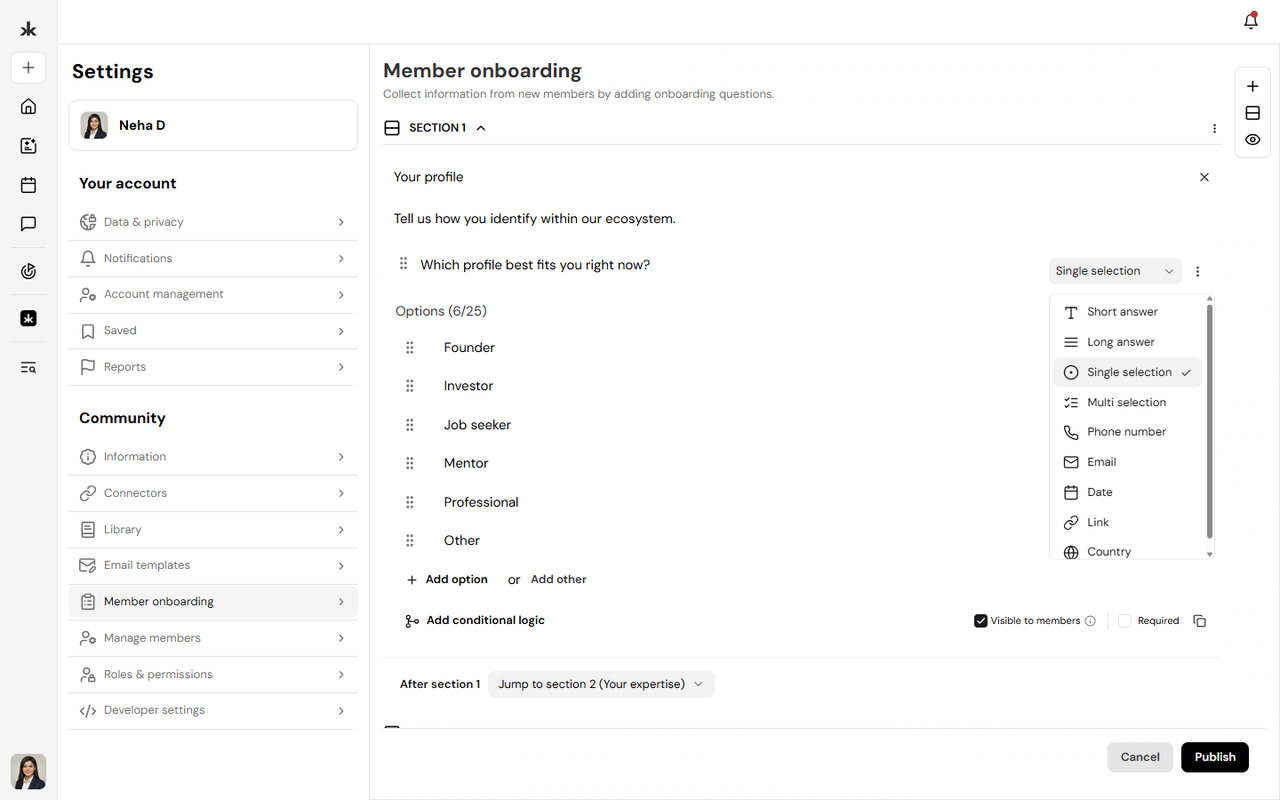
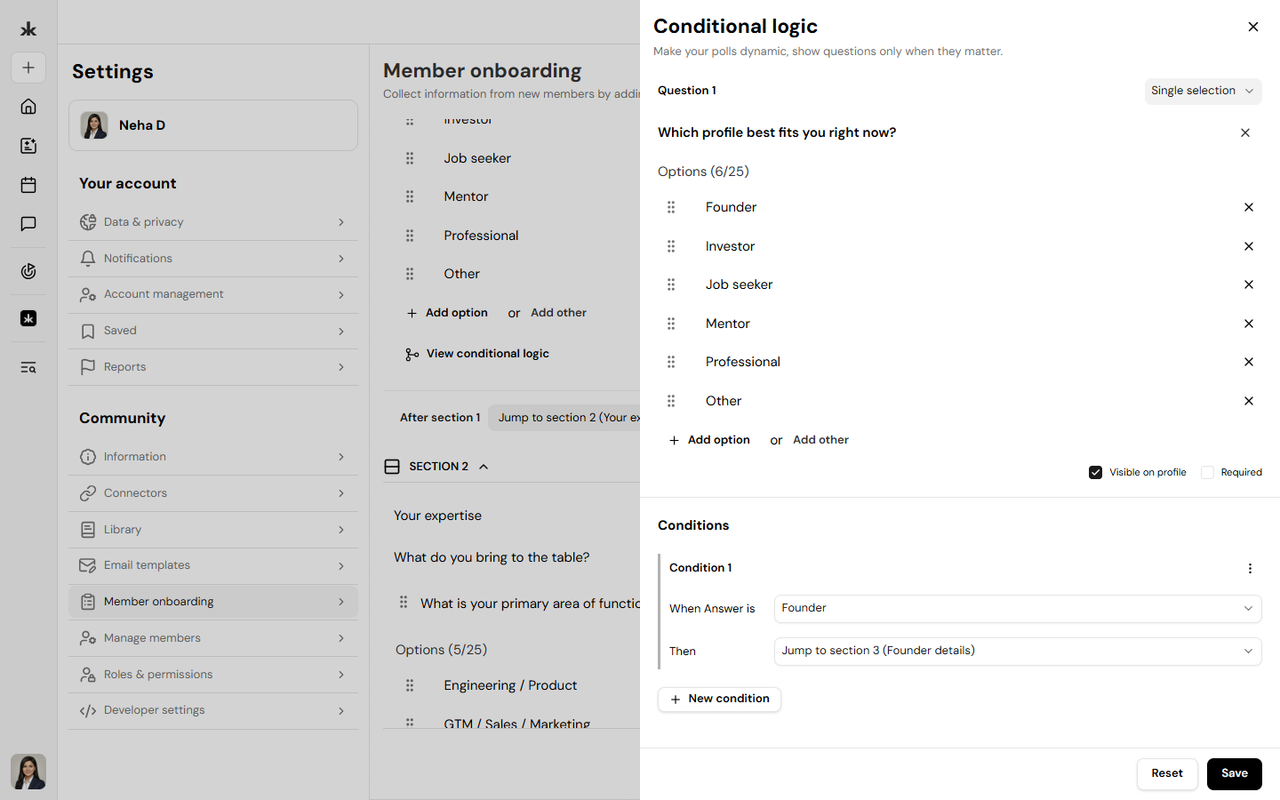
Conditional Logic allows administrators to create dynamic onboarding experiences. Based on a member's response, additional questions can be shown or hidden automatically. This helps keep the onboarding process relevant by only displaying questions that apply to each member.
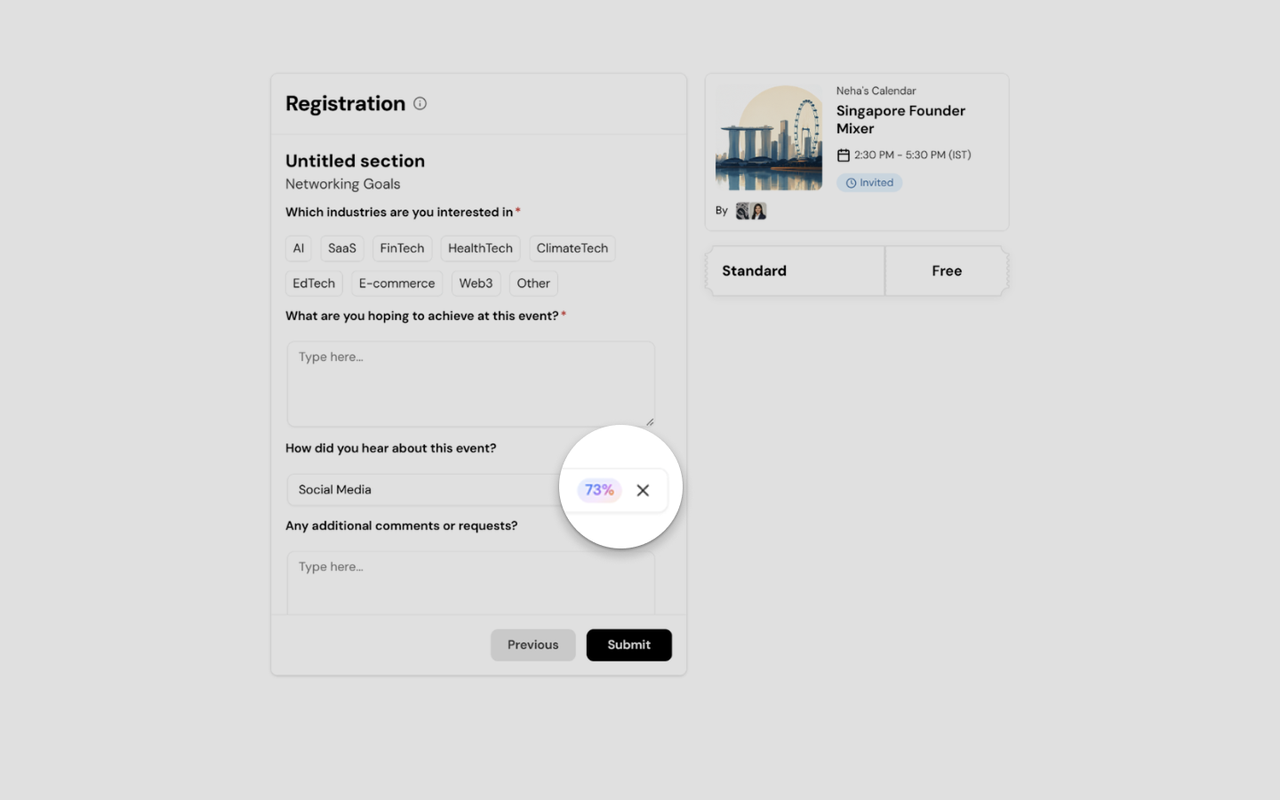
Pre-filled answer suggestions help members complete registration more efficiently while still allowing them to enter their own responses where applicable.
Edit or Remove Questions
Community Admins can update onboarding questions whenever community requirements change.
You can:
- Edit existing questions.
- Update answer choices.
- Modify conditional logic.
- Remove questions that are no longer needed.
- Reorder questions as required.
Changes apply to future registrations only.
Best Practices
- Ask only for information that is relevant to your community.
- Use Conditional Logic to create a more personalized onboarding experience.
- Keep onboarding concise to encourage completion.
- Review onboarding questions periodically to ensure they remain relevant.
Frequently Asked Questions
Who can manage Member Onboarding?
Only Community Admins and users with permission to manage community settings can create and manage onboarding questions.
When are registration questions shown?
Registration questions are displayed when users join or register for a community.
Can I edit registration questions later?
Yes. Community Admins can update, reorder, or remove registration questions at any time.
What are pre-filled answer suggestions?
Pre-filled answer suggestions provide recommended responses that members can quickly select while completing their registration.
Can I show different questions based on previous answers?
Yes. Conditional Logic allows additional questions to appear based on a member's earlier responses.
Public Pages & Rich Link Previews↗
When you share a link to a public Key AI page, the link can display a preview with relevant information about the page.
Rich previews are available for:
- Public profiles
- Communities
- Events
- Opportunities
- Library pages
Depending on the page, the preview can include the title, description, and image, making it easier for others to understand the shared content before opening the link.
Public Pages and Search
Public Key AI pages can now be indexed by search engines, making them easier to discover through online search. The following types of public pages can be indexed:
- Public profiles
- Communities
- Events
- Opportunities
- Library pages
This helps people discover publicly available Key AI content through search engines.
Still need help?
Can't find what you're looking for? Our team is here.
Contact us