Events & Calendars
Create and discover events, sell tickets, check in guests, send reminders, and manage calendars.
Events Overview↗
Overview
The Events module enables communities to create, manage, discover, and participate in events hosted within Key AI. Whether you're organizing an in-person meetup, a virtual webinar, or a hybrid event, the Events module provides the tools to manage registrations, attendee engagement, event communication, and event participation from a single platform. Depending on your role and permissions, you can create events, register for events, manage attendees, and participate in community activities.
Event Types
Key AI supports multiple event formats to accommodate different types of gatherings.
In-Person Events
In-person events take place at a physical location where attendees meet face-to-face.
Examples include:
- Networking events
- Conferences
- Workshops
- Meetups
Virtual Events
Virtual events are hosted online using supported meeting platforms. Members can register and join remotely using the meeting details provided by the event organizer.
Hybrid Events
Hybrid events combine both in-person and virtual participation, allowing attendees to join either onsite or remotely. This provides greater flexibility for members regardless of their location.
What You Can Do
Depending on your permissions, you can:
- Discover upcoming events.
- Register for events.
- Create and manage events.
- Edit event details.
- Manage attendees.
- Check in attendees.
- Participate in event Q&A.
- Receive event notifications.
- Sync events with your connected calendar.
Event Lifecycle
An event typically follows these stages:
- Create the event.
- Configure registration and event details.
- Publish the event.
- Members register to attend.
- Manage registrations and attendees.
- Host the event.
- Track attendance and engagement.
Each of these stages is covered in the following articles within this section.
Permissions
The actions available within Events depend on your community role.
For example:
- Community Members and other users can register for available events.
- Event Hosts can manage the events they organize.
- Community Admins can manage all community events.
Permissions may vary depending on the role assigned within the community.
Best Practices
- Keep event information accurate and up to date.
- Clearly specify whether an event is in-person, virtual, or hybrid.
- Include complete event details before publishing.
- Monitor registrations before the event begins.
- Use attendee management tools during the event.
Frequently Asked Questions
Who can create events?
All users can create events on Key AI. Publishing an event to a community calendar may require approval from a Community Admin or Calendar Admin, depending on your role.
Can anyone register for an event?
Registration depends on the event's configuration. Some events may be open to everyone, while others may have registration or community access requirements.
Can I edit an event after publishing it?
Yes. Users with the appropriate permissions can update event details after publication.
Can I join virtual events from Key AI?
Yes. Virtual events include the information required to join online.
- Events Dashboard
- Event Types
- Event Details
- Event Lifecycle
Create an Event↗
Overview
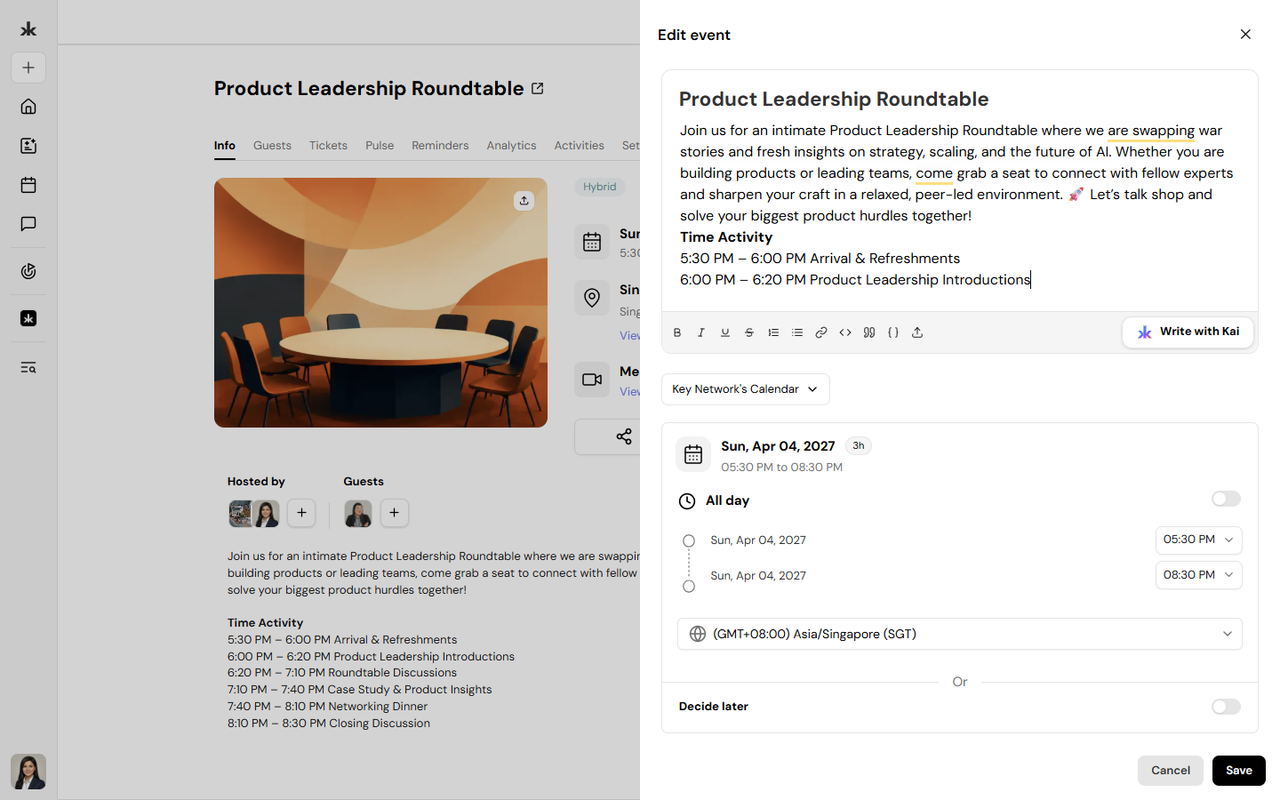
The Create Event feature allows users to create and manage events on the Key AI platform. Events can be created for personal use or submitted to a community calendar, depending on your permissions. The event creation experience provides a guided form where you can enter event details, configure registration settings, and use Kai to help generate or improve the event description.
Who Can Create Events?
Creating an event is available to all users in Key AI. However, whether an event appears on a community calendar depends on your role and permissions within that community.
- Community Admins and Calendar Admins can create and publish events directly to the community calendar.
- Users without calendar management permissions can still create events, but they must submit the event for approval before it appears on the community calendar.
Once an event is approved by a Community Admin or Calendar Admin, it becomes visible on the community calendar.
Access the Create Event Page
To create a new event:
- Navigate to the Events section.
- Click Create Event.
- Complete the required event information.
- Review your event details.
- Click Create Event.
Configure Event Details
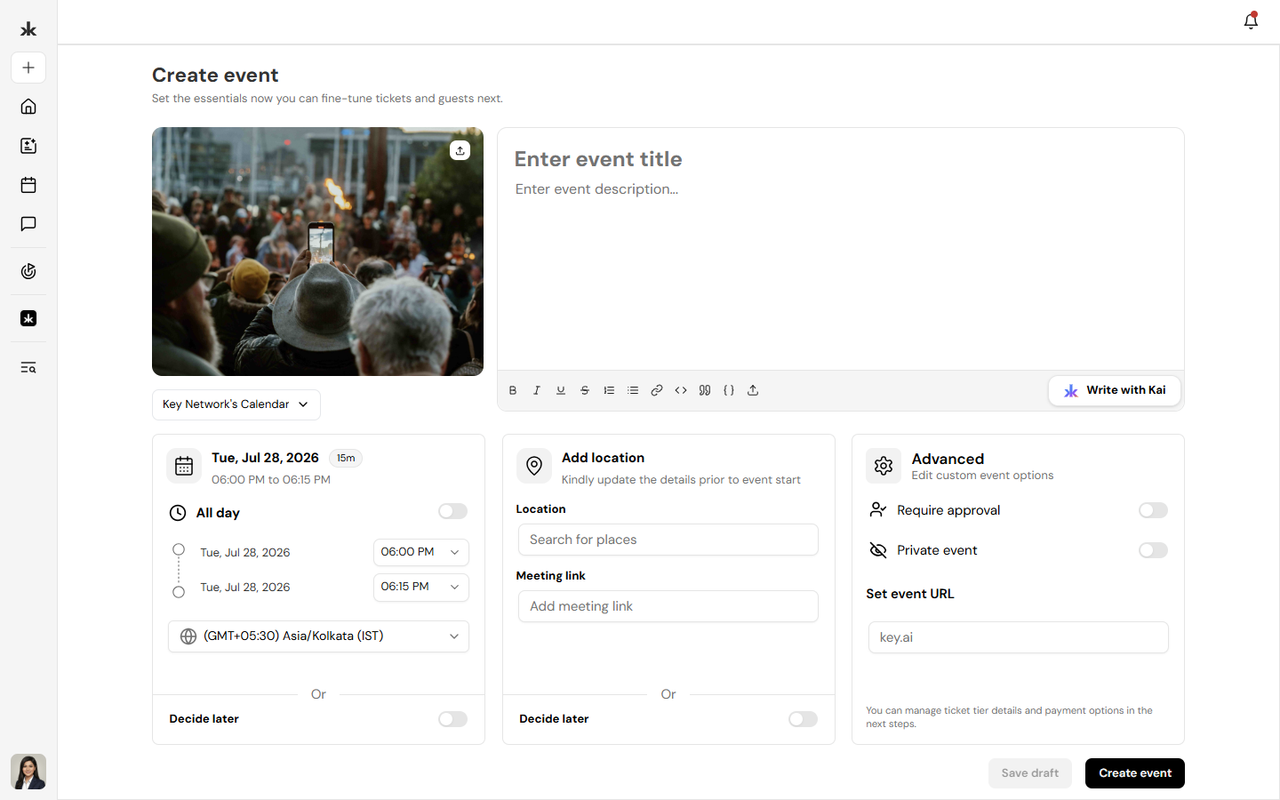
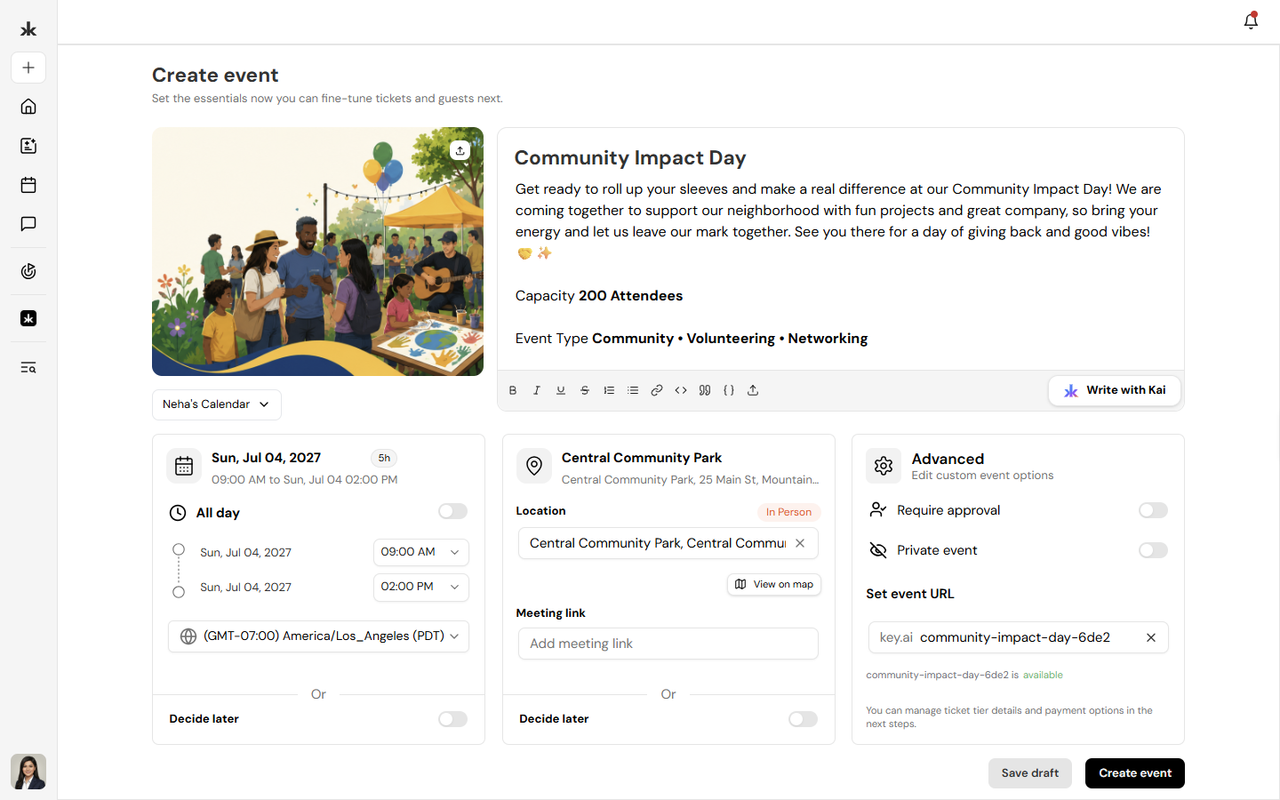
When creating an event, provide the required information, including:
- Event title
- Event description
- Event cover image (optional)
- Calendar where the event will be published
- Date and time
- Time zone
- Location or meeting link
- Custom event URL (optional)
You can use Write with Kai to generate or refine the event description before creating the event. If certain information is not yet finalized, you can use the Decide Later option for the event schedule and/or location. This allows you to create the event first and update those details later.
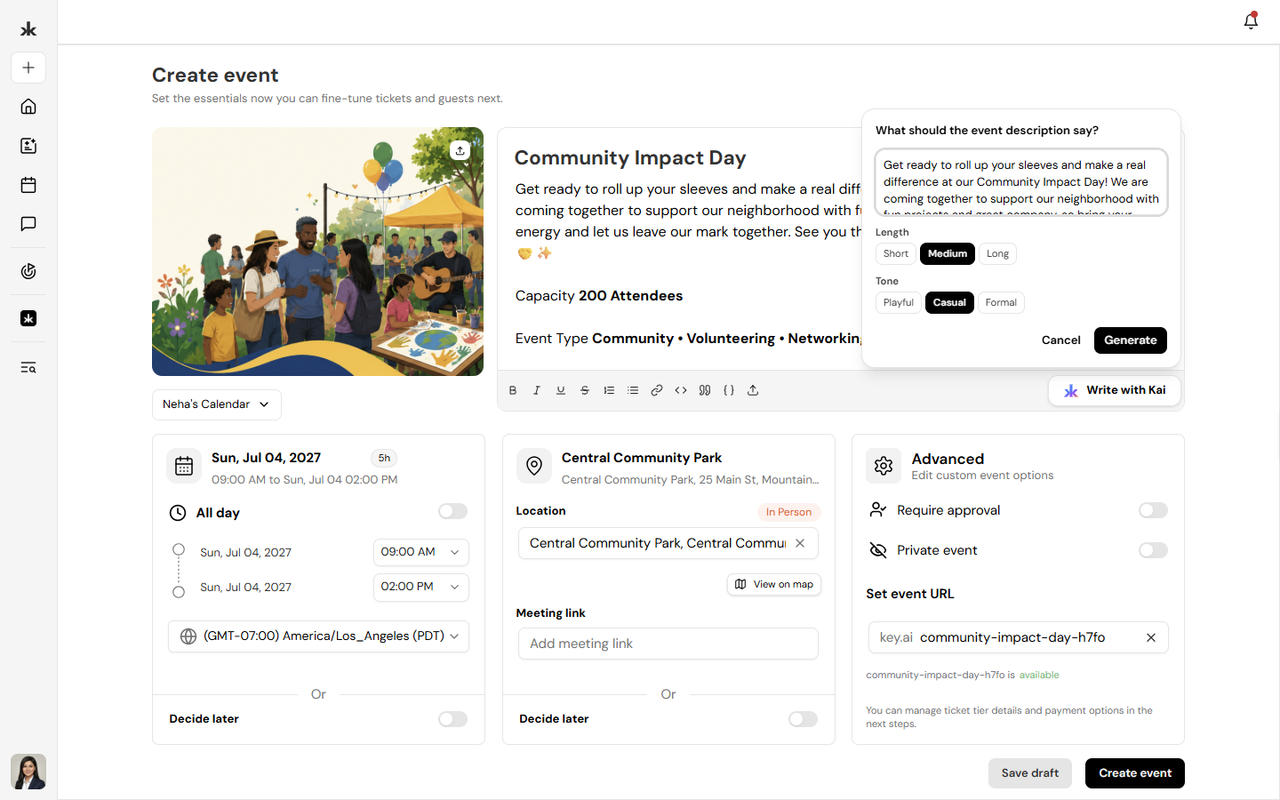
Use Kai to Write the Event Description
While creating an event, you can use Write with Kai to generate or improve the event description. Provide a prompt or brief details about your event, and Kai will generate a well-structured description that you can review and edit before saving.
Using Kai can help you:
- Generate event descriptions faster.
- Improve clarity and readability.
- Save time when creating events.
Configure Advanced Settings
The Advanced section allows you to configure additional event options, including:
- Require Approval - Require attendees to be approved before joining the event.
- Private Event - Restrict the event so only invited or authorized participants can access it.
- Custom Event URL - Create a custom URL for easier sharing.
These settings can be updated later if needed.
Configure Registration
Depending on your event requirements, you can configure registration settings such as:
- Registration availability
- Capacity limits (if applicable)
- Registration questions
- Attendance requirements
Event registration questions are configured separately from community onboarding questions.
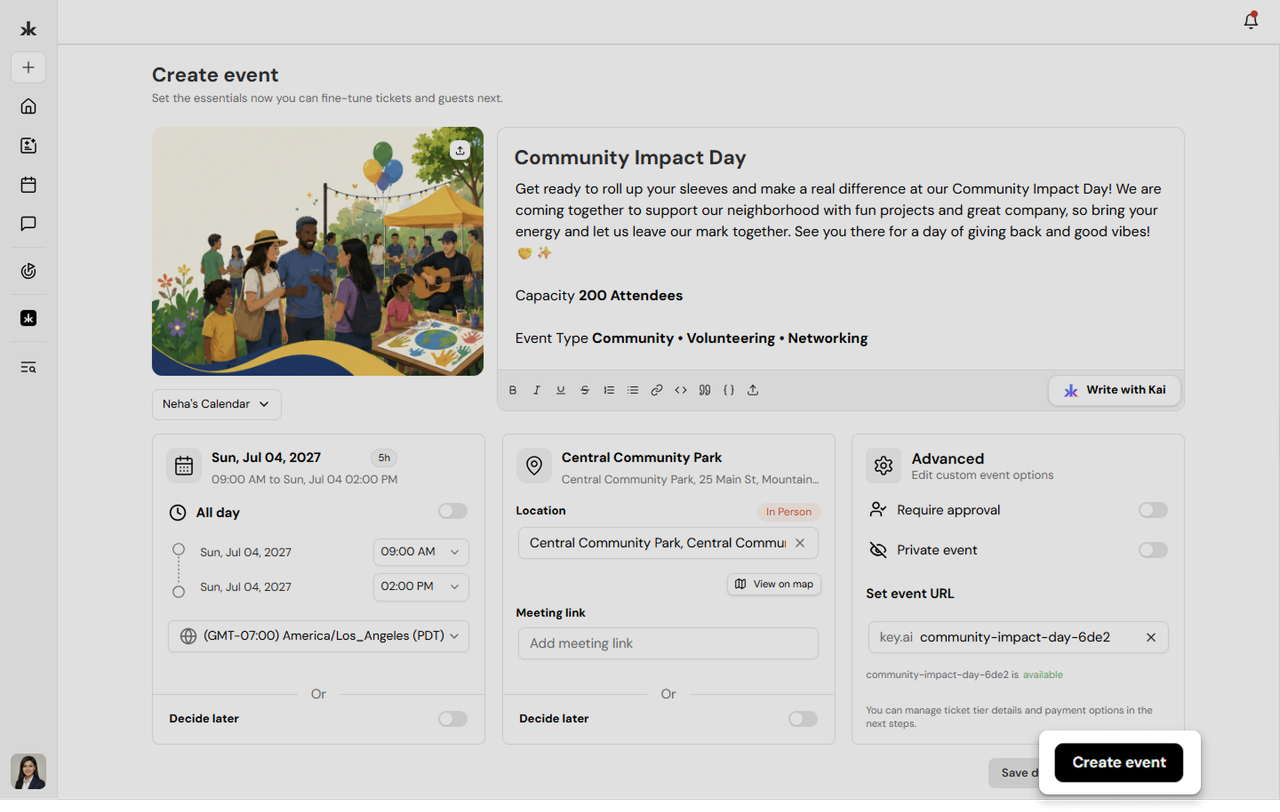
Create or Submit an Event
After reviewing your event details:
- Verify that all information is accurate.
- Click Create Event.
Depending on your permissions:
- If you have permission to publish events to the selected community calendar, the event is published immediately.
- If you do not have publishing permission, the event is submitted for approval. A Community Admin or Calendar Admin must approve it before it appears on the community calendar.
Once approved, the event becomes visible according to its visibility settings.
Edit an Event
Users with permission to manage an event can update its details after it has been created.
You can modify information such as:
- Event title
- Cover image
- Date and time
- Time zone
- Location or meeting link
- Registration settings
- Advanced settings
Changes are reflected once the event is updated.
Best Practices
- Choose a clear and descriptive event title.
- Add a detailed event description to help attendees understand the event.
- Use Write with Kai to create professional event descriptions quickly.
- Verify the date, time, and time zone before publishing.
- Add an accurate location or meeting link whenever possible.
- Use the Decide Later option if event details are still being finalized.
- Review the advanced settings before creating the event.
- Update attendees if important event details change after publication.
Frequently Asked Questions
Who can create an event?
All users can create events on Key AI.
Who can publish an event to a community calendar?
Community Admins and Calendar Admins can publish events directly. Other users can submit events for approval.
Can I use AI to create an event?
There is no AI event creation option. However, you can use Write with Kai to generate or improve the event description while creating the event.
Can I create an event if I don't know the date or location yet?
Yes. You can use the Decide Later option for the event schedule and/or location, then update those details before the event takes place.
Can I edit an event after creating it?
Yes. Users with the appropriate permissions can update event details after the event has been created. Are event registration questions the same as community registration questions? No. Event registration questions are managed separately from community onboarding questions.
- Advanced Settings
- Registration Settings
- Create Event
- Edit Event
Event Tickets↗
Overview
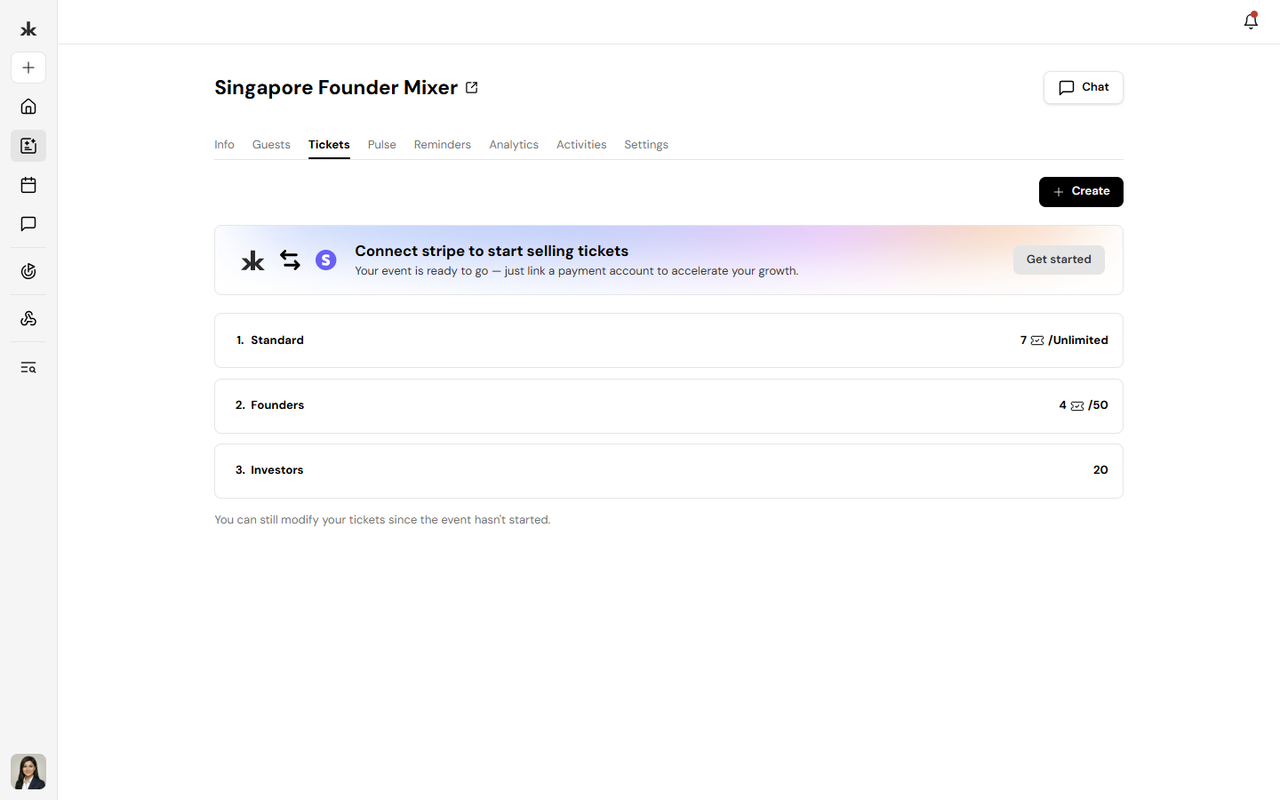
The Tickets section allows event organizers to configure how attendees register for an event. You can create one or more ticket types, define ticket capacity, control ticket visibility, and manage ticket settings before the event begins. For paid events, you can connect a Stripe account to accept online payments.
Access the Tickets Section
To manage tickets for an event:
- Open the event you want to manage.
- Navigate to the Tickets tab.
- Create a new ticket or edit an existing ticket.
Create or Edit a Ticket
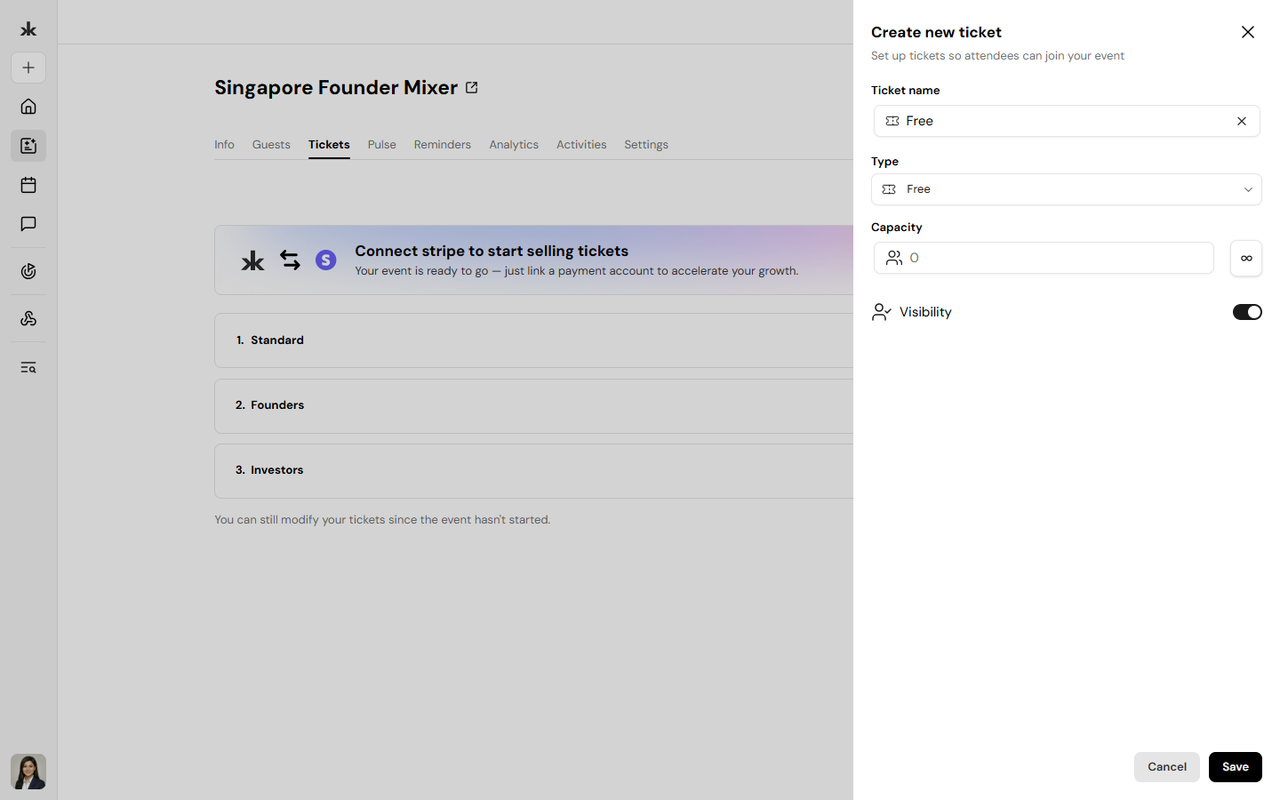
When creating or editing a ticket, configure the following information.
Ticket Name
Provide a descriptive name for the ticket, such as:
- Standard
- VIP
- Early Bird
- Student
The ticket name is displayed to attendees during registration.
Ticket Type
Select the ticket type for your event.
Depending on your event, you can configure:
- Free tickets for events that do not require payment.
- Paid tickets after connecting a Stripe account.
Ticket Capacity
Define how many attendees can register using the ticket.
You can:
- Set a specific attendee limit.
- Select Unlimited to allow unlimited registrations.
Once the ticket reaches its capacity, attendees can no longer register using that ticket unless the capacity is increased.
Ticket Visibility
Control whether the ticket is available during registration.
- Visible - Attendees can view and register using the ticket.
- Hidden - The ticket is not displayed during registration until visibility is enabled.
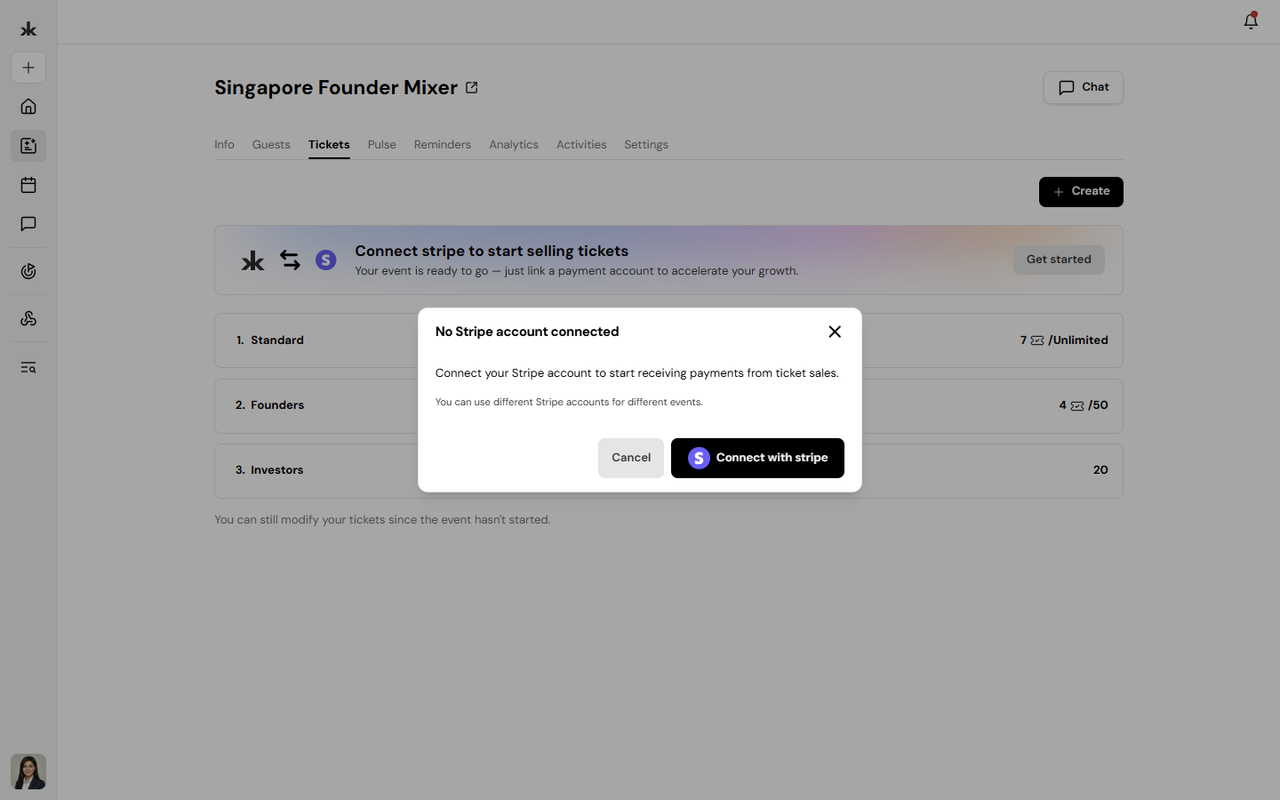
Connect Stripe for Paid Tickets
To sell paid tickets, connect your Stripe account from the Tickets page. Once connected, you can configure paid ticket types and accept payments securely through Stripe.
Save Ticket Changes
After configuring the ticket:
- Review the ticket details.
- Click Save.
If the event has not started, you can continue updating ticket settings as needed.
Edit Ticket Restrictions
Tickets can be edited before the event begins. However, once attendees have purchased tickets, certain fields become restricted.
You can continue to:
- Edit the ticket name.
- Update ticket visibility.
- Increase the ticket capacity.
The following restrictions apply after tickets have been purchased:
- The ticket price cannot be changed.
- The ticket capacity cannot be reduced below the number of tickets already sold.
- The ticket capacity can be increased at any time to accommodate additional attendees.
These restrictions help protect existing registrations and ensure a consistent experience for attendees.
Best Practices
- Use clear and descriptive ticket names.
- Set an appropriate capacity based on your event size.
- Use Unlimited only when there is no attendance limit.
- Hide tickets that should not yet be available for registration.
- Connect Stripe before creating paid tickets.
- Review ticket settings before publishing your event.
Frequently Asked Questions
Can I create multiple ticket types?
Yes. You can create multiple ticket types for a single event.
Can I limit the number of registrations?
Yes. You can define a maximum capacity or select Unlimited.
Can I edit a ticket after attendees have purchased it?
Yes, but some restrictions apply. Once tickets have been purchased:
- The ticket price cannot be changed.
- The ticket capacity cannot be reduced below the number of tickets already sold.
- The ticket capacity can be increased.
- Other editable fields, such as the ticket name and visibility, can still be updated.
Can I sell paid tickets?
Yes. Paid tickets can be configured after connecting a Stripe account.
Can I hide a ticket without deleting it?
Yes. You can hide a ticket by disabling its visibility. Hidden tickets are not shown to attendees during registration.
Guest Check-in↗
The Guest Check-in feature allows event organizers to mark attendees as present during an event. From a single check-in interface, organizers can search for guests, scan QR codes, or manually add and check in walk-in attendees.
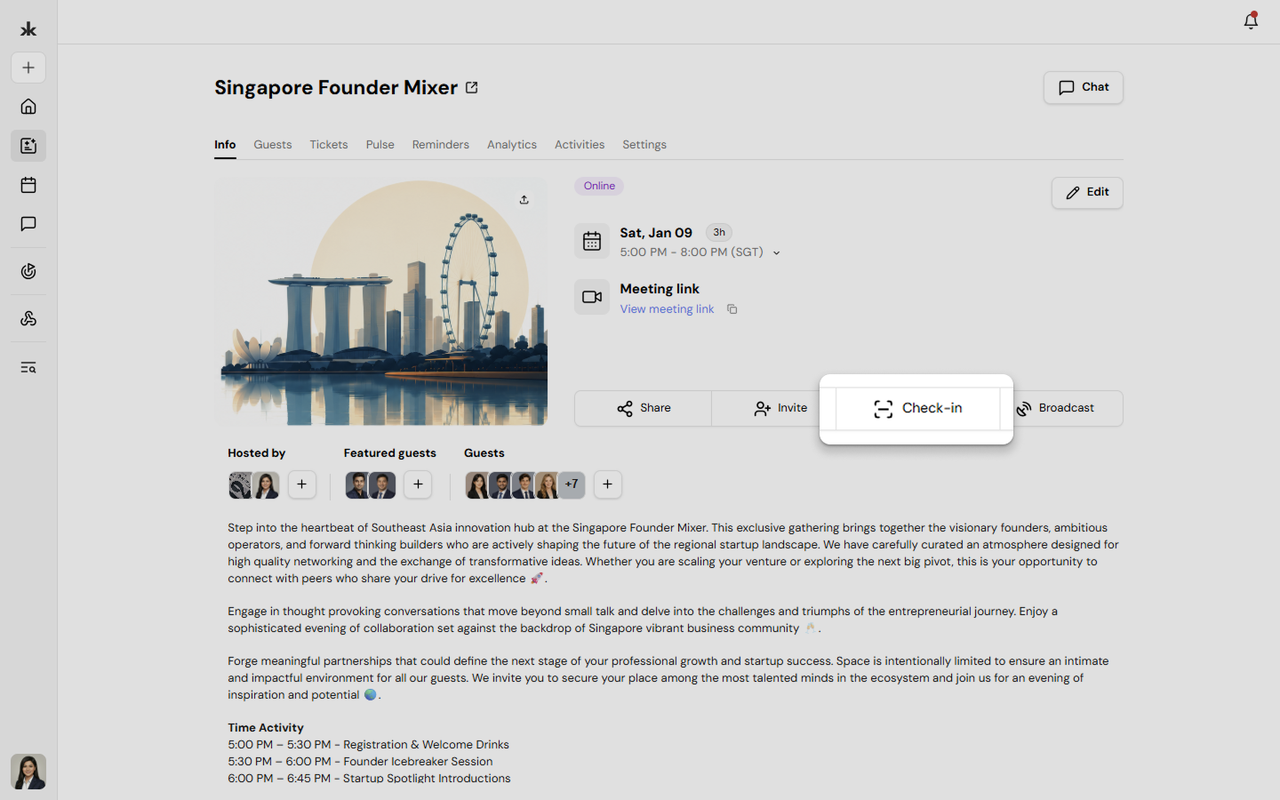
Open the Guest Check-in Window
- Open the event.
- Go to the Info tab.
- Click Check-in.
This opens the Guest Check-in window with three tabs:
- Guest List
- Scan QR Code
- Manual Check-in
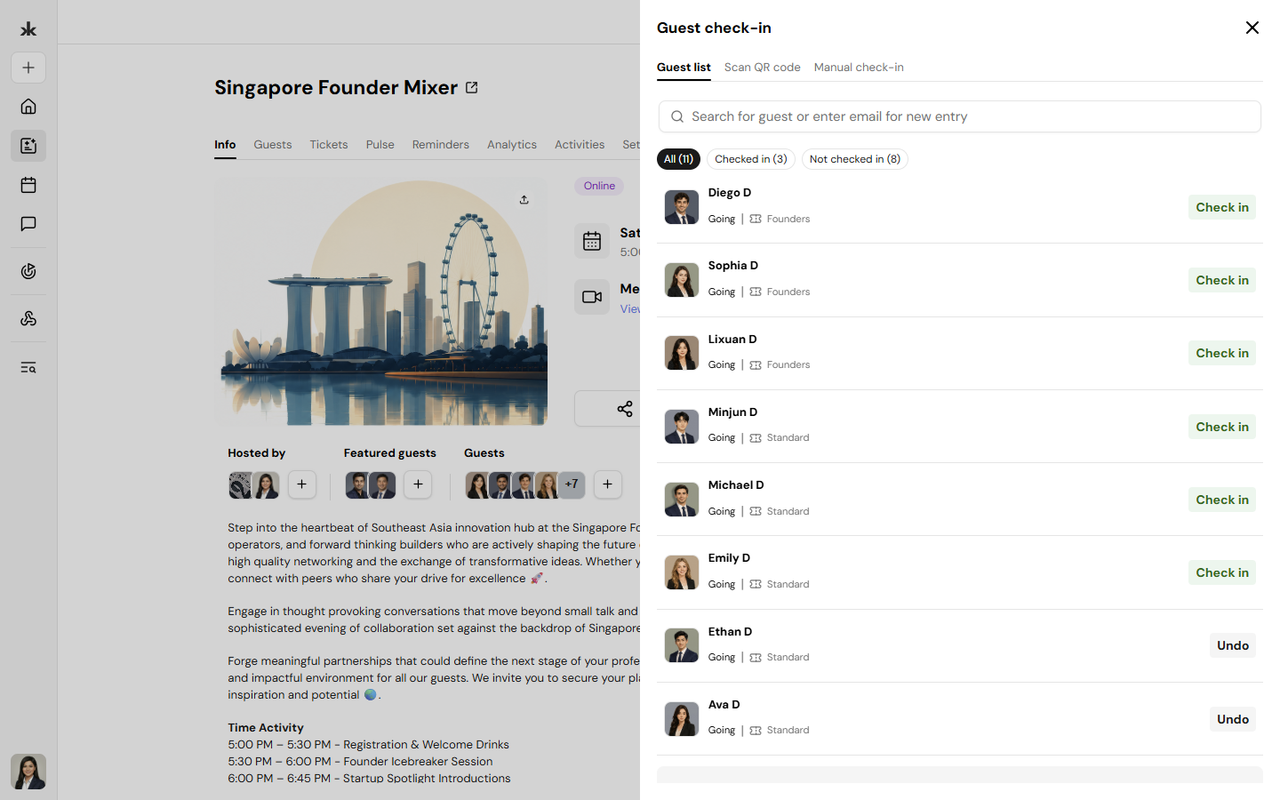
Guest List
The Guest List tab lets organizers view and search registered attendees before checking them in.
You can:
- Search guests by name or email.
- Filter guests by:
- All
- Checked in
- Not checked in
- View each guest's RSVP status and assigned ticket.
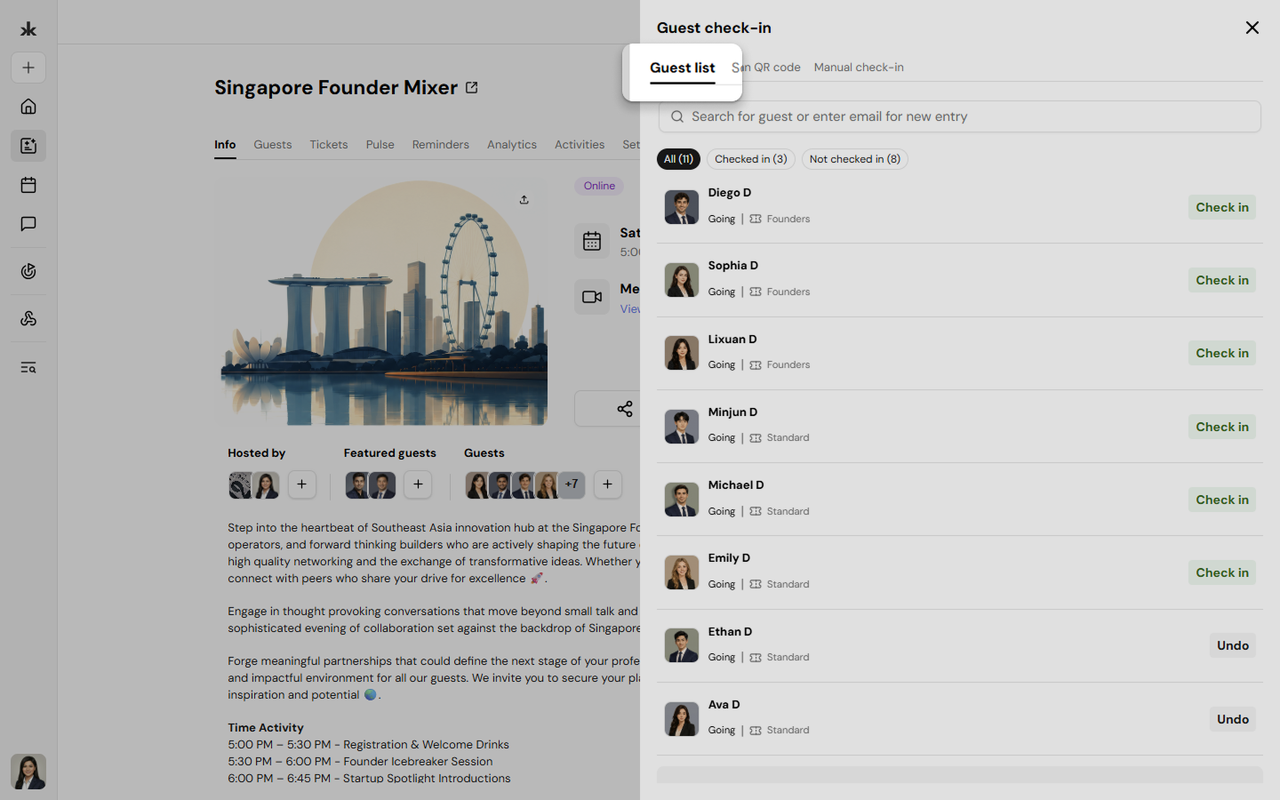
Scan QR Code
The Scan QR Code tab allows organizers to check in attendees by scanning the QR code on their event ticket.
To use QR check-in:
- Open the Scan QR Code tab.
- Allow camera access when prompted.
- Scan the attendee's QR code.
- The attendee is automatically checked in after a successful scan.
QR check-in provides a fast and accurate way to process attendees during event entry.
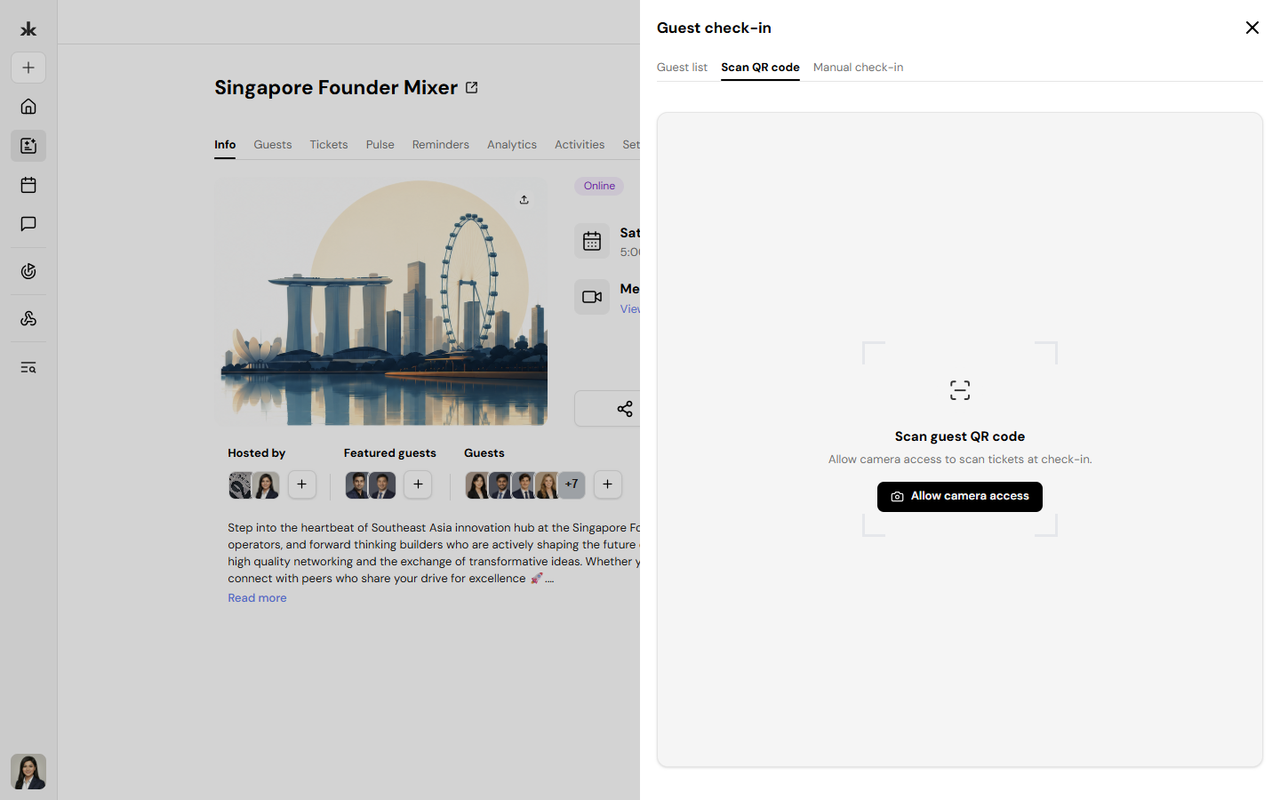
Manual Check-in
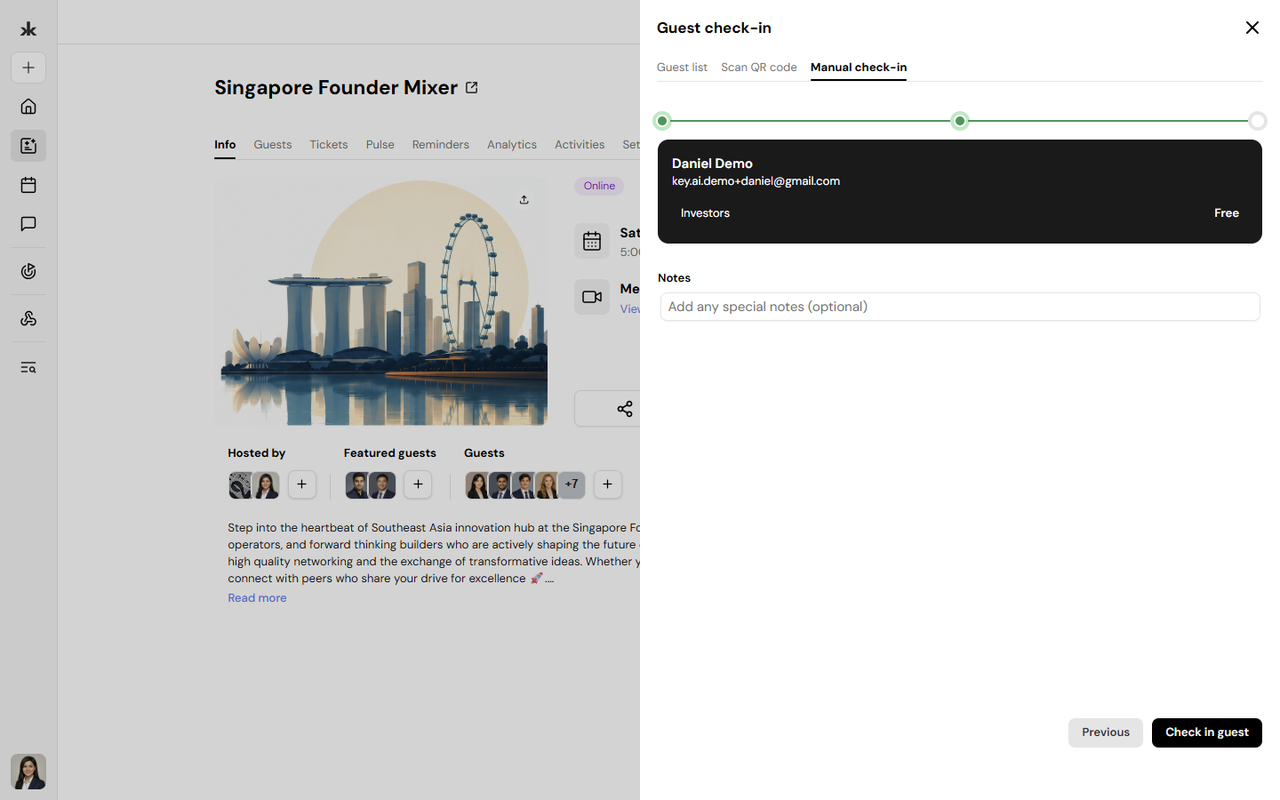
Manual Check-in is designed for walk-in attendees or situations where a guest does not have their QR code available.
To manually check in a guest:
- Open the Manual Check-in tab.
- Enter the guest's:
- First Name
- Last Name
- Email Address
- Click Continue to tickets.
- Select the appropriate ticket.
- Complete the check-in.
The guest is automatically added to the event guest list and marked as checked in.
Event Analytics↗
The Analytics tab provides insights into your event's performance, attendee engagement, email performance, and participation trends. These metrics help organizers measure the success of an event and understand attendee behavior.
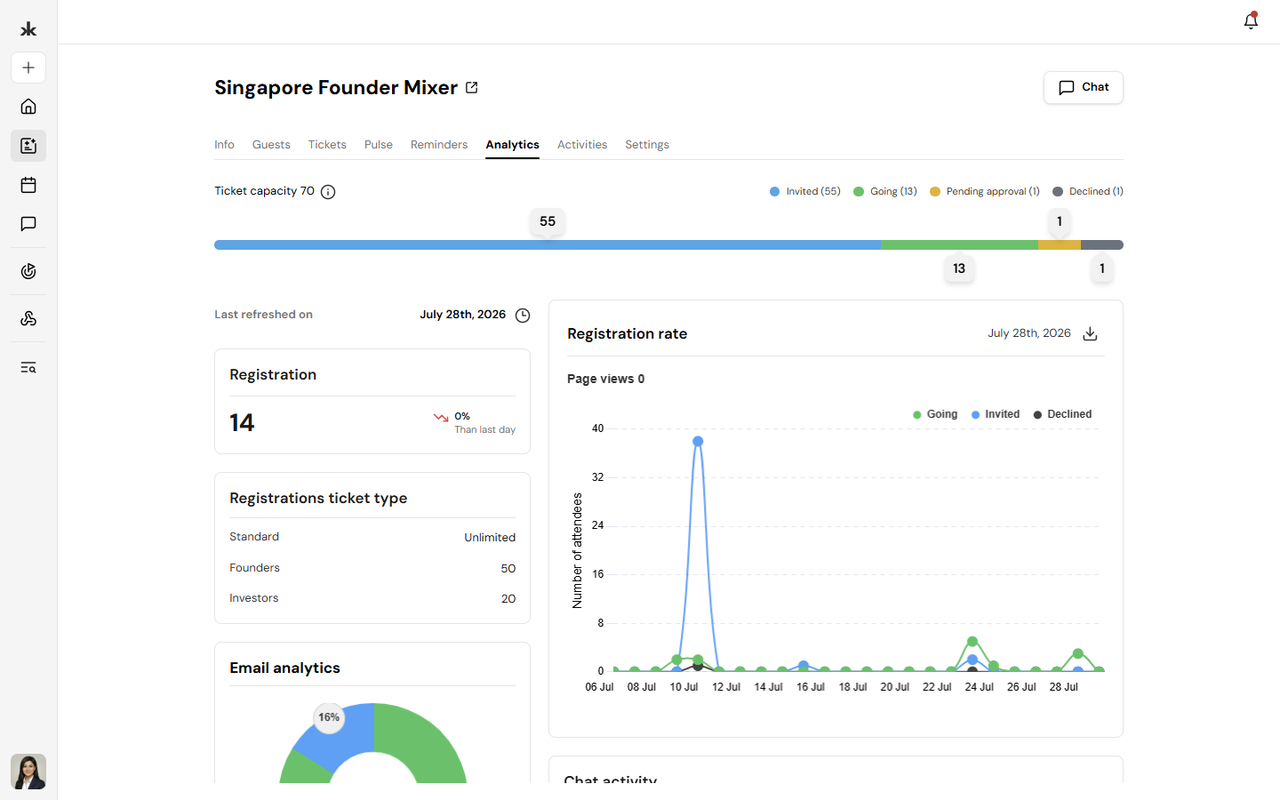
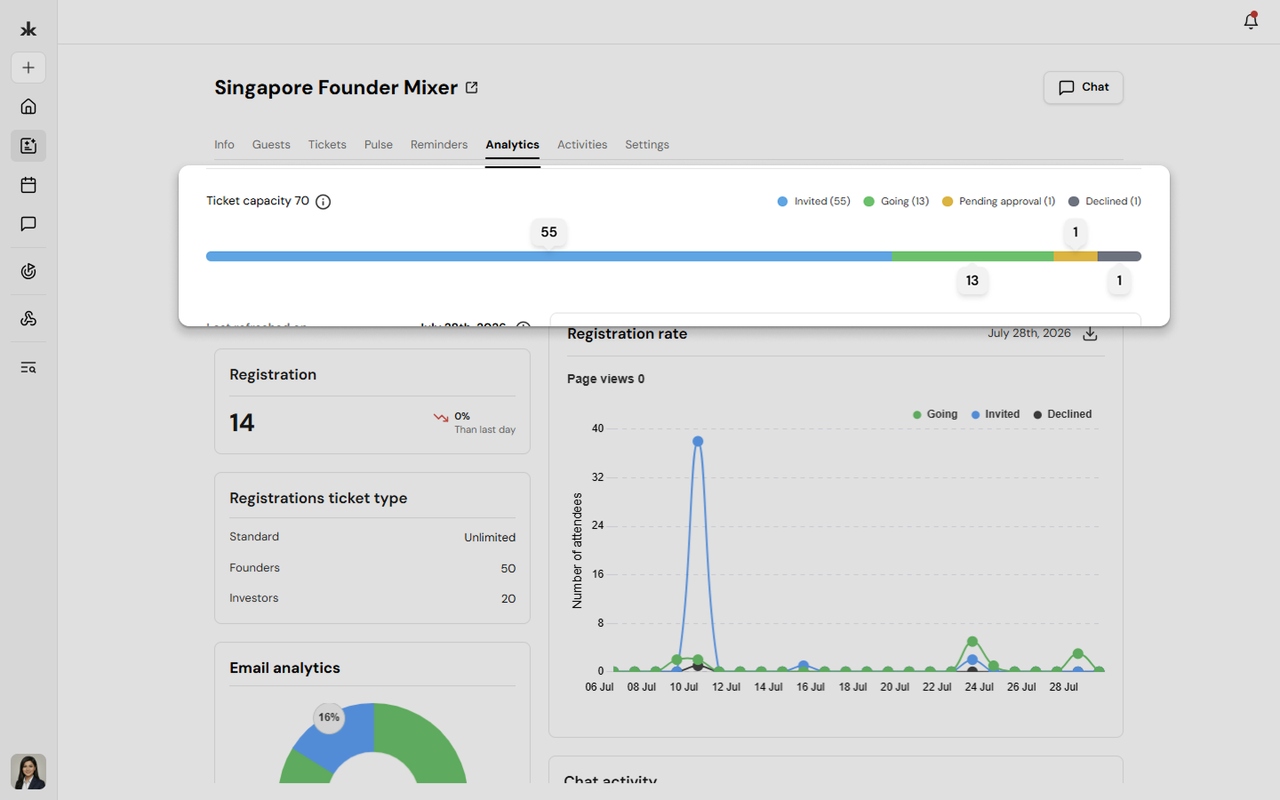
The Registration Summary provides a quick overview of your event registrations.
It includes:
- Total registrations for the event
- Registration trend
- Last refreshed date and time
This section helps organizers monitor registration growth at a glance.
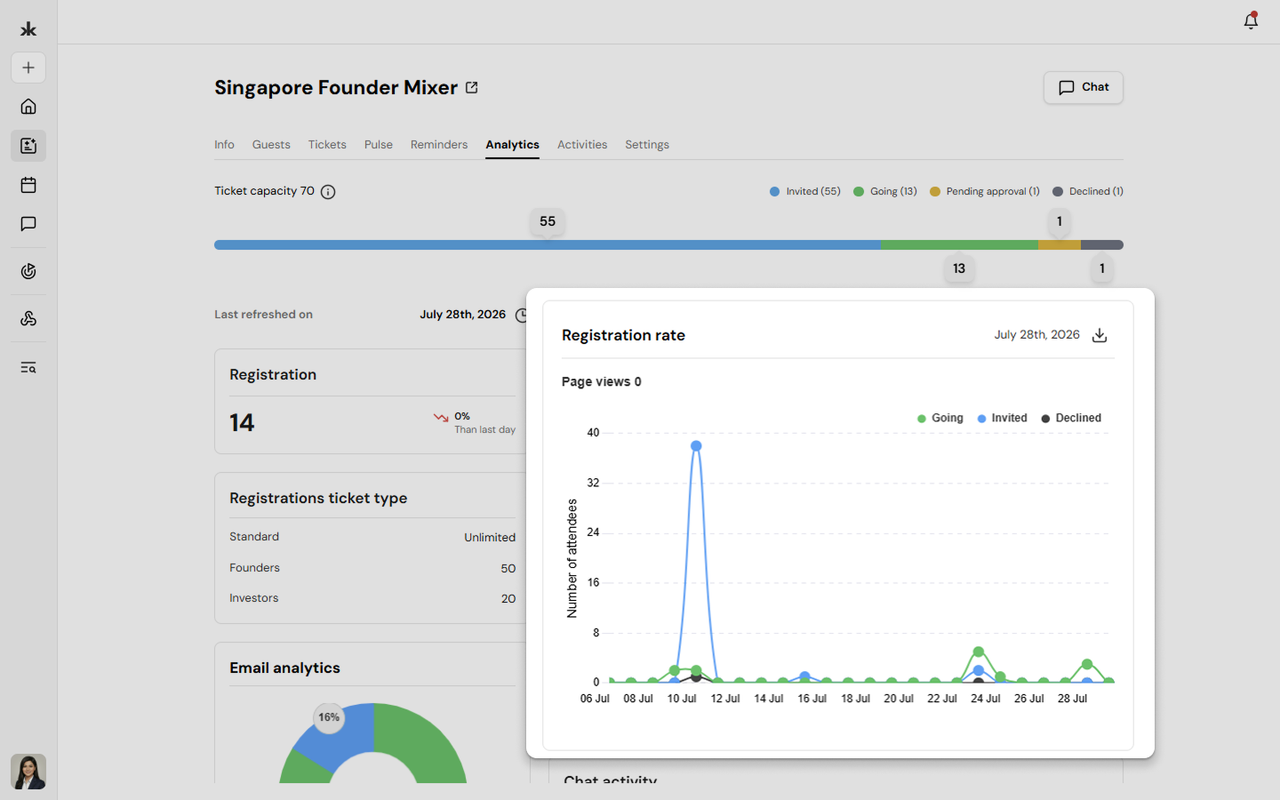
Registration Trends
The Registration Trends chart visualizes attendee responses over time, making it easy to identify registration patterns.
The chart displays attendee statuses such as:
- Going
- Invited
- Declined
This helps organizers understand how registrations are progressing throughout the event lifecycle.
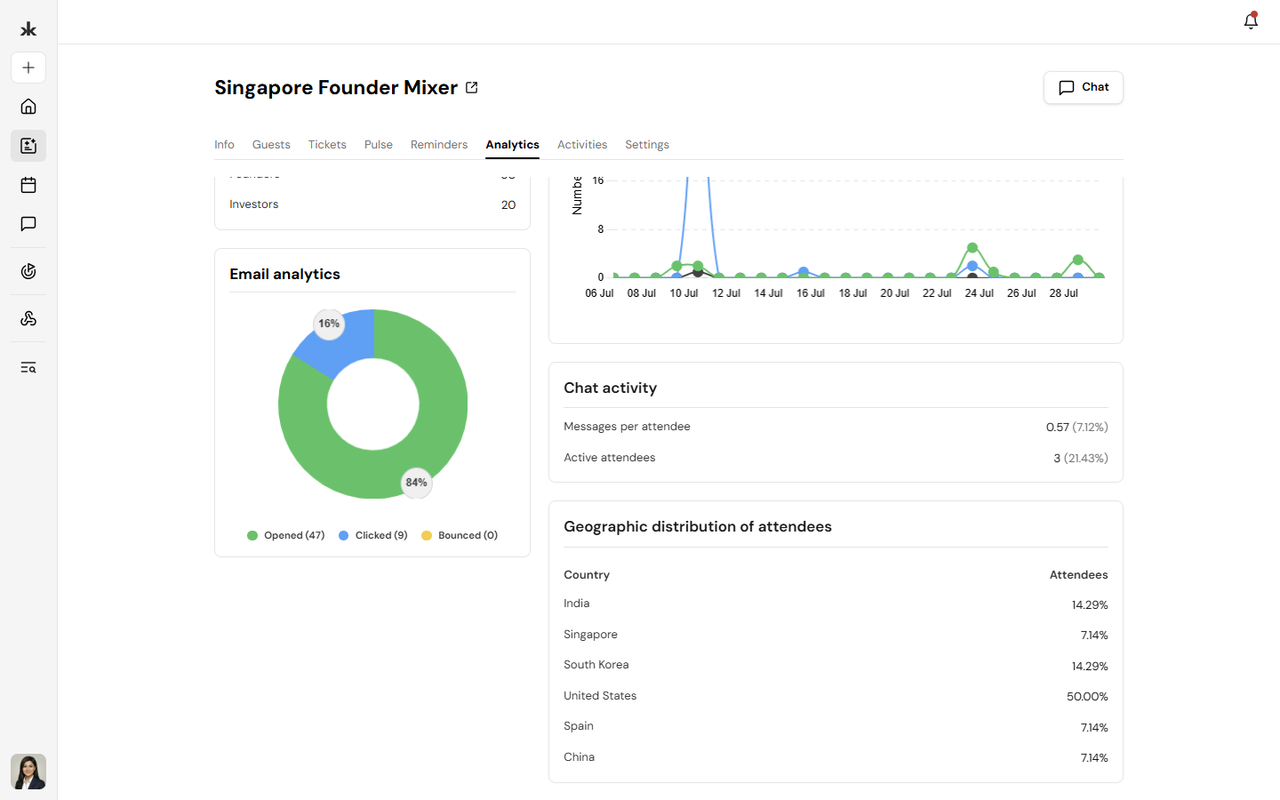
Email Analytics measures the performance of event emails sent to attendees.
Available metrics include:
- Opened - Number of recipients who opened the email
- Clicked - Number of recipients who clicked links within the email
- Bounced - Number of emails that could not be delivered
These metrics help evaluate the effectiveness of event communication.
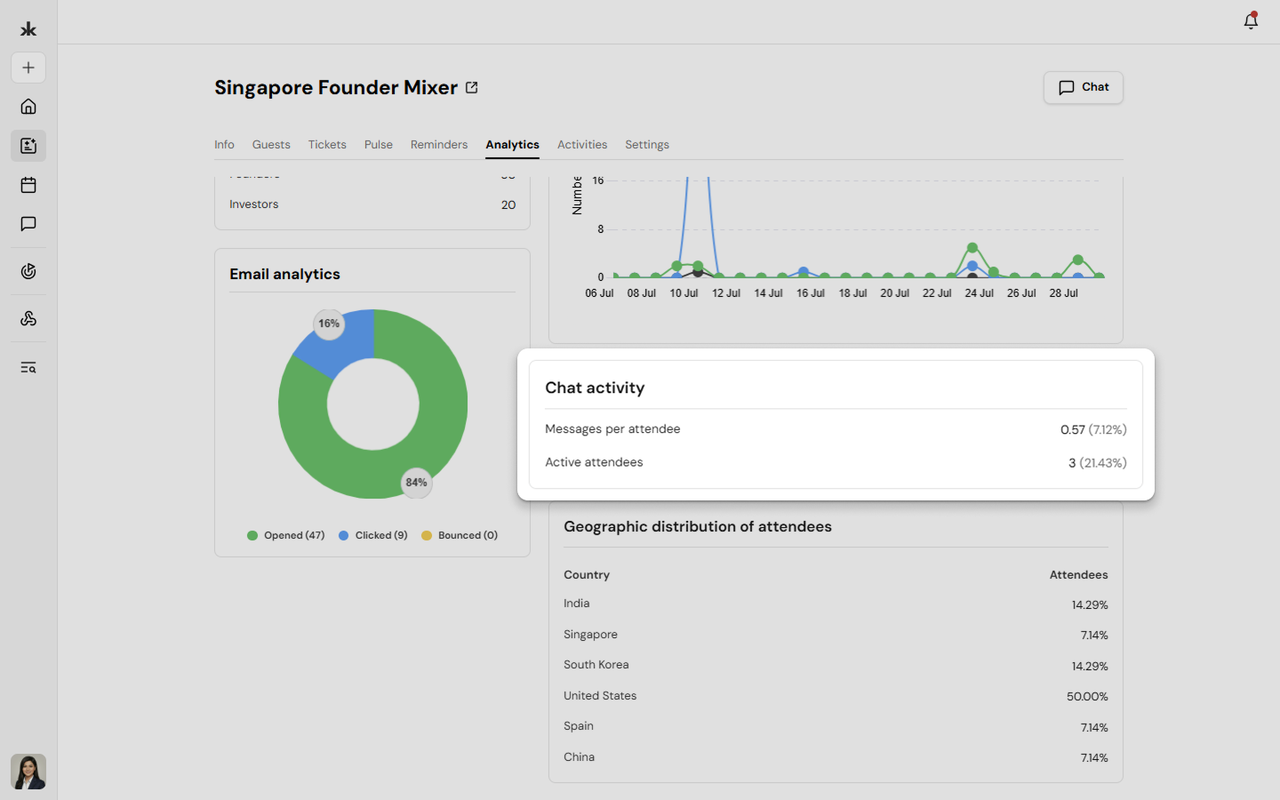
The Chat Activity section provides engagement metrics for event conversations.
Available metrics include:
- Messages per attendee - Average number of chat messages sent by each attendee
- Active attendees - Number and percentage of attendees who participated in chat
These insights help organizers understand attendee interaction during the event.
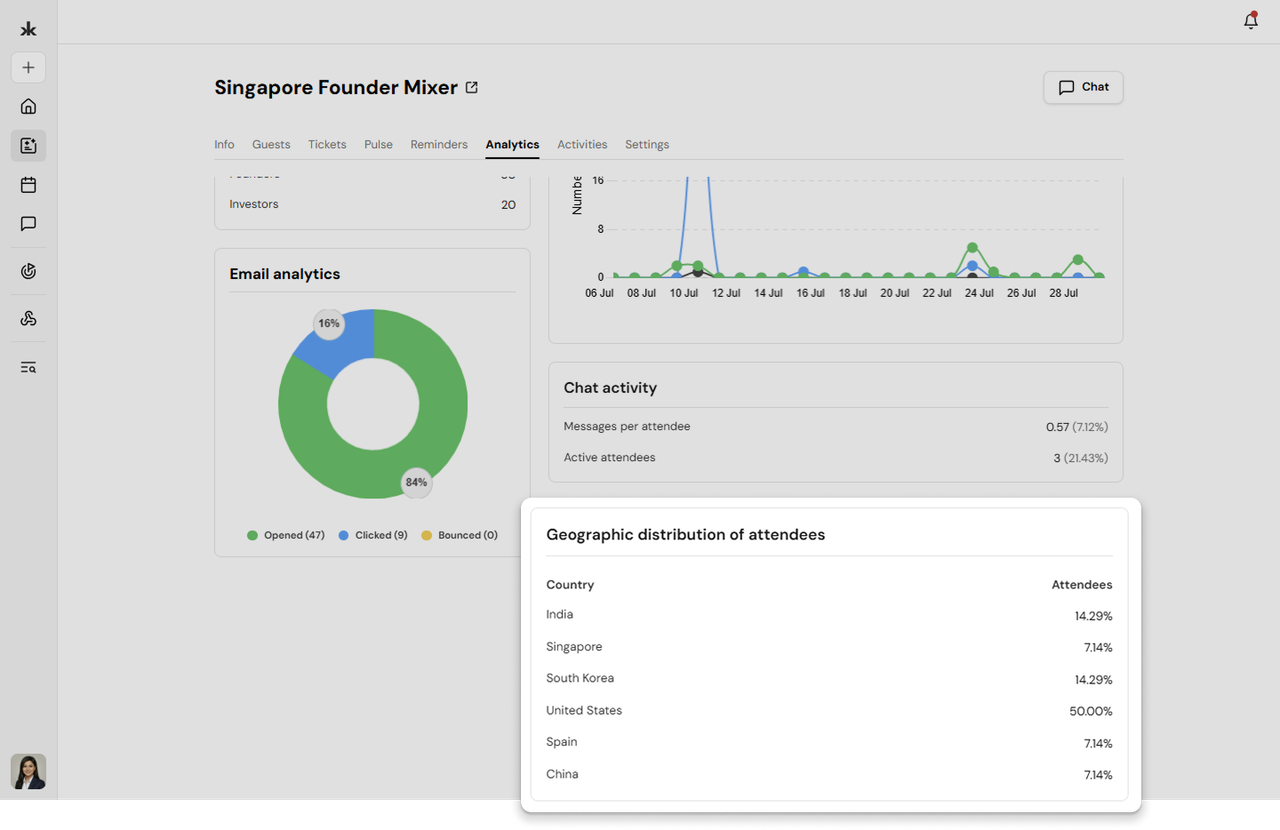
Geographic Distribution of Attendees
This section displays where your attendees are located based on their registered country.
It provides:
- Country names
- Percentage of attendees from each country
This information helps organizers understand the geographic reach of their event.
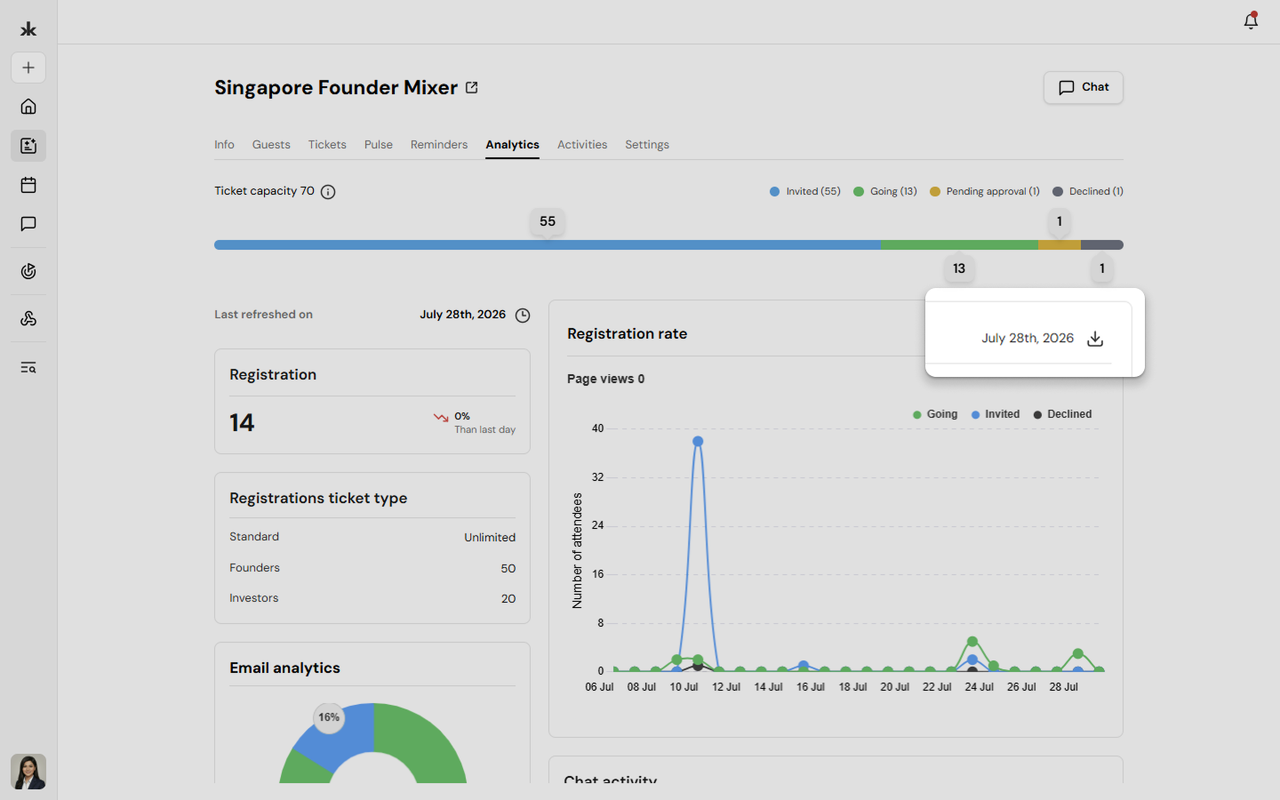
Export Analytics
Registration rate has an Export option, allowing organizers to download available analytics data for reporting or further analysis. Export availability may vary depending on the type of analytics being viewed.
Event Activities↗
The Activities tab provides a timeline of actions performed for the event. It helps organizers track important event-related activities in chronological order. The timeline serves as an audit log, making it easy to review changes and monitor event updates.
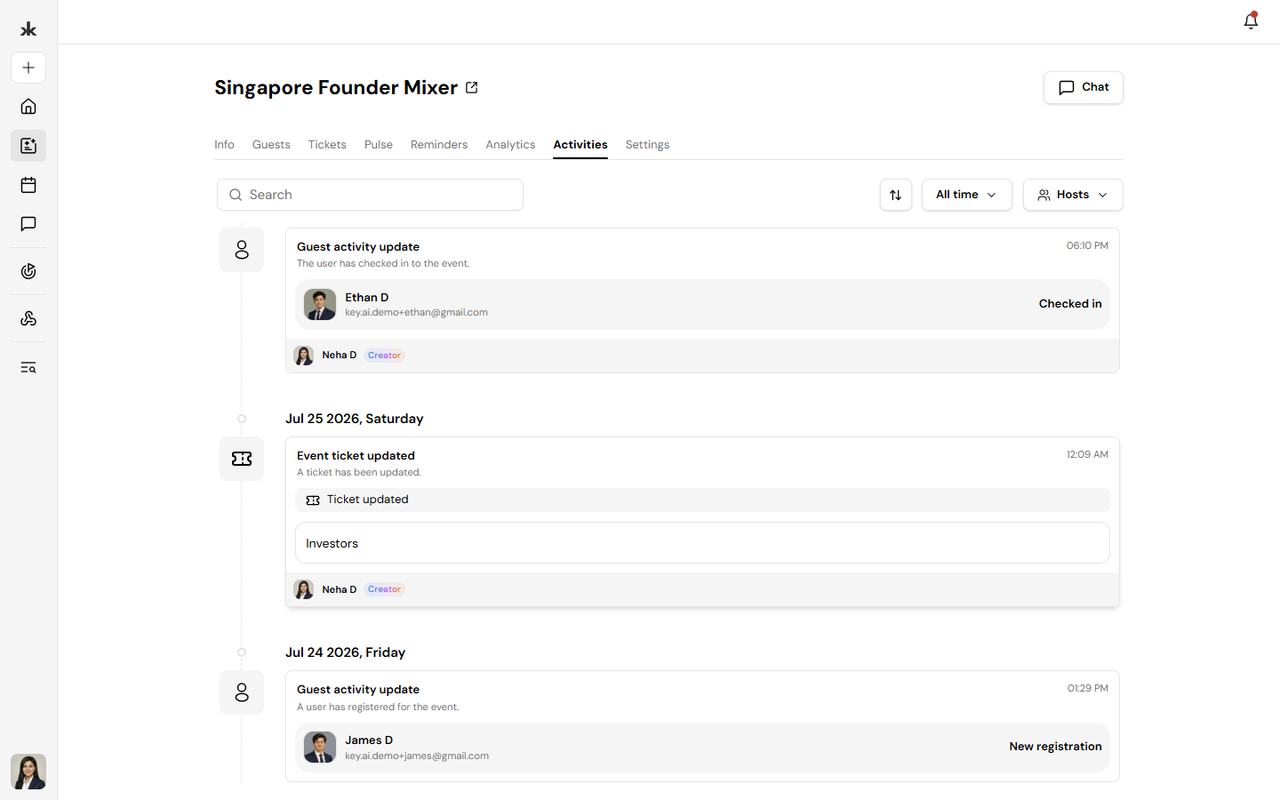
Viewing Event Activities
Open the Activities tab from the event page to view the complete activity history. Activities are displayed in chronological order, with the most recent actions appearing first. Depending on the actions performed, the timeline may include entries such as:
- Event created
- Event updated
- Guest invited
- Guest registered
- Guest checked in
- Reminder sent
- Broadcast sent
- Ticket purchased
- Ticket canceled
- Registration approved (when approval is enabled)
The exact activities shown depend on the actions performed for that event.
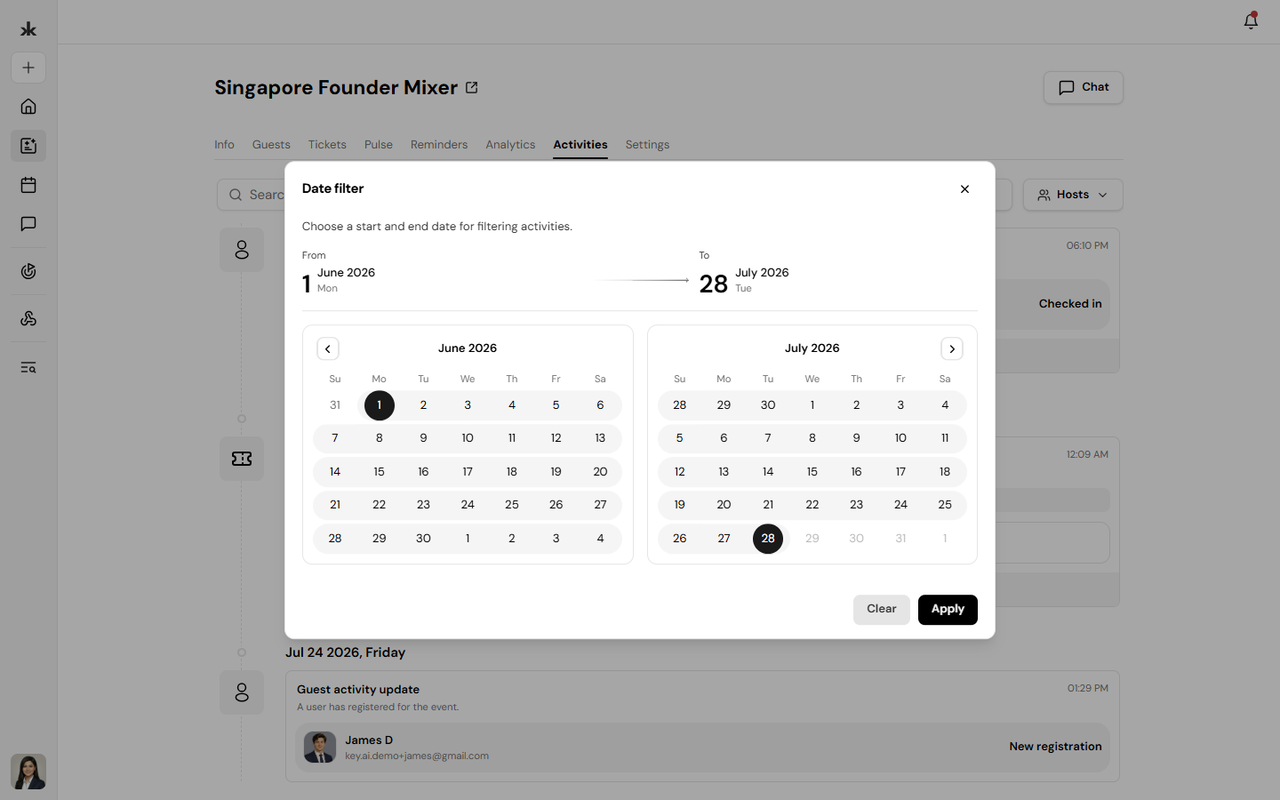
Activity Details
Each activity entry includes relevant information to help identify what happened.
Depending on the activity, entries may display:
- Activity type
- User who performed the action
- Guest involved
- Date and time of the activity
This makes it easier to audit changes and review the event history.
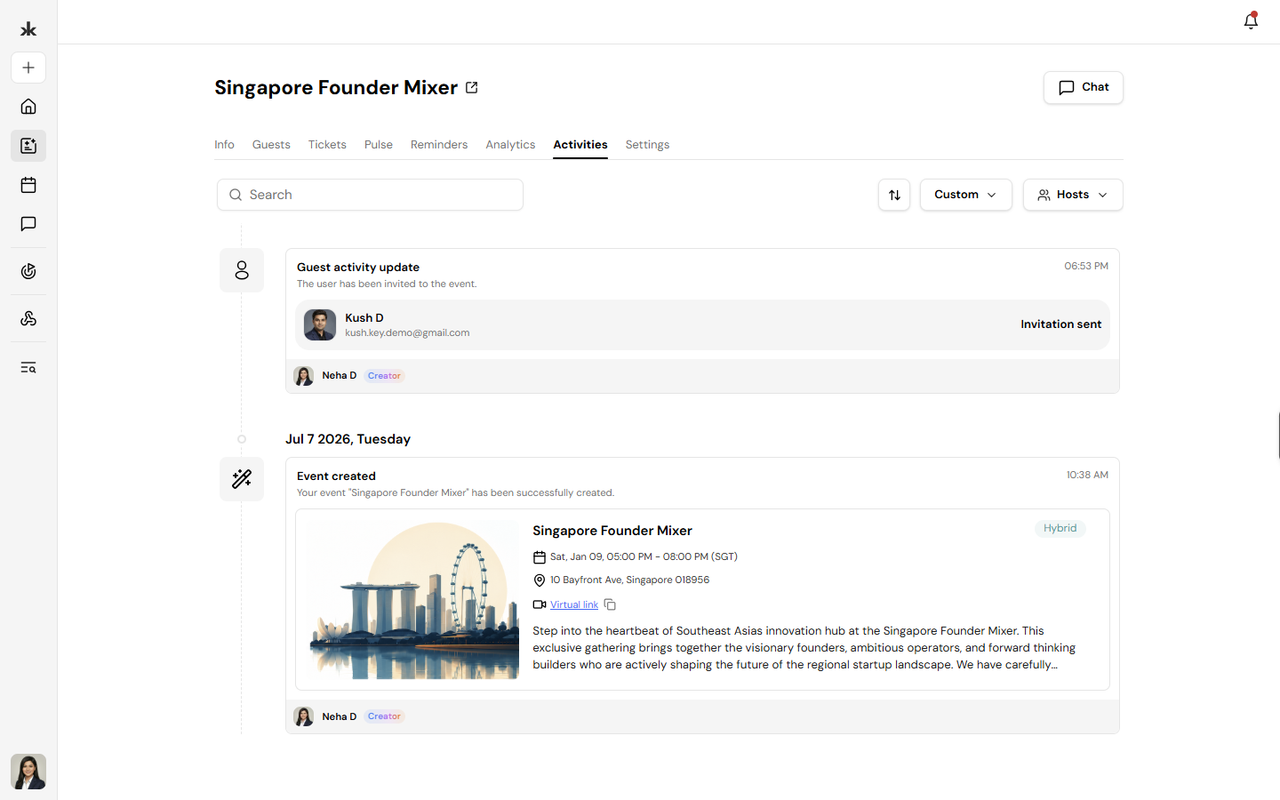
Why Use the Activities Tab?
The Activities tab helps organizers:
- Track changes made to an event
- Review guest-related actions
- Monitor communication history
- Audit important event updates
- Maintain visibility into event management
It serves as a centralized history of event activity throughout the event lifecycle.
Event Settings↗
The Settings tab allows event organizers to manage registration controls, privacy settings, event visibility, event embedding, event URL, and lifecycle actions such as duplicating or deleting an event.
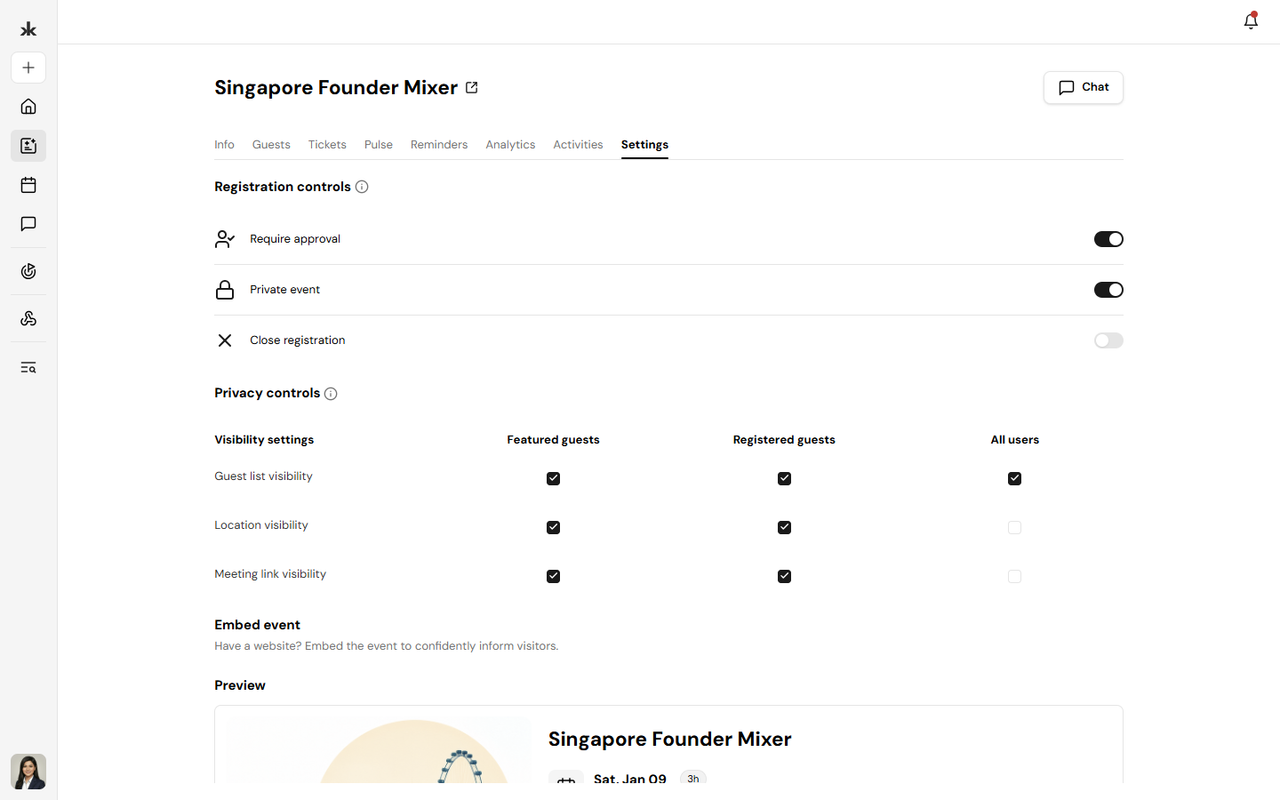
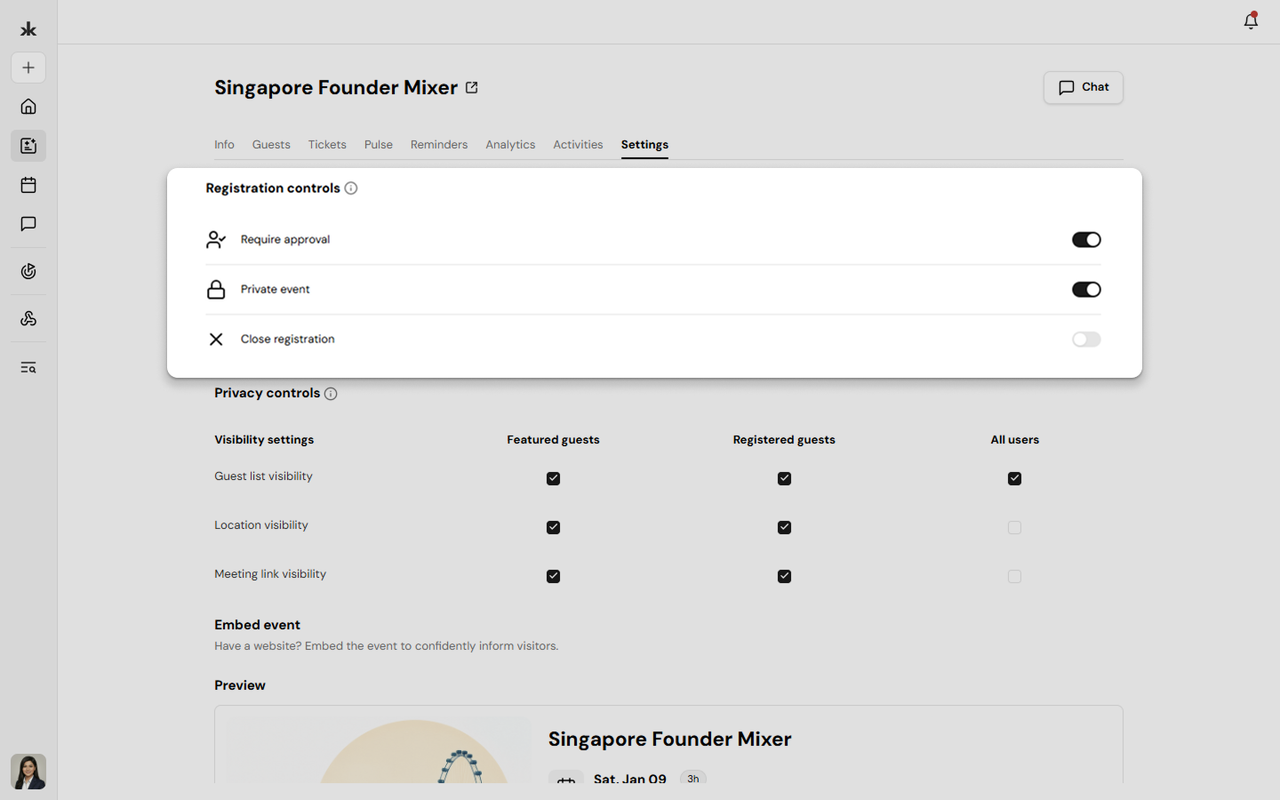
Registration controls determine how attendees can register for your event.
Available options include:
- Require approval - Enable this option to manually approve attendee registrations before they are confirmed.
- Private event - Restrict event access so only users with the event link or invitation can register.
- Close registration - Prevent any new registrations while keeping the event visible.
Changes take effect immediately after they are saved.
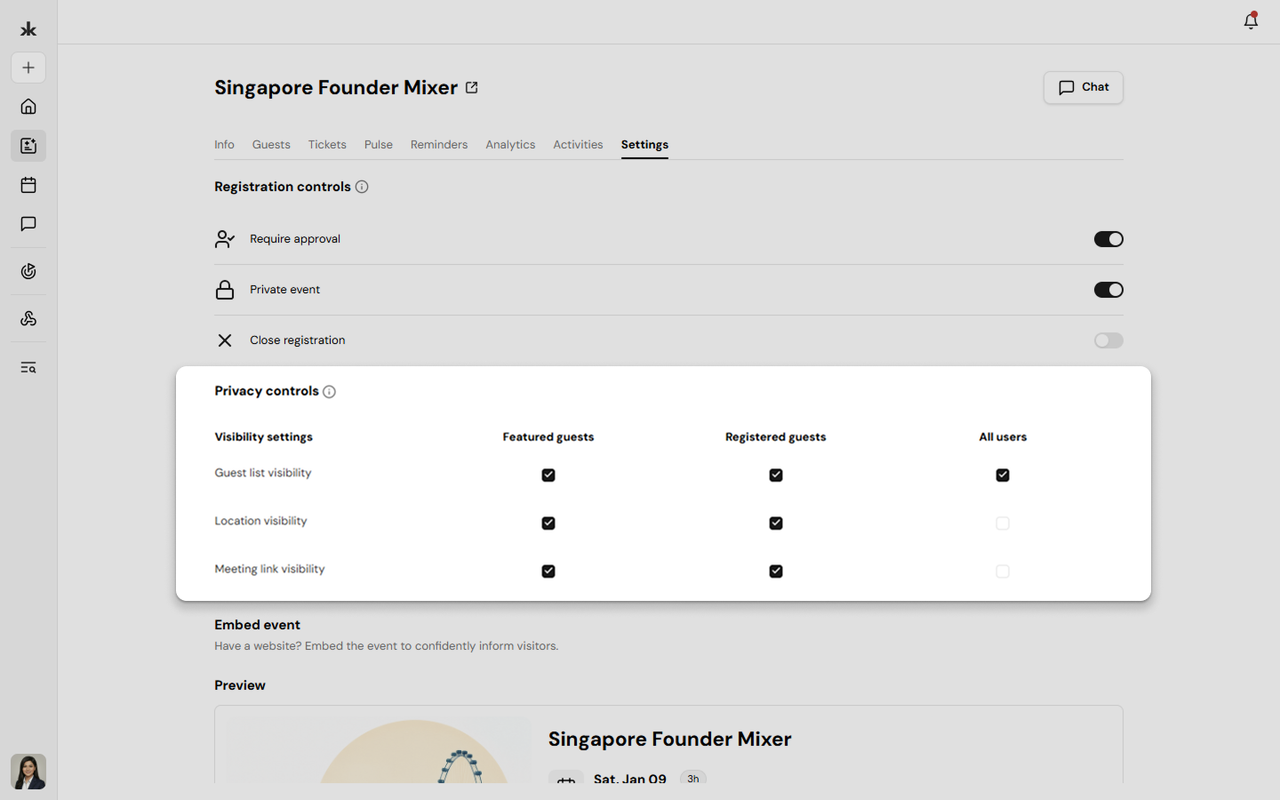
Privacy controls allow you to choose who can view specific event information. For each of the following items, visibility can be configured separately for:
- Featured Guests
- Registered Guests
- All Users
Available visibility settings include:
- Guest list visibility
- Location visibility
- Meeting link visibility
This allows organizers to share sensitive event information only with the intended audience.
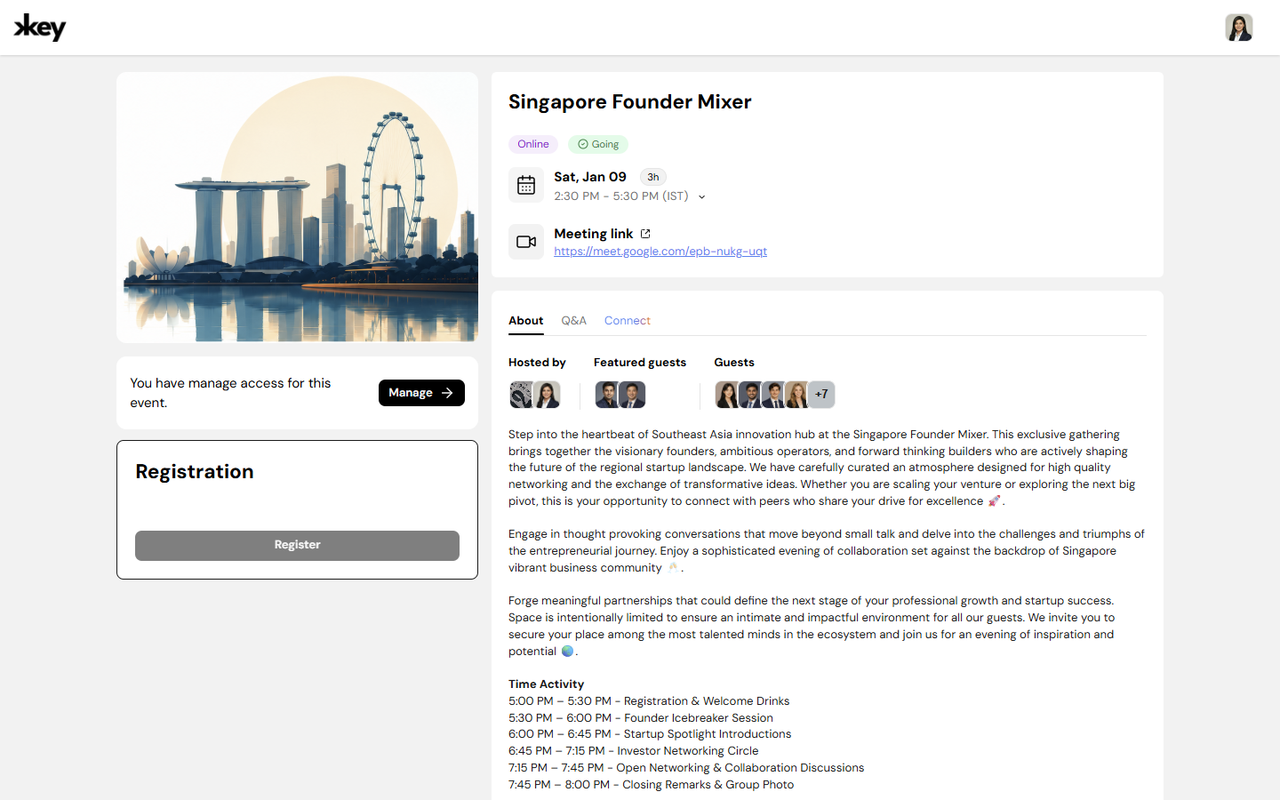
The Preview section displays how your event registration page appears to attendees.
From the preview, you can:
- Review how the event page will appear before sharing it.
- Open the full event page in a browser.
- Verify that event information is displayed correctly.
Embed Event on Your Website
The Embed Code section allows you to embed your event registration page on an external website.
To embed your event:
- Scroll to the Embed Code section in the Event Settings tab.
- Click Copy to copy the generated embed code.
- Paste the code into your website where you want the event registration widget to appear.
You can modify the width and height values in the embed code to fit your website's layout.
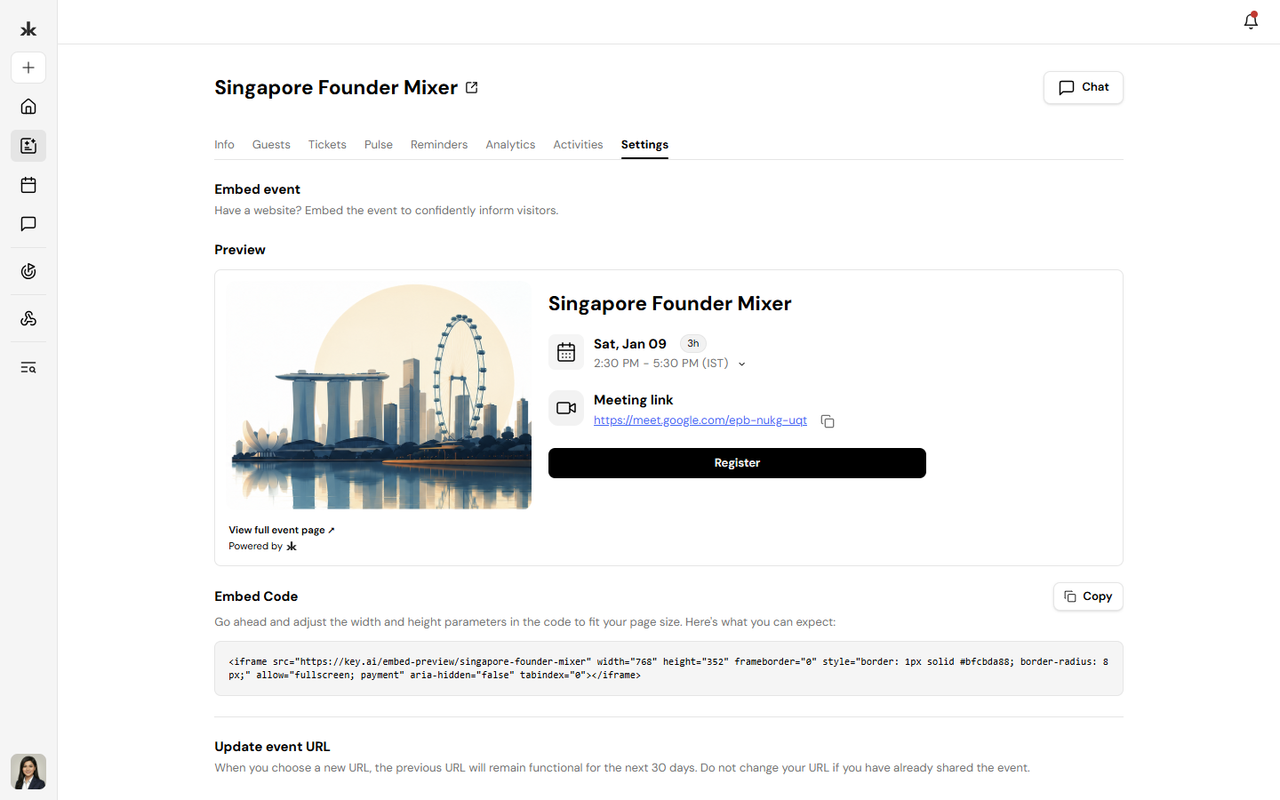
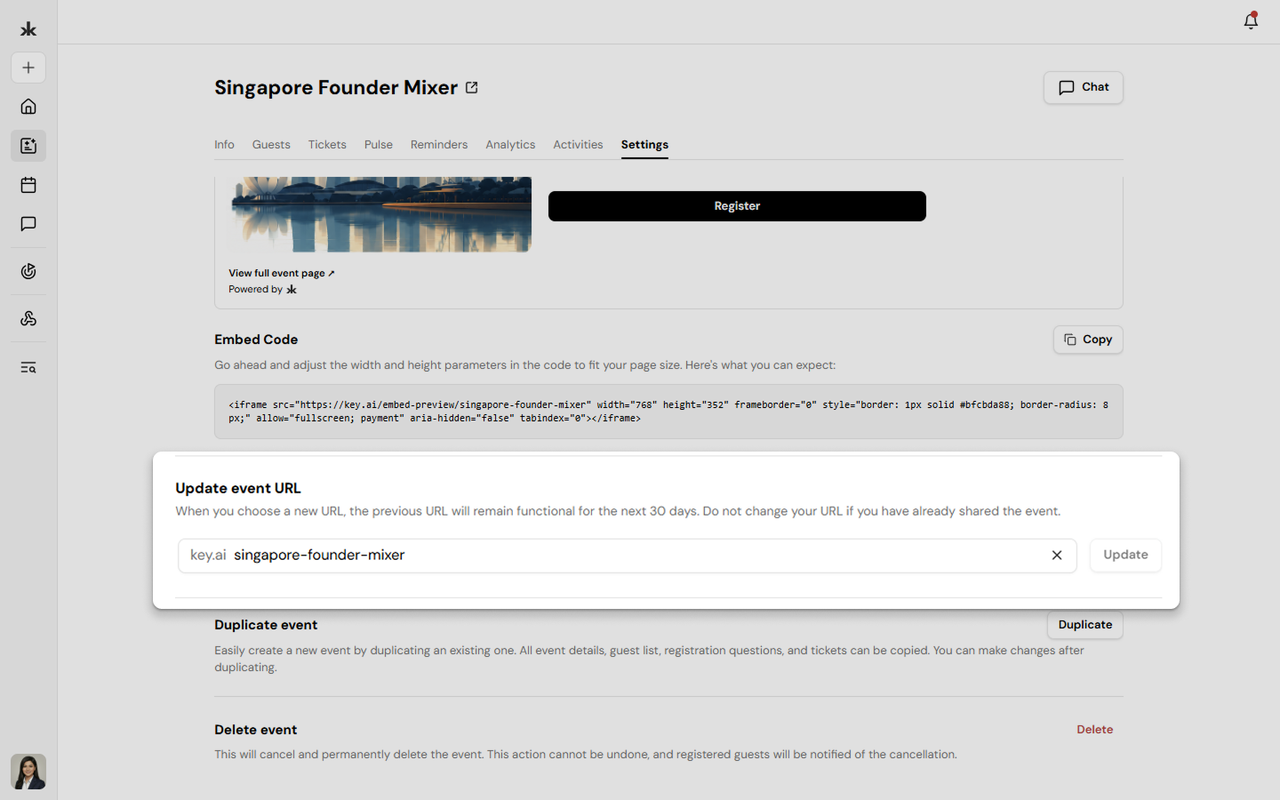
Update the Event URL
Each event has a unique URL that can be customized.
To update the event URL:
- Scroll to the Update Event URL section.
- Enter a new URL slug.
- Click Update.
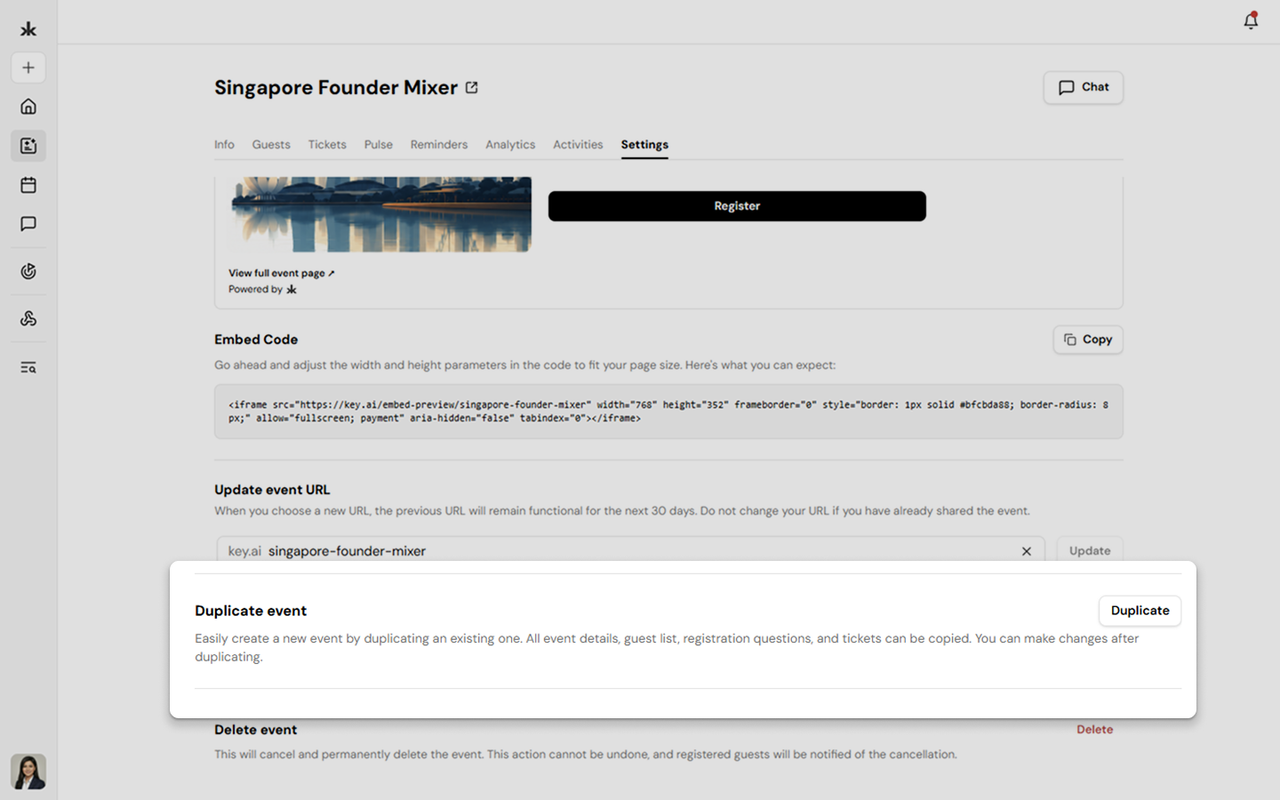
Duplicate an Event
The Duplicate Event option allows you to quickly create a new event using an existing one as a template. When duplicating an event, the following information is copied:
- Event details
- Registration questions
- Tickets
After the event is duplicated, you can modify any of the copied information.
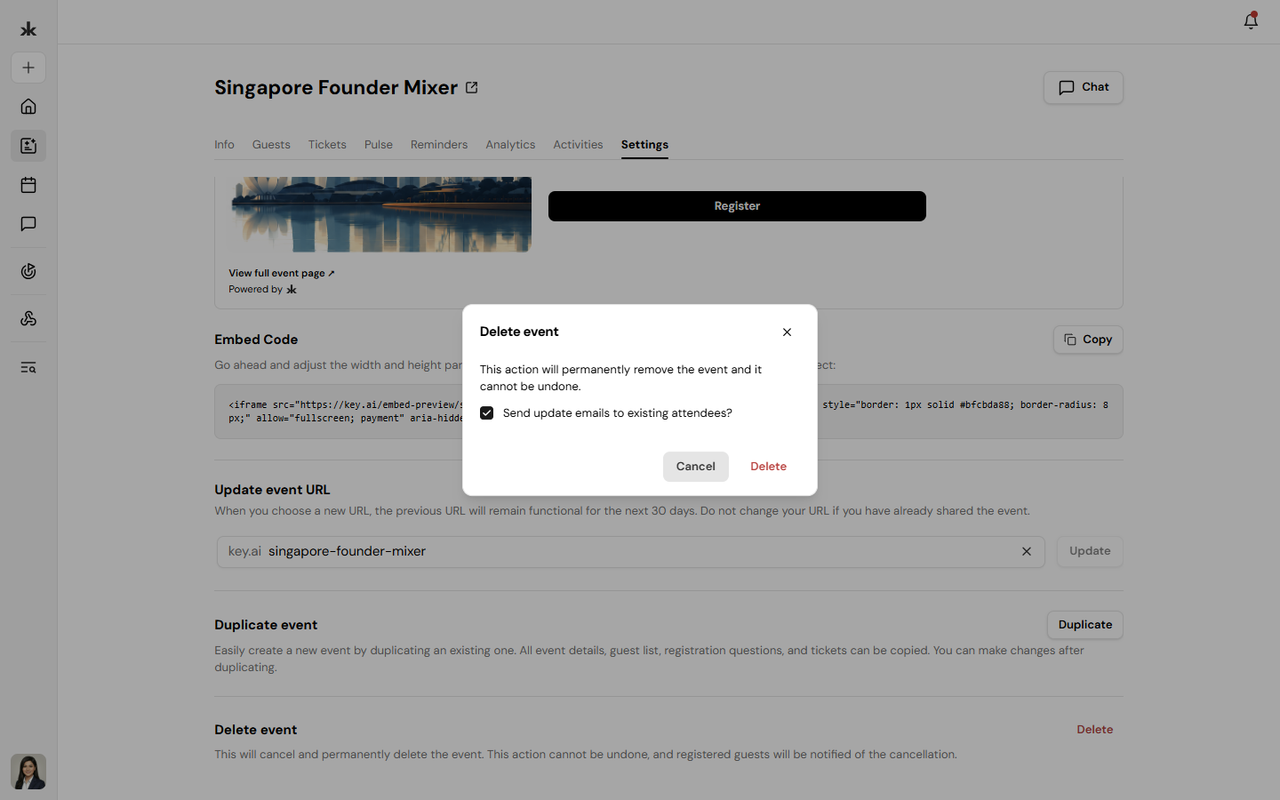
Delete an Event
Only the event creator can permanently delete an event.
To delete an event:
- Scroll to the Delete Event section.
- Click Delete.
- Confirm the action.
Event Reminders↗
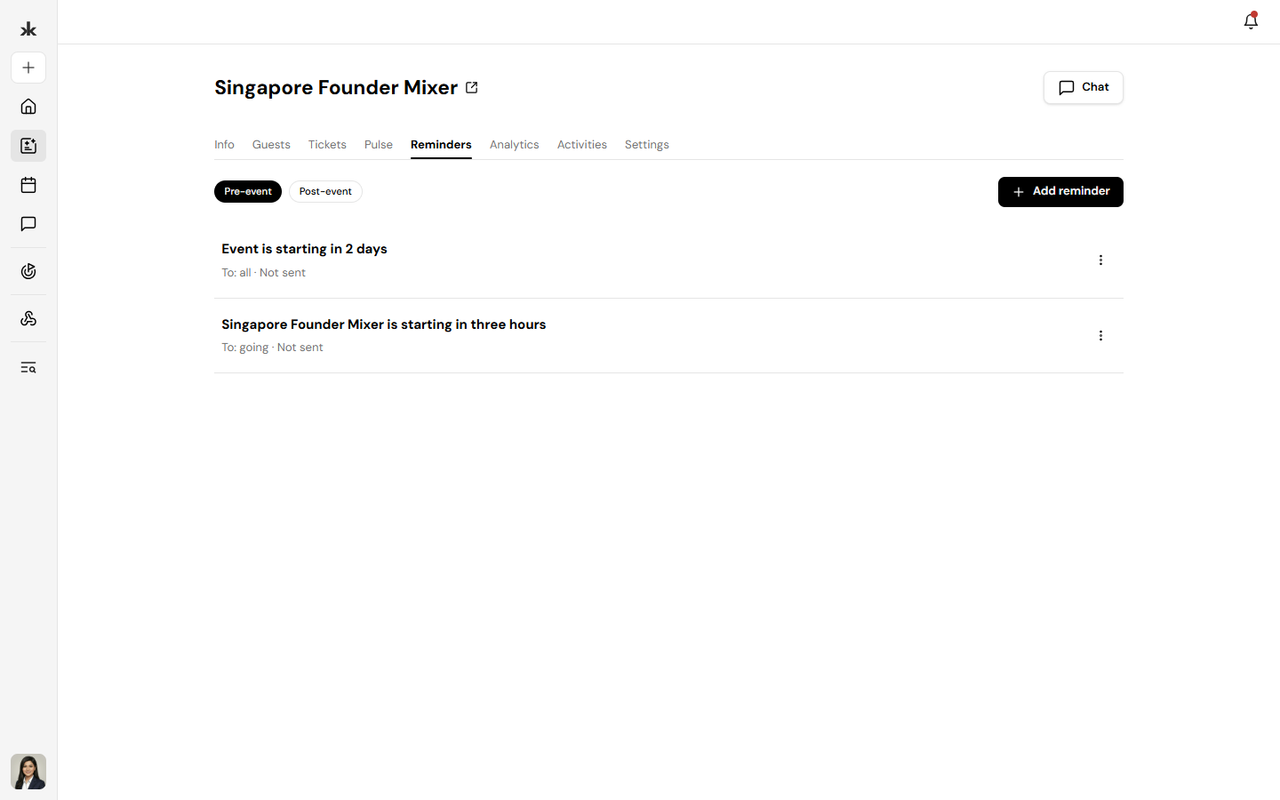
The Reminders tab allows event organizers to send scheduled messages to event participants before or after an event. Reminders can help keep attendees informed about upcoming events and provide follow-up communication after an event.
To access Reminders:
- Open the event.
- Select the Reminders tab.
Reminder Types
Reminders are organized into two categories:
- Pre-event - Send reminders before the event starts.
- Post-event - Send follow-up reminders after the event.
By default, two pre-event reminders are available:
- 1 day before the event - Sent one day before the event starts.
- 3 hours before the event - Sent three hours before the event starts.
You can also add additional reminders using Add reminder. The Reminders section includes separate tabs for Pre-event and Post-event reminders.
Create a Reminder
To create a reminder:
- Open the event.
- Select Reminders.
- Choose Pre-event or Post-event.
- Click Add reminder.
- Select when the reminder should be sent.
- Select the recipients.
- Add a subject.
- Write the reminder message.
- Save the reminder.
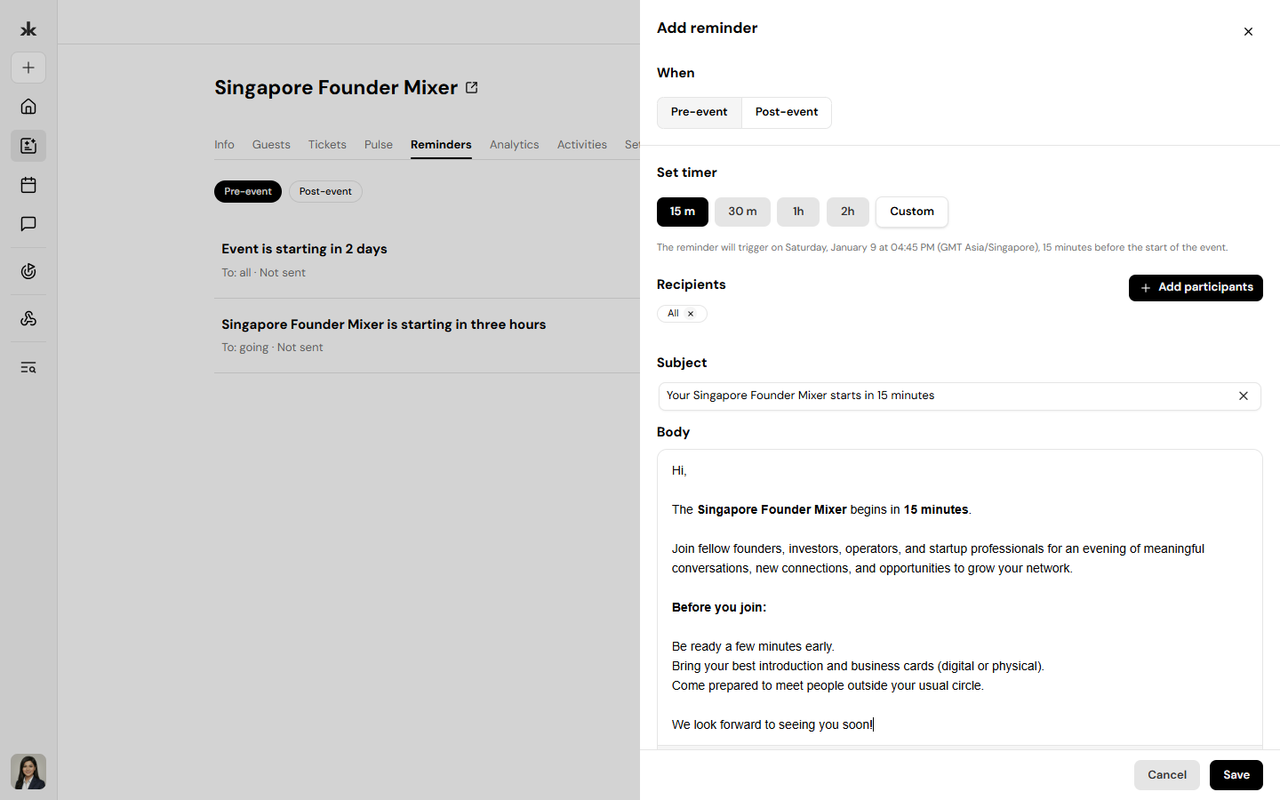
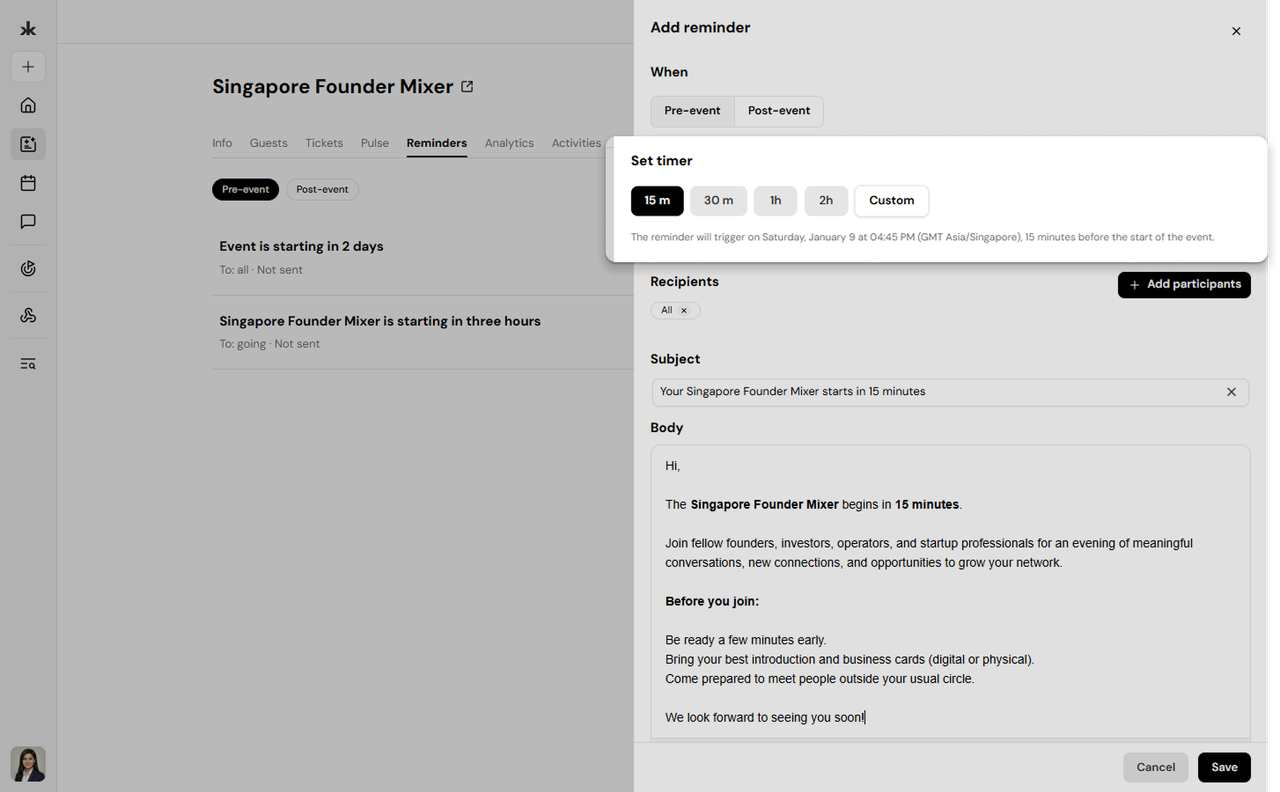
You can choose from preset time options for scheduling a reminder. For example, a pre-event reminder can be scheduled for:
- 15 minutes before the event
- 30 minutes before the event
- 1 hour before the event
- 2 hours before the event
You can also use a Custom timer to set a different time. For post-event reminders, select the appropriate time after the event based on the available options.
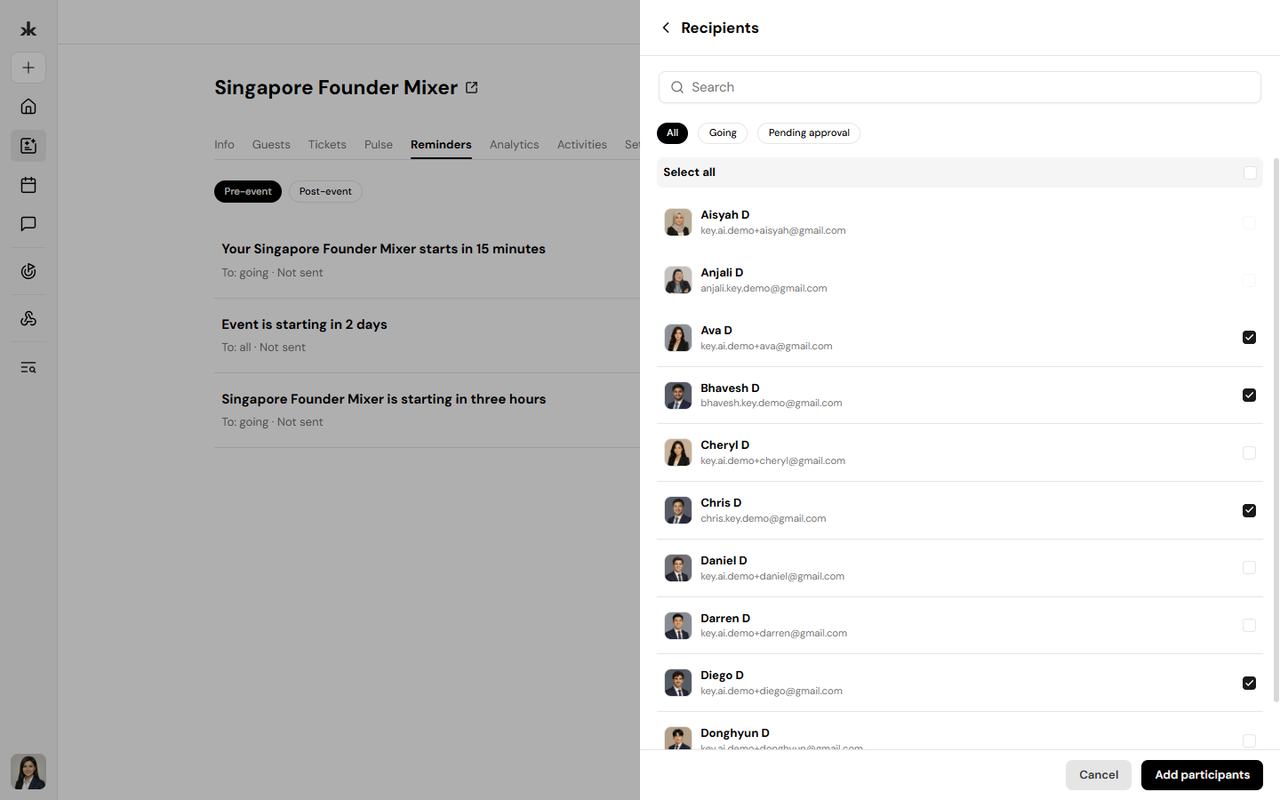
You can choose who should receive the reminder. Depending on the reminder, you can send it to:
- All participants
- Selected participants
Select the appropriate recipients when creating the reminder.
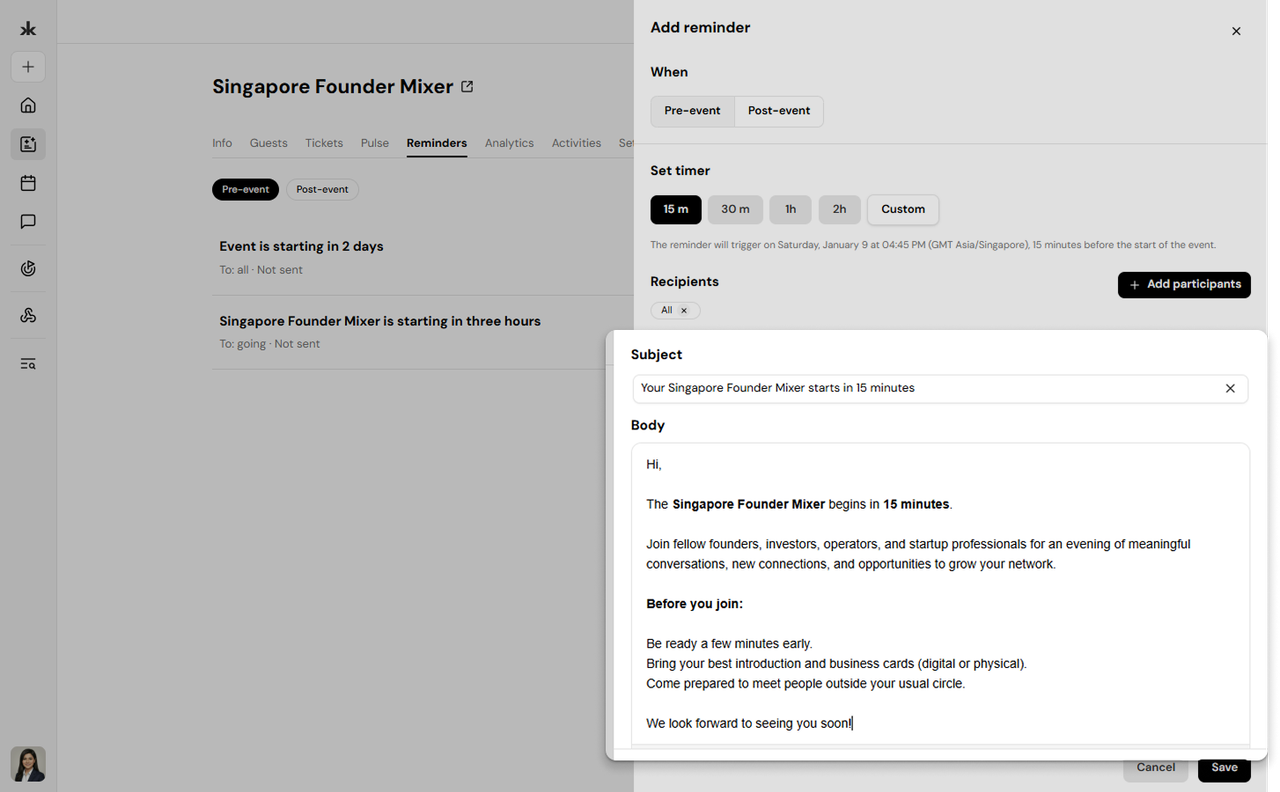
Customize the Reminder
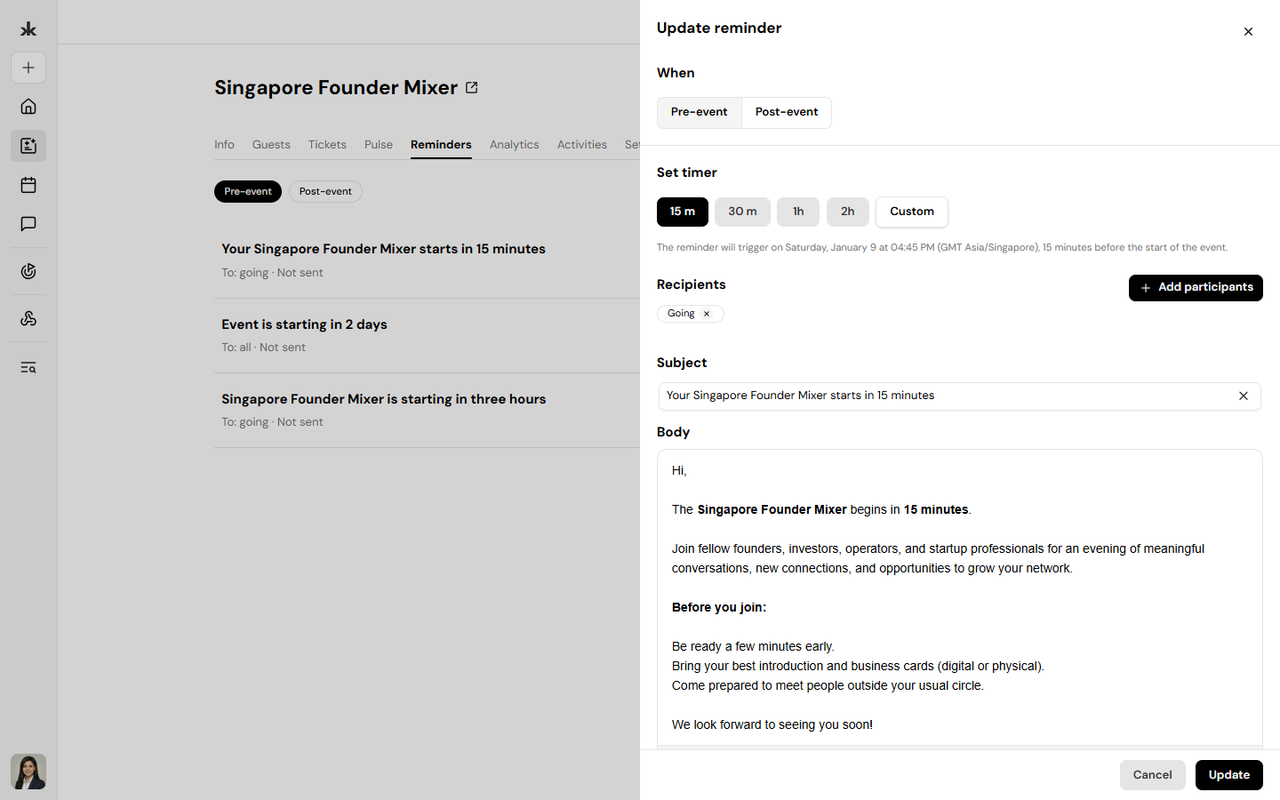
You can customize the content of your reminder by adding:
- Subject - The title of the reminder.
- Message body - The content you want to send to recipients.
Use the available formatting options to format the message as needed.
Manage Reminders
After creating a reminder, you can manage it from the Reminders tab.
Depending on the reminder's status, you can:
- View the reminder.
- Edit the reminder.
- Delete the reminder.
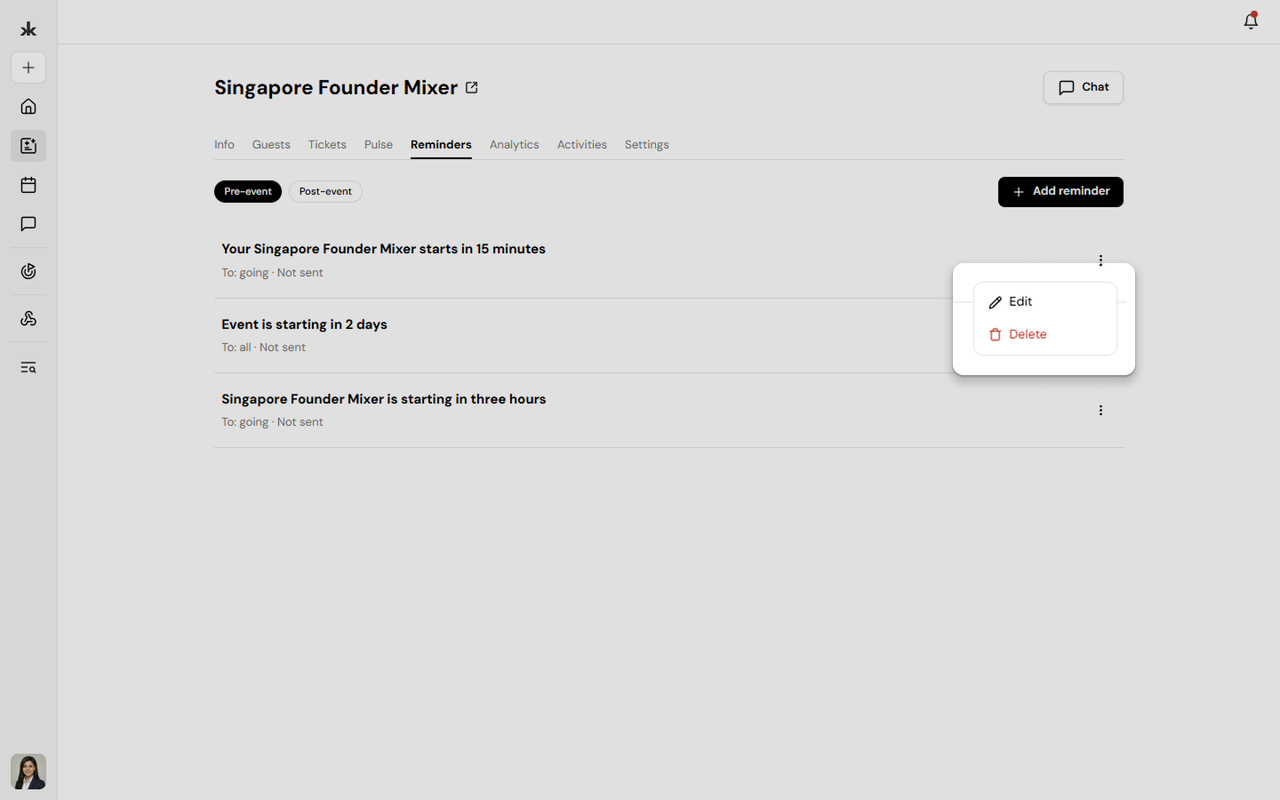
To access additional actions, open the three-dot menu associated with the reminder.
Edit a Reminder
To edit a reminder:
- Open the Reminders tab.
- Find the reminder you want to change.
- Open the three-dot menu.
- Select Edit.
- Update the reminder details.
- Save your changes.
Delete a Reminder
To delete a reminder:
- Open the Reminders tab.
- Find the reminder you want to remove.
- Open the three-dot menu.
- Select Delete.
- Confirm the deletion if prompted.
Reminder Status
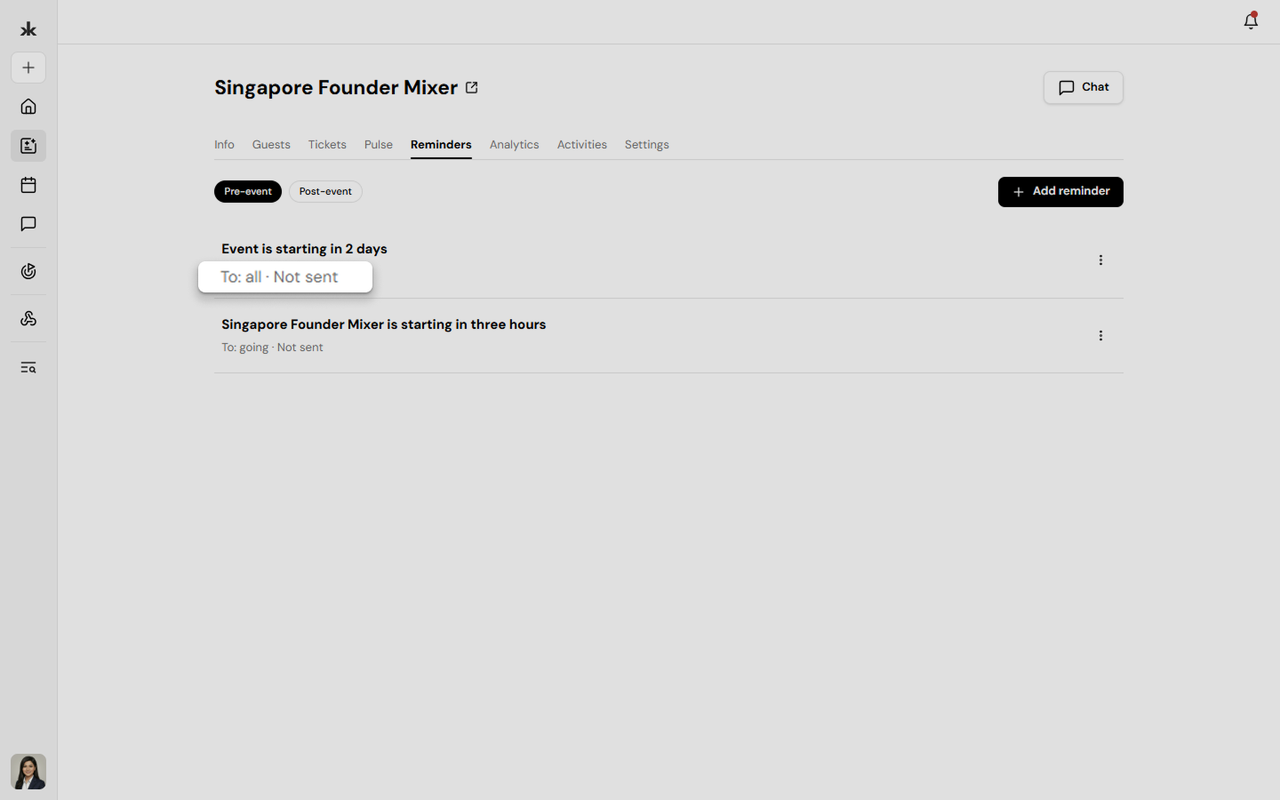
The Reminders tab shows the status of each reminder.
A reminder may show whether it has:
- Not been sent - The reminder is scheduled for a future time.
- Sent - The reminder has already been delivered according to its schedule.
Examples of Reminders
Common examples of pre-event reminders include:
- Event starts tomorrow.
- Event starts in three hours.
- Event starts in one hour.
- Event starts in 30 minutes.
You can also create custom reminders based on your communication needs.
Frequently Asked Questions
Can I send reminders before an event?
Yes. You can create pre-event reminders and schedule them to be sent before the event begins.
Can I send reminders after an event?
Yes. You can create post-event reminders for follow-up communication after the event.
Can I choose who receives a reminder?
Yes. You can send reminders to all participants or select specific participants, depending on the available recipient options.
Can I customize the reminder message?
Yes. You can customize the subject and message body.
Can I edit a reminder after creating it?
Yes. Existing reminders can be edited from the Reminders tab.
Can I delete a reminder?
Yes. You can delete a reminder from the three-dot menu.
Calendars Calendars
Calendars↗
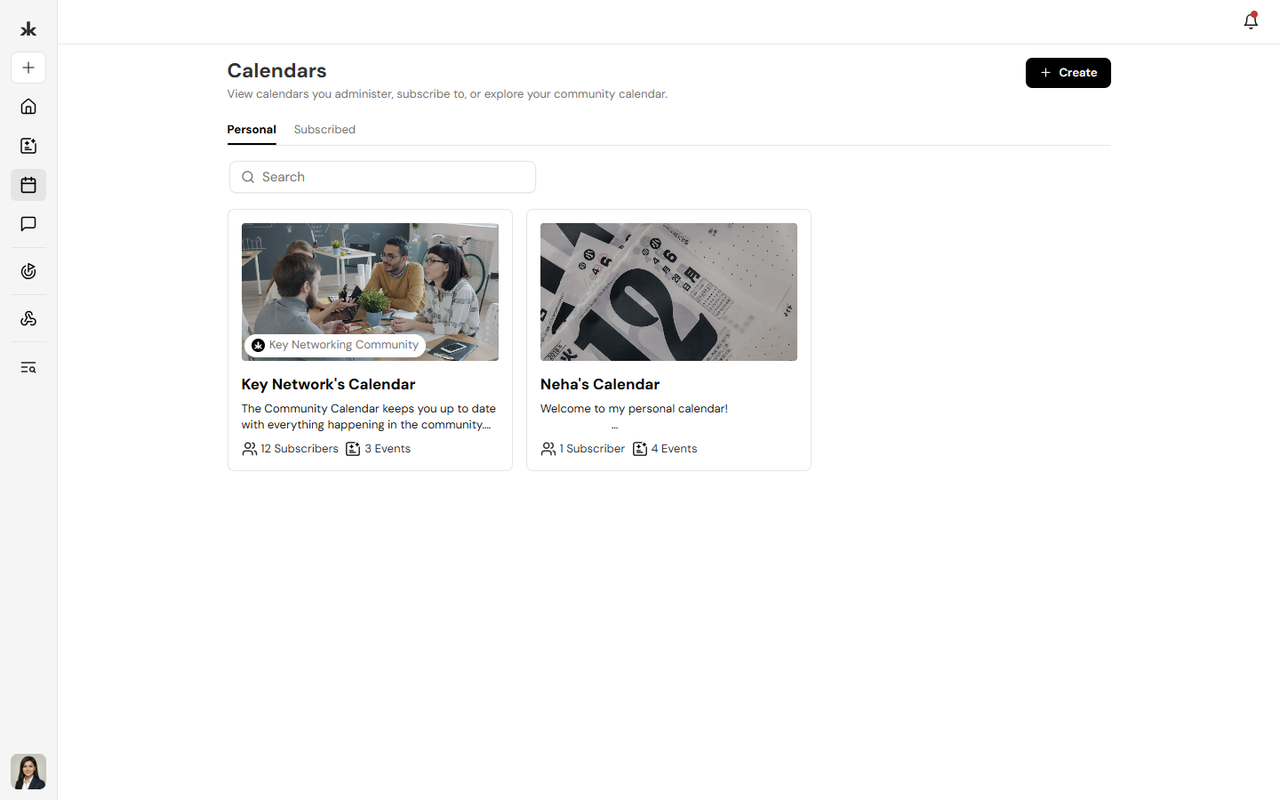
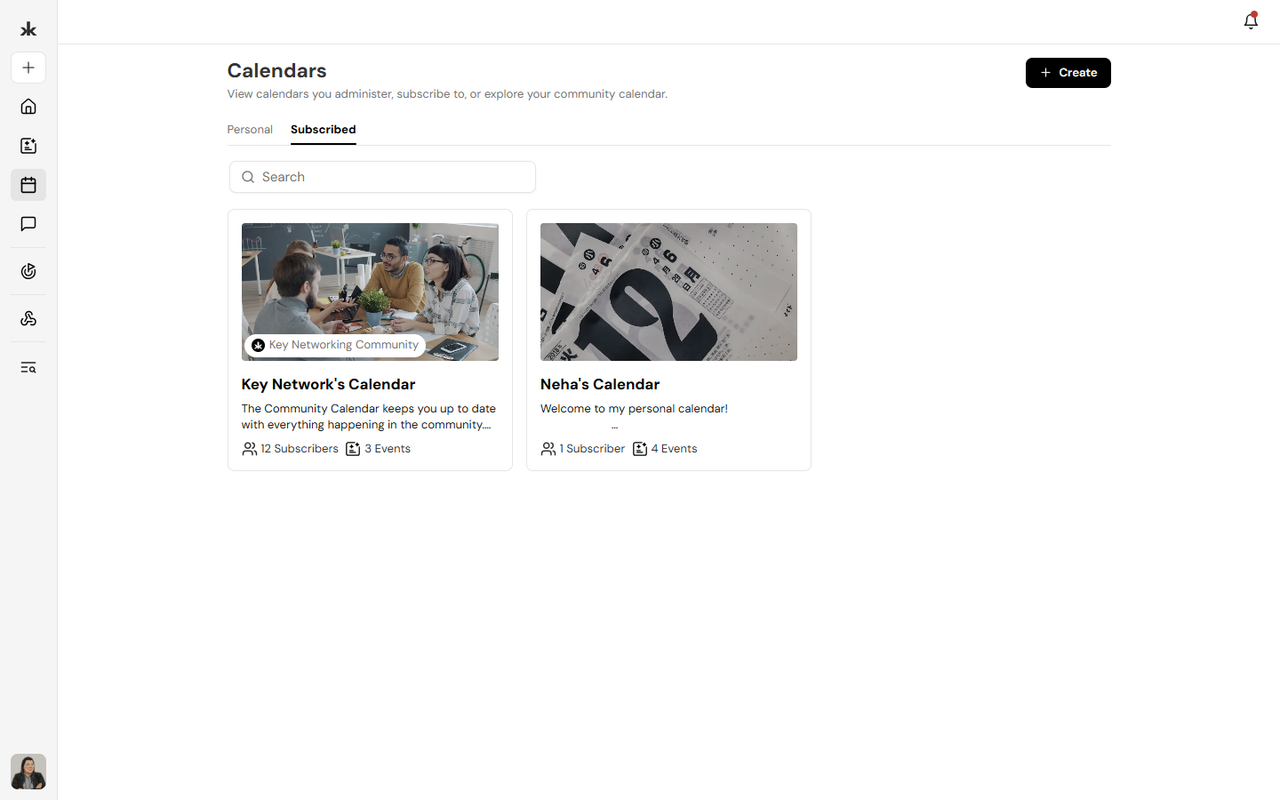
The Calendars section displays available calendars that you can explore.
You can:
- Browse available calendars.
- Search for a calendar.
- Open a calendar to view its events.
- Subscribe to a calendar, where available.
Each calendar may include its own name, description, cover image, and events.
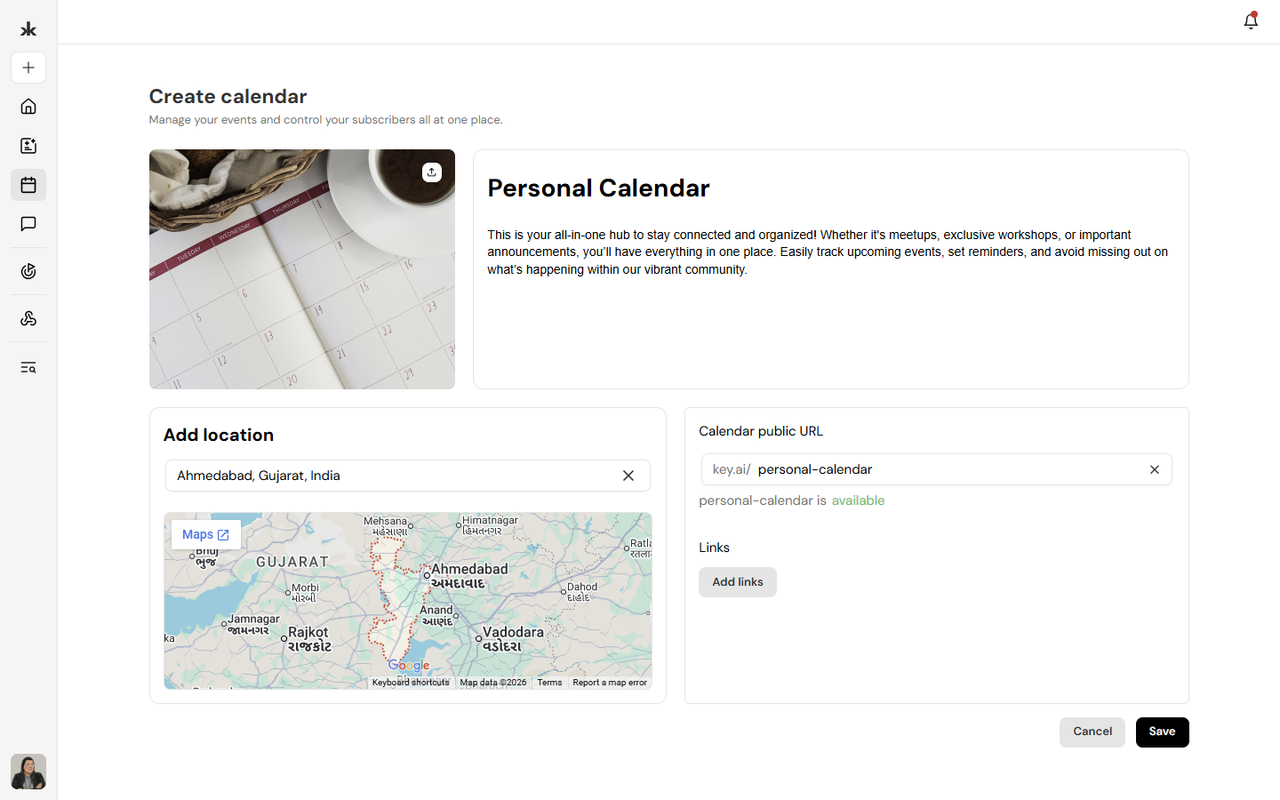
Create a Calendar
Anyone on Key AI can create a calendar. No special permissions are required.
To create a calendar:
- Open the Calendars section.
- Click Create.
- Add the calendar details.
- Add a cover image.
- Save the calendar.
After creating a calendar, you can manage its events and calendar settings.
View a Calendar
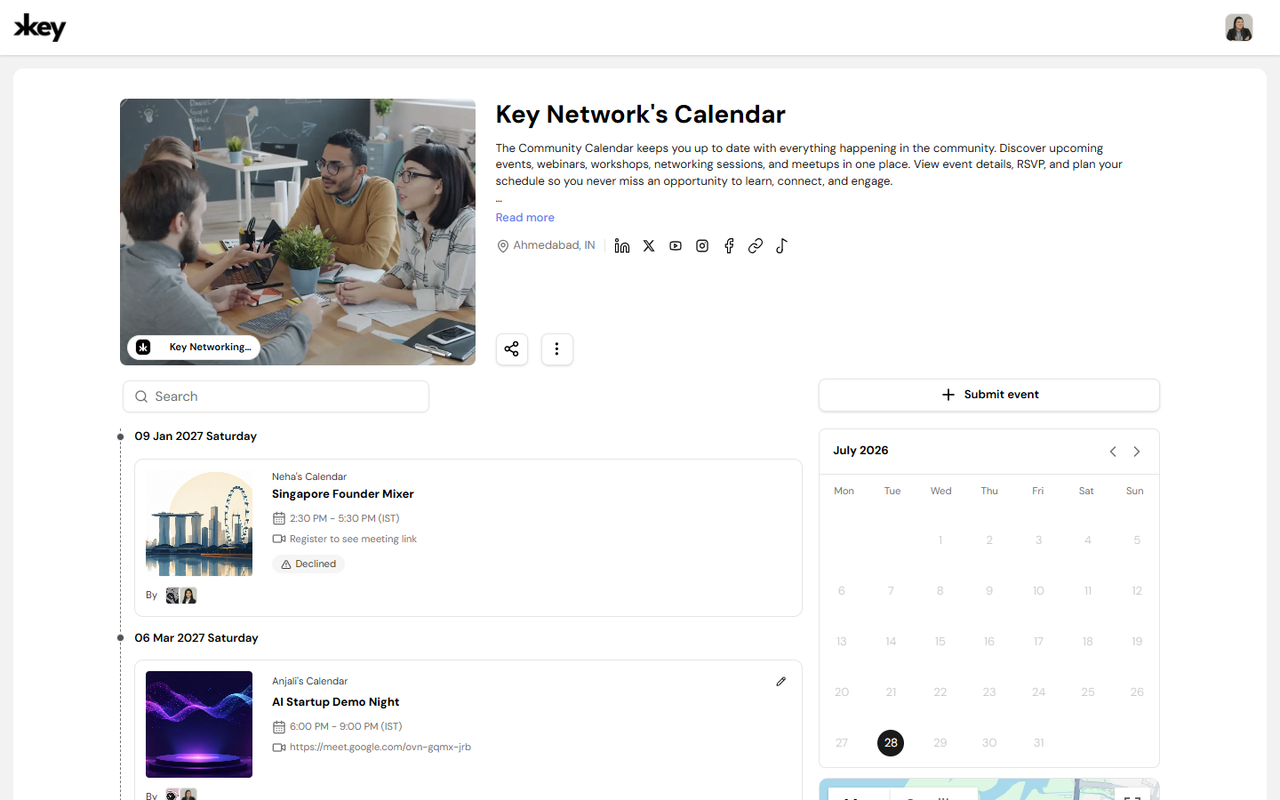
When you open a calendar, you can view the events associated with it.
The calendar provides:
- A list of upcoming events.
- A calendar view for browsing events by date.
- Event details.
- Event locations, where available.
- Options to navigate between dates.
You can select an event to open its event page and view additional information.
Submit an Event to a Calendar
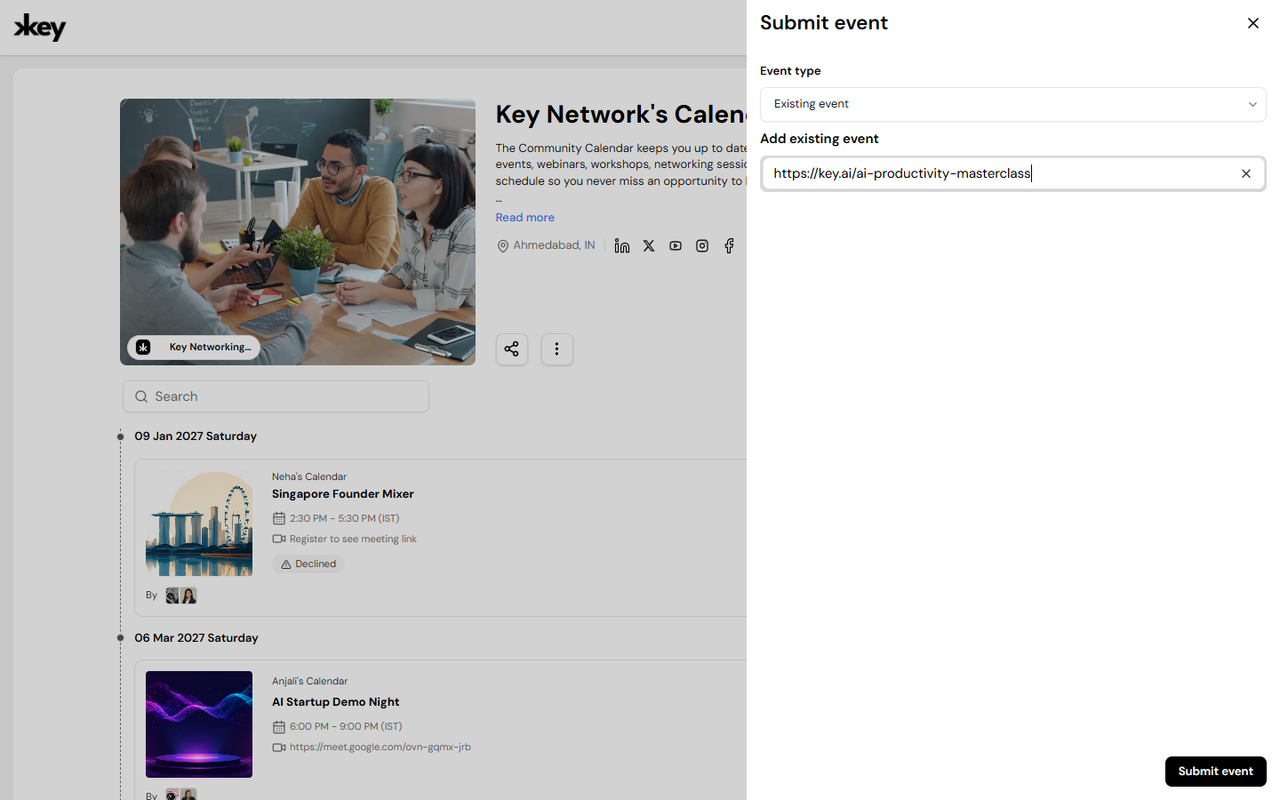
Depending on your access to the calendar, you may be able to submit an event.
To submit an event:
- Open the calendar.
- Click Submit Event.
- Select the type of event you want to submit.
- Enter the required event details.
- Submit the event for review.
Available submission options include:
- External Event - Submit an event hosted outside Key AI.
- Existing Event - Add an event that already exists on Key AI.
- New Event - Create a new event.
Event Approval
If an event is submitted by someone who is not a Calendar Admin, the event may require approval before it is added to the calendar. Calendar Admins can review submitted events and approve them for inclusion in the calendar.
Subscribe to a Calendar
You can subscribe to a calendar to follow the events associated with it. Subscribing to a calendar helps you keep track of events added to that calendar.
Calendar Admins
Calendar Admins help manage a calendar and its events.
Depending on their access, Calendar Admins can:
- Manage calendar settings.
- Review submitted events.
- Approve events.
- Add events to the calendar.
- Manage calendar administrators and subscribers.
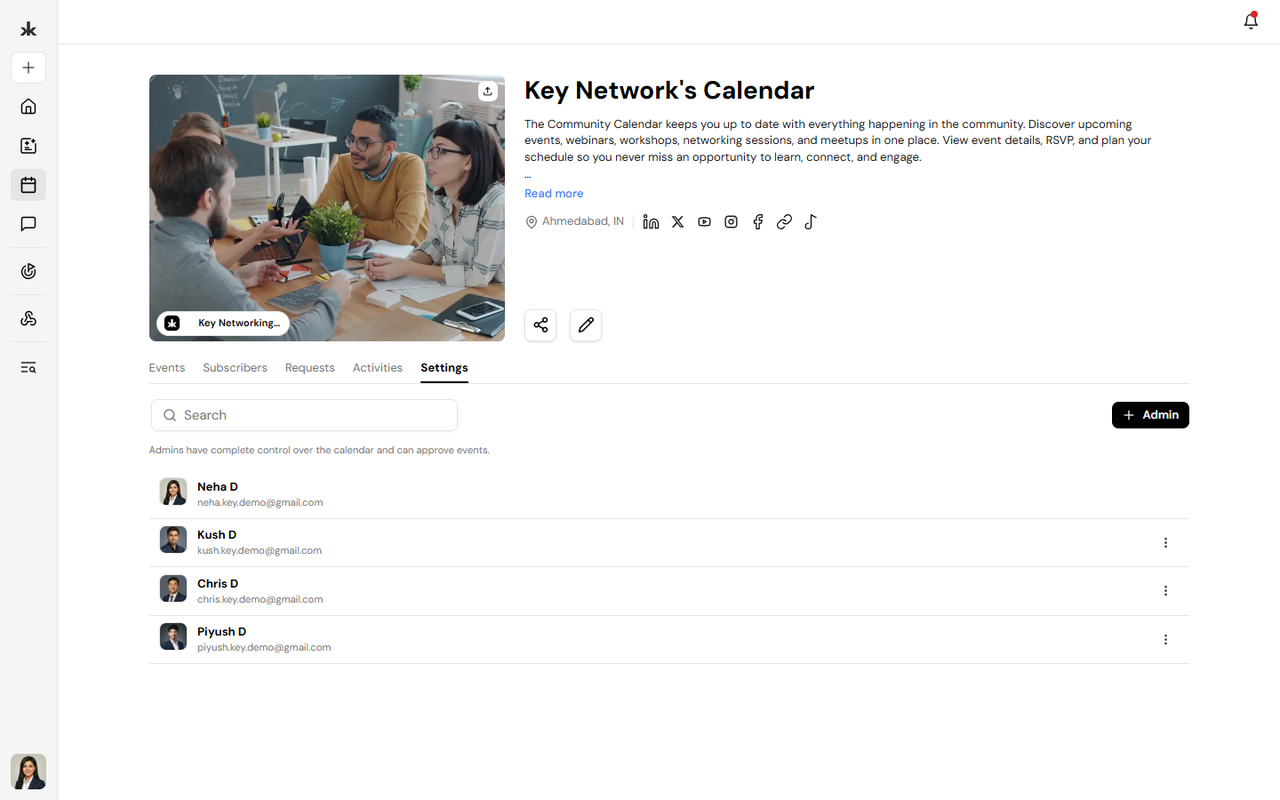
Community Admins and Calendar Admins
When a person is added as a Community Admin, they are automatically added as a Calendar Admin for the community's calendar. If they are later removed as a Community Admin:
- They are removed from their Calendar Admin role.
- They may continue to remain subscribed to the calendar.
Add a Calendar Admin
Calendar Admins can be added independently of community membership. This means that someone can be added as a Calendar Admin even if they are not a member of the community. This allows calendar management responsibilities to be assigned separately from community membership.
Manage Calendar Settings
Calendar Admins can manage the calendar from its settings.
Depending on their access, settings may include:
- Calendar information.
- Calendar branding or cover image.
- Calendar administrators.
- Calendar members or subscribers.
- Calendar event management.
Calendar Events
Events displayed in a calendar can be accessed from the calendar view or event list.
You can:
- Browse upcoming events.
- View events by date.
- Open an event to view its details.
- Register for events, where registration is available.
An event page may include information such as:
- Event date and time.
- Location.
- Event description.
- Registration information.
- Tickets.
- Pulse features.
- Q&A.
- Reminders.
Frequently Asked Questions
Can anyone create a calendar?
Yes. Anyone on Key AI can create a calendar. No special permissions are required.
Can anyone submit an event to a calendar?
Event submission and approval depend on the user's access to the calendar. Events submitted by users who are not Calendar Admins may require approval before being added to the calendar.
Can a Calendar Admin be someone who is not part of the community?
Yes. A person can be added as a Calendar Admin even if they are not a member of the community.
Are Community Admins automatically Calendar Admins?
Yes. When someone is added as a Community Admin, they are automatically added as a Calendar Admin for the community's calendar.
What happens if someone is removed as a Community Admin?
They lose their Calendar Admin permissions but may continue to remain subscribed to the calendar.
Can I subscribe to a calendar?
Yes, where subscription is available. Subscribing allows you to follow the events associated with the calendar.
Does subscribing to a calendar sync all Key AI events?
No. A calendar subscription is specific to the events associated with that calendar. It does not automatically sync every event or activity across Key AI.
What types of events can be submitted to a calendar?
Depending on the available options, you can submit:
- An external event.
- An existing Key AI event.
- A new event.
- Submit Event Options
- External Event Submission
- Existing Event Submission
- New Event Submission
- Calendar Admin Settings
- Event Approval
- Calendar Settings
Still need help?
Can't find what you're looking for? Our team is here.
Contact us